AUD/JPY Long Setup – Anticipating Continuation to Daily Resistan
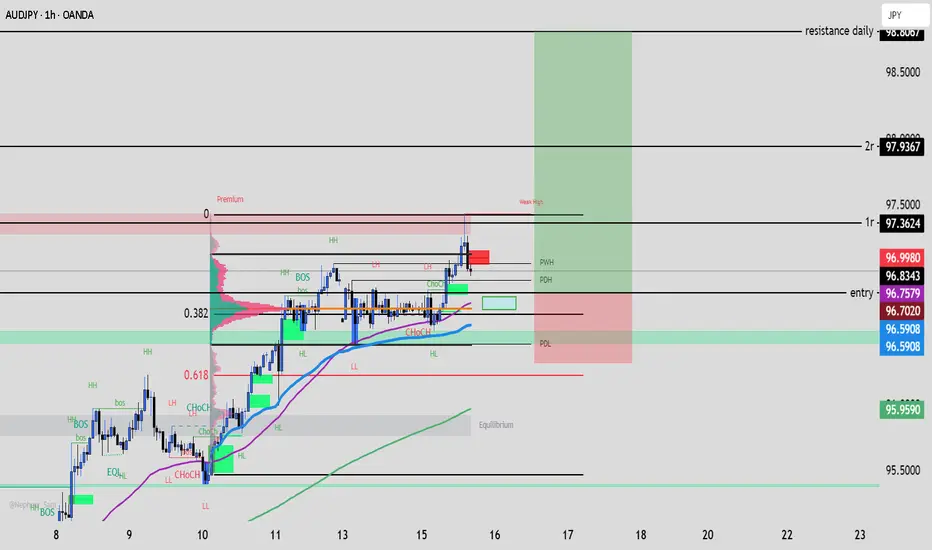
Timeframe: 1H
Bias: Bullish
Entry Zone: ~96.75
SL: Below PDH/POC region
TP1 (1R): 97.36
TP2 (2R): 97.93
Final Target: Daily resistance zone ~98.86
Idea Breakdown:
Price has been forming higher highs and higher lows, respecting both 50EMA and AVWAP on the hourly. After a solid breakout above recent structure and BOS confirmation, I’m looking to buy into a retracement toward the 0.382 fib level and low-volume node (96.70–96.75 region).
This zone also aligns with:
Previous breakout structure
PDH/PWH region
Value area low
EMA support
If price pulls back into this zone and holds, I expect bullish continuation targeting the next major resistance zones above.
Risk: Entry just above PDH with a stop below PDL and key structure
Reward: Clear path to 2R and higher with limited resistance overhead after breakout
Please note i am a amateur logging my own trades for reference and should not be copied
Disclaimer
The information and publications are not meant to be, and do not constitute, financial, investment, trading, or other types of advice or recommendations supplied or endorsed by TradingView. Read more in the Terms of Use.
Disclaimer
The information and publications are not meant to be, and do not constitute, financial, investment, trading, or other types of advice or recommendations supplied or endorsed by TradingView. Read more in the Terms of Use.