🔹 Market Structure 🔹
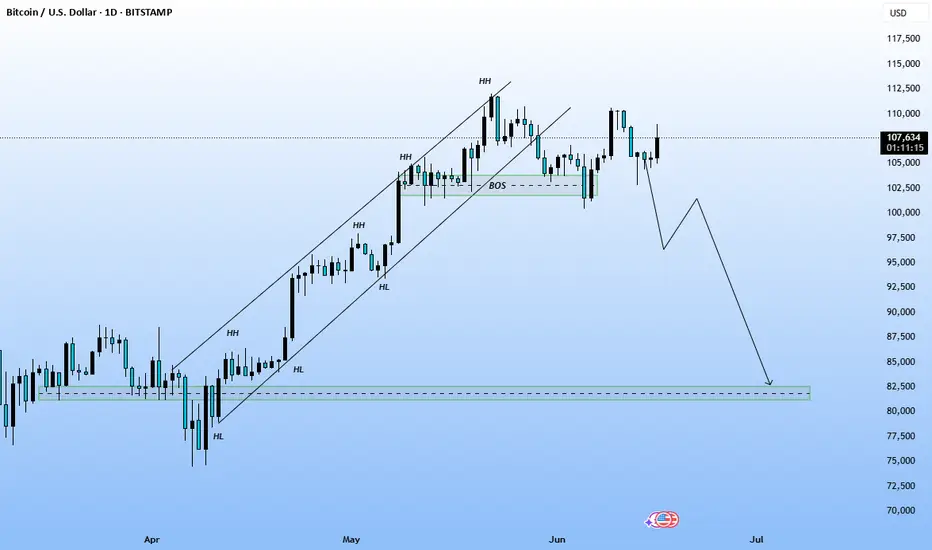
The price was in a clear uptrend (higher highs and higher lows).
We saw a Break of Structure (BOS) after the last higher low was broken.
This signals a potential reversal from up to down — a key structural shift.
🔹 Supply and Demand Zones 🔹
The green box near $112,500 is a strong supply zone (resistance) where sellers previously stepped in, turning price down.
Currently, we’re bouncing upward (forming a lower high), which might be a retest of this previously broken structure.
🔹 projected price action 🔹
The arrow signals a lower high following the break of structure.
From there, we’re expecting a further drop toward the demand zone (marked by the grey box) in the $82,500 range.
🔹 What to watch 🔹
✅ Confirmatory signals:
Look for weak upward momentum, candlestick rejection, or reversal patterns at the lower high before the drop.
✅ Target zone:
The $82,500 demand zone might provide strong buying pressure — it’s a key liquidity pool where many traders’ buy orders are resting.
✅ Risk management:
Always use a well-placed stop-loss above the lower high to protect your trades in case the market reverses upward instead of following this projected path.
Disclaimer
The information and publications are not meant to be, and do not constitute, financial, investment, trading, or other types of advice or recommendations supplied or endorsed by TradingView. Read more in the Terms of Use.
Disclaimer
The information and publications are not meant to be, and do not constitute, financial, investment, trading, or other types of advice or recommendations supplied or endorsed by TradingView. Read more in the Terms of Use.
