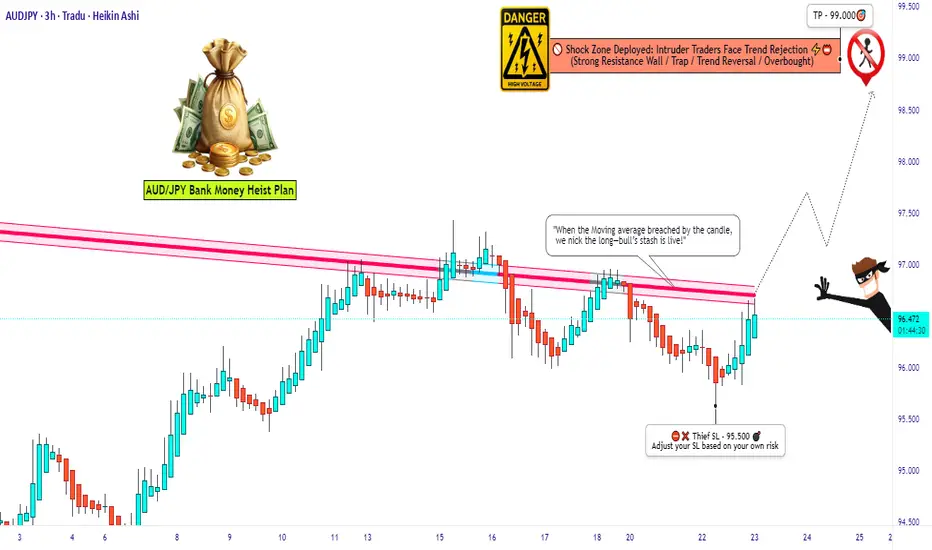
Aussie vs Yen: Setup for a Clean Long Robbery💣AUD/JPY Forex Heist: Aussie vs Yen 🔥Master Robbery Plan Unfolded!
🌟Hi! Hola! Ola! Bonjour! Hallo! Marhaba!🌟
Dear Money Makers, Bandits & Chart Pirates 🤑💰💸✈️
It's time to reload your gear and lock in the blueprint. Based on our 🔥Thief Trader Technical + Fundamental Intelligence🔥, we’re all set to ambush the AUD/JPY "Aussie vs Yen" battlefield. This ain’t no casual walk—it’s a full-scale market operation targeting the High Voltage Reversal Trap Zone⚡. The pressure is real: Overbought, Tricky Consolidation, and Bears camping at resistance. Your job? Steal profits before they smell the breakout! 🏆💪💵
🎯 Entry Point — "Let the Heist Begin"
🗝 Entry Level: Wait for the Breakout @ 94.500. When price shatters the Moving Average ceiling—that's your greenlight!
🚀 Execution Choices:
Place Buy Stop above the breakout point
Or, use Buy Limit Orders near recent swing highs/lows on the 15/30-min chart using Layering/DCA tactics (that’s how the real thieves sneak in 🕶️).
🔔 Set an alert to stay sharp—don’t miss the vault crackin’ open!
🛑 Stop Loss — “Cover Your Escape”
🎯 SL Level: Just under the recent swing low on the 3H timeframe (around 95.500)
🚫 Never place the SL before the breakout confirms! Let the move prove itself first.
🧠 SL sizing depends on your capital, lot size, and number of entries stacked. You control the risk, not the other way around!
🎯 Target — "Cash Out or Vanish"
💎 First Take-Profit: 99.000
🚪Optional Escape: Secure the bag early if momentum fades. Better leave rich than be late!
👀 For Scalpers & Swing Robbers Alike
🔍 Scalpers: Only ride the Long wave.
💼 Big pockets? Hit straight entry.
👟 Small capital? Tag in with swing trades and trail that SL like a pro.
🎣 Use a Trailing SL to lock profits as price sprints toward resistance.
📰 The Bigger Picture: Why AUD/JPY?
The pair is pumped by:
📈 Macro Economics
📊 Quant Analysis
📰 COT Reports
📉 Intermarket Correlations
🧠 Sentiment Heatmaps
🔥 Future Price Dynamics
Don’t pull the trigger blind. Read the battlefield before charging in.
⚠️ Thief’s Caution Zone: News Traps Ahead
🛎 News = chaos.
📌 Avoid entering fresh trades during major data drops.
🔐 Use Trailing SLs to protect ongoing plays.
📉 Let the market dance, but you control the music.
💥Hit the Boost Button!💥
If this heist plan pumps your portfolio, smash that boost. That’s how we fund more blueprints, fuel the Thief Gang’s vault, and keep the robbery cycle alive.
🤑💵 Together, let’s rob this market clean—Thief Style.
New plan drops soon. Stay locked. Stay sharp. Stay profitable.
🧠💰🏴☠️
— Thief Trader Out 🐱👤🔓🚀
Audjpyidea
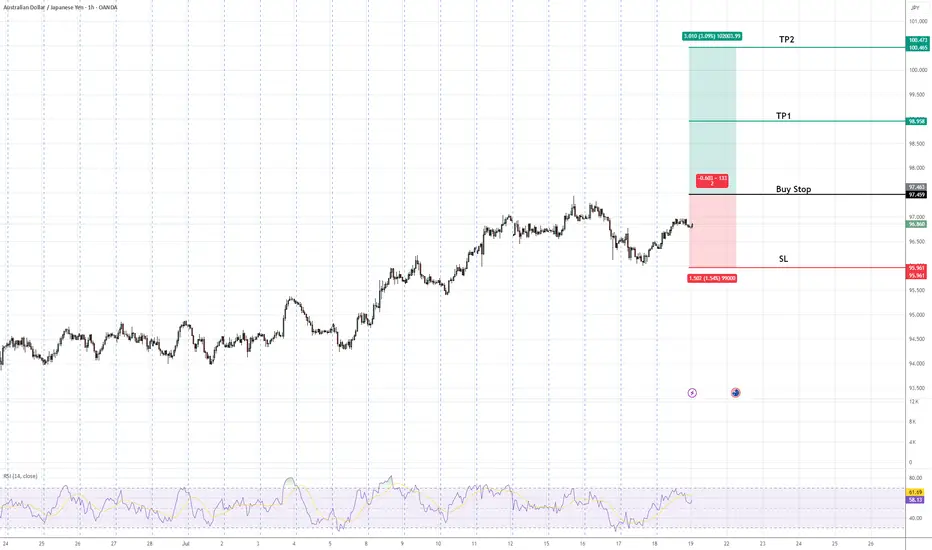
AUDJPY Buy Stop Setup | Trend Continuation in FocusAUDJPY is in an established uptrend, forming higher highs and higher lows. A buy stop is positioned above the recent swing high to confirm bullish continuation. The setup includes a defined stop-loss below the previous higher low to manage risk and two target profit levels (TP1 & TP2) aligned with key resistance zones. This approach favors trend-following traders seeking confirmation of upward momentum before entry.
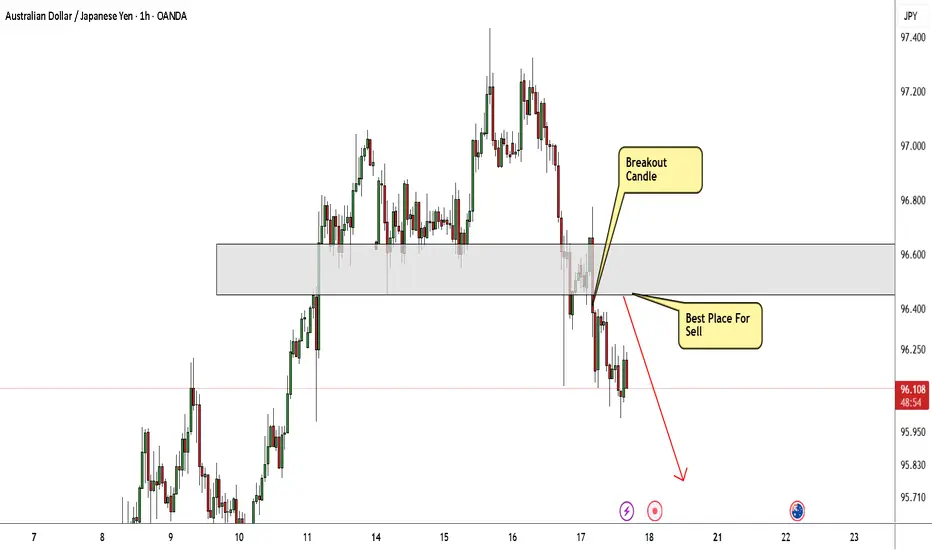
AUD/JPY Finally Decided To Go Down , Don`t Miss This 150 Pips !Here is my 1H Chart on AUD/JPY , And my opinion is we have a very clear breakout and the price will go down a little to make a retracement after this huge movement to upside without any correction , so i`, waiting the price to retest my broken supp and new Res and then we can enter a sell trade and targeting 100 : 150 pips . if the price go up again and closed above my res area with daily candle then this idea will not be valid anymore.
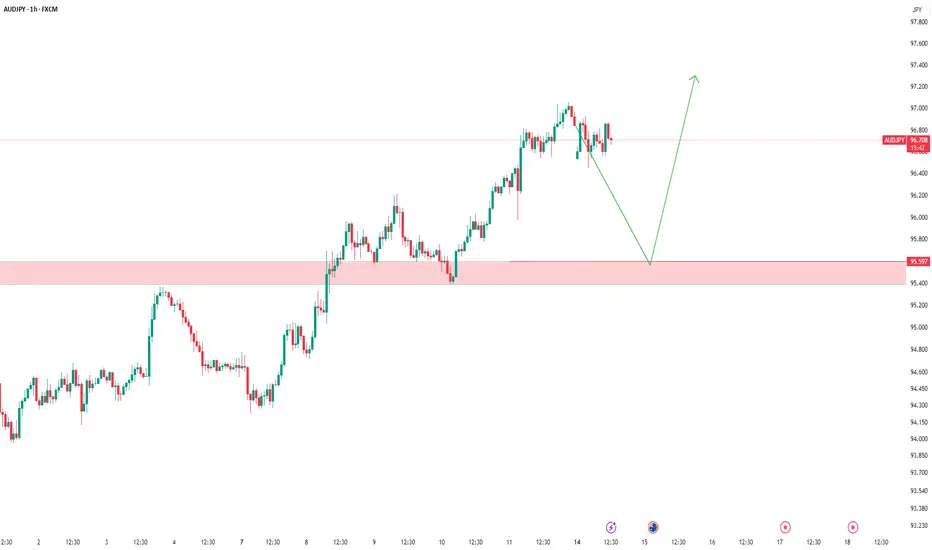
AUDJPY – Waiting for the Long SetupThe price is currently in a corrective move,
and as always, we’ve already marked our key level.
📍 We’re patiently waiting for price to reach our support zone.
If a valid buy signal appears, we’ll take the long position
according to our trading plan.
❌ What if the level breaks?
No worries.
We don’t predict — we follow the market.
We’ll wait for a clean pullback and enter short if confirmed.
🎯 Our job isn’t to predict where price will go,
our job is to manage risk and stay aligned with the market.
Price can do anything —
we’re ready for every scenario.
"AUD/JPY: Bulls About to Raid Tokyo? (Long Plan)"🎯 AUD/JPY BULLISH BANK HEIST! (Long Setup Inside) - Thief Trading Strategy
🚨 Yen Carry Trade Alert: Aussie Loot Up For Grabs! 💰
🦹♂️ ATTENTION ALL MARKET PIRATES!
To the Profit Raiders & Risk-Takers! 🌏💣
Using our 🔥Thief Trading Tactics🔥 (a deadly combo of carry trade flows + risk sentiment + institutional traps), we're executing a bullish raid on AUD/JPY—this is not advice, just a strategic heist plan for traders who play by their own rules.
📈 THE LOOTING BLUEPRINT (LONG ENTRY PLAN)
🎯 Treasure Zone: 92.700 (or escape earlier if bears attack)
💎 High-Reward Play: Neutral turning bullish - trap for yen bulls
👮♂️ Cop Trap: Where bears get squeezed at support
🔑 ENTRY RULES:
"Vault Unlocked!" – Grab bullish loot on pullbacks (15-30min TF)
Buy Limit Orders near swing lows OR Market Orders with tight stops
Aggressive? Enter at market but watch JPY news
🚨 STOP LOSS (Escape Plan):
Thief SL at nearest swing low (4H chart)
⚠️ Warning: "Skip this SL? Enjoy donating to yen bulls."
🎯 TARGETS:
Main Take-Profit: 92.700
Scalpers: Ride the Asian session momentum
🔍 FUNDAMENTAL BACKUP (Why This Heist Works)
Before raiding, check:
✅ BOJ Policy (Yen weakness continuing?)
✅ Commodity Prices (Iron ore/coal supporting AUD?)
✅ Risk Sentiment (Stocks rally = carry trade fuel)
✅ Interest Spreads (AUD-JPY yield advantage)
🚨 RISK WARNING
Avoid BOJ/RBA speeches (unless you like volatility torture)
Trailing stops = your golden parachute
💎 BOOST THIS HEIST!
👍 Smash Like to fund our next raid!
🔁 Share to recruit more trading pirates!
🤑 See you at the target, rebels!
⚖️ DISCLAIMER: Hypothetical scenario. Trade at your own risk.
#AUDJPY #CarryTrade #TradingView #RiskOn #ThiefTrading
💬 COMMENT: "Long already—or waiting for better entry?" 👇🔥
P.S. Next heist target already being scouted... stay tuned! 🏴☠️

AUDJPY SELLBy utilizing levels, historical patterns, , we can formulate a hypothesis that the market might follow a similar trajectory if bearish sentiment prevails.

AUDJPY BUY SETUPWe have transitioned from a downtrend to and up trend as shown by the transition for lower low and lower high to a higher high and potential higher low. we have pulled back to a key level for an entry.

AUDJPY SHORT FORECAST Q2 W24 D12 Y25AUDJPY SHORT FORECAST Q2 W24 D12 Y25
Professional Risk Managers👋
Welcome back to another FRGNT chart update📈
Diving into some Forex setups using predominantly higher time frame order blocks alongside confirmation breaks of structure.
Let’s see what price action is telling us today! 👀
💡Here are some trade confluences📝
✅Weekly Order block rejection
✅15' Order block
✅1H 50EMA
✅Daily 50 EMA
🔑 Remember, to participate in trading comes always with a degree of risk, therefore as professional risk managers it remains vital that we stick to our risk management plan as well as our trading strategies.
📈The rest, we leave to the balance of probabilities.
💡Fail to plan. Plan to fail.
🏆It has always been that simple.
❤️Good luck with your trading journey, I shall see you at the very top.
🎯Trade consistent, FRGNT X

AUDJPY SHORT FORECAST Q2 W23 D2 Y25AUDJPY SHORT FORECAST Q2 W23 D2 Y25
Professional Risk Managers👋
Welcome back to another FRGNT chart update📈
Diving into some Forex setups using predominantly higher time frame order blocks alongside confirmation breaks of structure.
Let’s see what price action is telling us today! 👀
💡Here are some trade confluences📝
✅Weekly Order block rejection
✅15' Order block identification
✅4H 50EMA
✅Daily 50 EMA
🔑 Remember, to participate in trading comes always with a degree of risk, therefore as professional risk managers it remains vital that we stick to our risk management plan as well as our trading strategies.
📈The rest, we leave to the balance of probabilities.
💡Fail to plan. Plan to fail.
🏆It has always been that simple.
❤️Good luck with your trading journey, I shall see you at the very top.
🎯Trade consistent, FRGNT X

AUDJPY SHORT FORECAST Q2 W22 D29 Y25AUDJPY SHORT FORECAST Q2 W22 D29 Y25
😎CONFLUENCE IS KEY HERE!
Professional Risk Managers👋
Welcome back to another FRGNT chart update📈
Diving into some Forex setups using predominantly higher time frame order blocks alongside confirmation breaks of structure.
Let’s see what price action is telling us today! 👀
💡Here are some trade confluences📝
✅Weekly Order block rejection
✅15' Order block identification
✅4H 50EMA
✅Daily 50 EMA
🔑 Remember, to participate in trading comes always with a degree of risk, therefore as professional risk managers it remains vital that we stick to our risk management plan as well as our trading strategies.
📈The rest, we leave to the balance of probabilities.
💡Fail to plan. Plan to fail.
🏆It has always been that simple.
❤️Good luck with your trading journey, I shall see you at the very top.
🎯Trade consistent, FRGNT X

From Breakdown to Breakout: AUD/JPY Flips Structure Above 92🟡 What happened recently?
At the beginning of April, AUD/JPY dropped to a low of 86, but by early May, the pair had surged over 600 pips, reclaiming the key 92 support level.
Most importantly, price reached a high of 95.50 — breaking well above the descending trendline that started back in July 2024.
📉 The recent pullback confirms the breakout
The drop from 95.50 wasn’t bearish — it was confirmation:
✅ Clear rejection from the 92 zone
✅ Former resistance now acting as strong support
✅ Market structure has shifted to bullish
📈 What’s next?
At the time of writing, AUD/JPY is trading around 92.76, and the structure suggests more upside ahead.
🧭 My strategy:
➡️ Buy dips toward 92.00
➡️ Target: 95.50 — the recent high
🚀 The breakout is confirmed, the trend has shifted, and the opportunity is clear.
Let the market do the work — we just need to stay aligned.
Disclosure: I am part of Trade Nation's Influencer program and receive a monthly fee for using their TradingView charts in my analyses and educational articles.

Bearish Outlook on AUD/JPY – Watching for Entry After Retrace!I'm currently focused on the AUD/JPY currency pair 📉.
We’re seeing a clear, sustained downtrend on the daily timeframe, marked by a recent break of market structure — a key sign that sellers are firmly in control 🐻.
At the moment, price appears overextended and is trading directly into a major liquidity pool — specifically, a cluster of sell-side liquidity sitting below previous lows 🧲.
I’m watching for a retracement or pullback into a zone of interest. If that happens, I’ll be on the lookout for a bearish break of structure on the lower timeframes to confirm a high-probability short setup 🎯.
As always, this is not financial advice, just a look at how I’m approaching the current price action ⚠️.

AUDJPY SHORT FORECAST Q2 W22 D26 Y25AUDJPY SHORT FORECAST Q2 W22 D26 Y25
Professional Risk Managers👋
Welcome back to another FRGNT chart update📈
Diving into some Forex setups using predominantly higher time frame order blocks alongside confirmation breaks of structure.
Let’s see what price action is telling us today! 👀
💡Here are some trade confluences📝
✅Weekly Order block rejection
✅4H Order block identification
✅15' Order block identification
✅4H 50EMA target
✅Daily 50 EMA target
🔑 Remember, to participate in trading comes always with a degree of risk, therefore as professional risk managers it remains vital that we stick to our risk management plan as well as our trading strategies.
📈The rest, we leave to the balance of probabilities.
💡Fail to plan. Plan to fail.
🏆It has always been that simple.
❤️Good luck with your trading journey, I shall see you at the very top.
🎯Trade consistent, FRGNT X

AUD/JPY “Aussie vs. Yen” Skyrocketing Safari!🌈 G’day, Forex Adventurers & PIP Hunters! 🌏✨
Join our epic AUD/JPY Forex expedition! 🦘🚀 Our Stellar Navigator Strategy fuses pinpoint technicals with powerful fundamentals to chase profits in the Aussie-Yen jungle. Ready to soar to new heights and grab those pips? Let’s embark on this bullish quest! 🌍💰
🌟 The Stellar Navigator Plan
Entry Points 🛫:
🦅 Bullish Launch: Jump in after a breakout above the Sky High at 94.800—your cue for bullish gains!
🐾 Pullback Path: Place buy limit orders near the 15M/30M support (94.200) for a savvy entry.
Pro Tip: Set alerts to spot the breakout spark! 🔔
Stop Loss (SL) 🛡️:
Bullish Trade: Secure SL at the 2H support (93.600) for day trades.
Tailor SL to your risk, lot size, and order count. This is your safety net—keep it snug! ⚠️
Take Profit (TP) 🎯:
Bullish Explorers: Aim for the Star Peak at 96.500 or exit if the momentum dips.
Scalpers: Grab quick pips on the long side, but lock in gains with trailing stops! 🚨
🌏 Why AUD/JPY?
The Aussie’s soaring 📈 as of May 12, 2025, powered by:
Fundamentals: RBA’s 4.35% rate dwarfs BoJ’s 0.1%, boosting AUD.
Macroeconomics: Australia’s commodity boom (gold, iron ore) outpaces Japan’s slow recovery.
COT Data (May 9, 2025): Rising AUD net longs signal bullish sentiment (source: CFTC).
Intermarket: AUD/JPY tracks Nikkei 225’s risk-on rally.
Quantitative: RSI (14) at 59 and a break above the 50-day SMA (93.57) confirm upward momentum.
📊 Sentiment Snapshot (May 12, 2025, UTC+1)
Retail Traders:
🟢 Bullish: 53% 😊 (RBA strength, China trade optimism)
🔴 Bearish: 37% 😣 (Yen safe-haven demand on tariff risks)
⚪ Neutral: 10% 🤔
Institutional Traders:
🟢 Bullish: 46% 💼 (Commodity demand, risk-on flows)
🔴 Bearish: 39% ⚠️ (BoJ intervention fears, US yields)
⚪ Neutral: 15% 🧐
📰 Market Buzz (May 12, 2025)
- US-China trade progress lifts risk appetite, pushing AUD/JPY to 94.50.
- Easing tariff concerns weaken JPY safe-haven appeal.
- Japan’s soft consumer spending data pressures JPY.
📡 Risk Navigation ⚡
Markets can be wild—tread carefully:
- Avoid new trades during major news (RBA, BoJ, US CPI).
- Use trailing stops to protect profits and cap losses.
- Watch for BoJ moves if JPY weakens sharply! 🌪️
💸 Real-Time Market Data (May 12, 2025, UTC+1)
- Forex: AUD/JPY at 94.50, up 0.5% daily (source: Financial Juice).
- Commodities CFD: Gold (XAU/USD) at 2,650, up 0.2%; Iron Ore at 105.50, flat.
- Metals: Silver (XAG/USD) at 31.820, down 1.3%.
- Energies: WTI Crude Oil at 78.40, up 0.6%.
- Crypto: BTC/USD at 62,300, down 0.5%.
- Indices: Nikkei 225 at 39,200, up 0.7%; ASX 200 at 7,850, up 0.4%.
🚀 Join the Stellar Navigator Squad!
Smash the Boost Button to supercharge our Stellar Navigator Strategy and make this safari epic! 🌟 Every boost empowers our crew to dominate the markets. Let’s conquer AUD/JPY together! 🤝
Stay glued to your charts, keep alerts active, and vibe high. See you in the profits, adventurers! 🤑🎉
#StellarNavigator #AUDJPY #AussieYen #TradingView #ChaseThePips

HTF 50EMA POWER PLAY - AUDJPY SHORT FORECAST Q2 W21 D23 Y25AUDJPY SHORT FORECAST Q2 W21 D23 Y25
HTF 50EMA POWER PLAY
BE SMART- AWAIT A BREAK OF STRUCTURE FIRST!
Professional Risk Managers👋
Welcome back to another FRGNT chart update📈
Diving into some Forex setups using predominantly higher time frame order blocks alongside confirmation breaks of structure.
Let’s see what price action is telling us today!
💡Here are some trade confluences📝
✅4H Order Block
✅Tokyo ranges to be filled
✅15' order block identified
✅4H 50EMA
✅Daily 50 EMA
🔑 Remember, to participate in trading comes always with a degree of risk, therefore as professional risk managers it remains vital that we stick to our risk management plan as well as our trading strategies.
📈The rest, we leave to the balance of probabilities.
💡Fail to plan. Plan to fail.
🏆It has always been that simple.
❤️Good luck with your trading journey, I shall see you at the very top.
🎯Trade consistent, FRGNT X

"Epic AUD/JPY Forex Raid Plan Bullish Swing Trade to 96.600!"Ultimate AUD/JPY Forex Heist Plan 🚨 Swing Trade Mastery for Epic Gains! 🚀
Greetings, Wealth Warriors & Market Mavericks! 👋💸
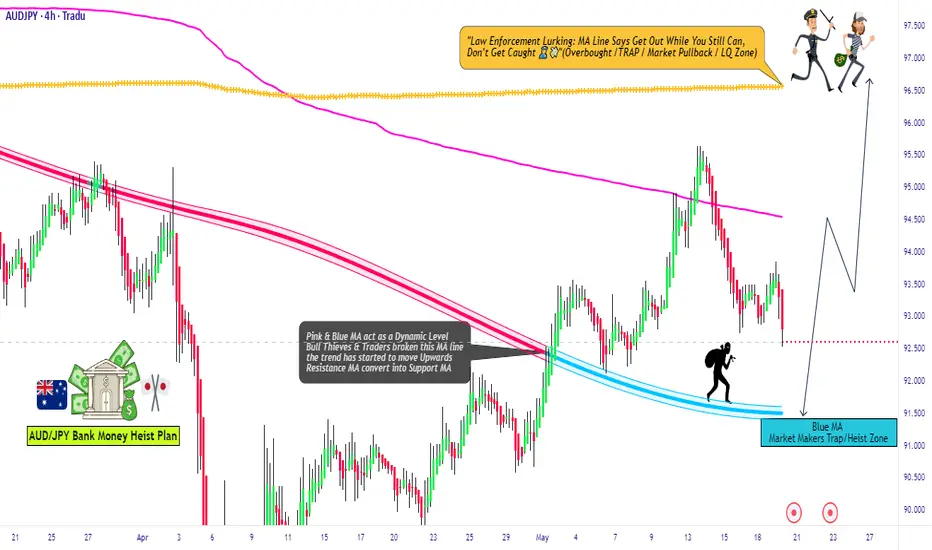
Get ready to execute a legendary heist on the AUD/JPY "Aussie vs Yen" Forex market with our exclusive Thief Trading Style! 🎯 This meticulously crafted strategy blends technical precision and fundamental firepower to maximize your profits. Follow the plan outlined in the chart, focusing on a long entry to conquer the high-risk Yellow MA Zone—a battleground of overbought conditions, consolidation, and potential trend reversals where bearish bandits lurk. 🐻 Stay sharp, lock in profits, and trade safely! 💪🎉
Entry 📈: The heist begins! Watch for the MA pullback in the market maker’s trap zone (91.500 OR above) to strike. Bullish riches await! Set buy stop orders above the Moving Average or place buy limit orders within the 15 or 30-minute timeframe’s recent swing low/high.
Pro tip: Set an alert to catch the breakout entry in action! 🔔
Stop Loss 🛑: Place your Thief SL at the recent swing low/high on the 4H timeframe (90.200) for swing trades. Adjust SL based on your risk tolerance, lot size, and multiple orders.
Target 🎯: Aim for 96.600 or make a swift exit before the target to secure your loot!
🧲 Scalpers, listen up! 👀 Stick to long-side scalps. Big players can jump in now; others, join the swing trade heist. Use a trailing SL to protect your stash. 💰
💵 AUD/JPY "Aussie vs Yen" Forex Heist Plan (Swing Trade) is riding a bullish wave 🐂, fueled by critical market drivers. Dive into the fundamentals—Macro Economics, COT Reports, Quantitative Analysis, Intermarket Analysis, Sentiment Outlook, and Future Trends—before launching your heist. Check the linkKs for the full scoop! 🔗👉
📌 Markets move fast, so stay vigilant and adapt your analysis to the latest developments.
⚠️ Trading Alert: News & Position Management 📰🚨
News releases can shake up prices and volatility. Protect your positions by:
Avoiding new trades during news events
Using trailing stop-loss orders to lock in gains
💖 Boost our heist plan! 💥 Hit the Boost Button to supercharge our team’s strength and make stealing profits a breeze. With the Thief Trading Style, you’ll conquer the market daily with ease! 🏆🤝🎉
Stay tuned for the next epic heist plan, Money Makers! 🤑🐱👤🚀
AUD/JPY "Aussie vs Yen" Forex Market Heist Plan🌟Hi! Hola! Ola! Bonjour! Hallo! Marhaba!🌟
Dear Money Makers & Thieves, 🤑💰💸✈️
Based on 🔥Thief Trading style technical and fundamental analysis🔥, here is our master plan to heist the AUD/JPY "Aussie vs Yen" Forex market. Please adhere to the strategy I've outlined in the chart, which emphasizes long entry. Our aim is the high-risk Red Zone. Risky level, overbought market, consolidation, trend reversal, trap at the level where traders and bearish robbers are stronger. 🏆💸Book Profits wealthy and safe trade.💪🏆🎉
Entry 📈 : "The heist is on! Wait for the MA breakout (94.500) then make your move - Bullish profits await!"
however I advise to Place Buy stop orders above the Moving average (or) Place buy limit orders within a 15 or 30 minute timeframe most recent or swing, low or high level.
📌I strongly advise you to set an alert on your chart so you can see when the breakout entry occurs.
Stop Loss 🛑:
Thief SL placed at the recent/swing low or high level Using the 4H timeframe (92.500) swing trade basis.
SL is based on your risk of the trade, lot size and how many multiple orders you have to take.
Target 🎯: 87.000 (or) Escape Before the Target
🧲Scalpers, take note 👀 : only scalp on the Long side. If you have a lot of money, you can go straight away; if not, you can join swing traders and carry out the robbery plan. Use trailing SL to safeguard your money 💰.
AUD/JPY "Aussie vs Yen" Forex Market is currently experiencing a Bullish trend., driven by several key factors. 📰🗞️Get & Read the Fundamental, Macro Economics, COT Report, Quantitative Analysis, Intermarket Analysis, Sentimental Outlook, Future Trend Move:
Before start the heist plan read it.👉👉👉
📌Keep in mind that these factors can change rapidly, and it's essential to stay up-to-date with market developments and adjust your analysis accordingly.
⚠️Trading Alert : News Releases and Position Management 📰 🗞️ 🚫🚏
As a reminder, news releases can have a significant impact on market prices and volatility. To minimize potential losses and protect your running positions,
we recommend the following:
Avoid taking new trades during news releases
Use trailing stop-loss orders to protect your running positions and lock in profits
💖Supporting our robbery plan 💥Hit the Boost Button💥 will enable us to effortlessly make and steal money 💰💵. Boost the strength of our robbery team. Every day in this market make money with ease by using the Thief Trading Style.🏆💪🤝❤️🎉🚀
I'll see you soon with another heist plan, so stay tuned 🤑🐱👤🤗🤩

WHO'S PRINTING PIPS AND CASH? AUDJPY SHORT FORECAST Q2 W21 Y25WHO'S PRINTING PIPS AND CASH? AUDJPY SHORT FORECAST Q2 W21 Y25
Professional Risk Managers👋
Welcome back to another FRGNT chart update📈
Diving into some Forex setups using predominantly higher time frame order blocks alongside confirmation breaks of structure.
Let’s see what price action is telling us today!
💡Here are some trade confluences📝
✅Weekly order block rejection
✅Daily order block rejection
✅HTF 50 EMA acting as support and resistance.
✅Gap to be filled
🔑 Remember, to participate in trading comes always with a degree of risk, therefore as professional risk managers it remains vital that we stick to our risk management plan as well as our trading strategies.
📈The rest, we leave to the balance of probabilities.
💡Fail to plan. Plan to fail.
🏆It has always been that simple.
❤️Good luck with your trading journey, I shall see you at the very top.
🎯Trade consistent, FRGNT X

AUDJPY buy/longBy utilizing Fibonacci retracement levels, historical patterns, , we can formulate a hypothesis that the market might follow a similar trajectory if bullish sentiment prevails.

AUDJPY SHORT FORECAST Q2 W20 D15 Y25AUDJPY SHORT FORECAST Q2 W20 D15 Y25
Professional Risk Managers👋
Welcome back to another FRGNT chart update📈
Diving into some Forex setups using predominantly higher time frame order blocks alongside confirmation breaks of structure.
Let’s see what price action is telling us today!
💡Here are some trade confluences📝
✅Weekly order block rejection
✅Daily order block rejection
✅15' order block targets
✅Gap to be filled
🔑 Remember, to participate in trading comes always with a degree of risk, therefore as professional risk managers it remains vital that we stick to our risk management plan as well as our trading strategies.
📈The rest, we leave to the balance of probabilities.
💡Fail to plan. Plan to fail.
🏆It has always been that simple.
❤️Good luck with your trading journey, I shall see you at the very top.
🎯Trade consistent, FRGNT X

AUDJPY SHORT FORECAST Q2 W20 D14 Y25AUDJPY SHORT FORECAST Q2 W20 D14 Y25
Professional Risk Managers👋
Welcome back to another FRGNT chart update📈
Diving into some Forex setups using predominantly higher time frame order blocks alongside confirmation breaks of structure.
Let’s see what price action is telling us today!
💡Here are some trade confluences📝
✅Weekly order block rejection
✅Daily order block rejection
✅15' order block targets
✅Gap to be filled
🔑 Remember, to participate in trading comes always with a degree of risk, therefore as professional risk managers it remains vital that we stick to our risk management plan as well as our trading strategies.
📈The rest, we leave to the balance of probabilities.
💡Fail to plan. Plan to fail.
🏆It has always been that simple.
❤️Good luck with your trading journey, I shall see you at the very top.
🎯Trade consistent, FRGNT X

AUDJPY –From Breakdown to Breakout Long Setup After Failed ShortFX:AUDJPY
The short idea was invalidated after price broke above the key resistance zone and hit our stop.
Now, we’re watching for a pullback to the broken zone for a potential long setup, supported by bullish momentum.
Keep it clean. Wait for confirmation.
Stay sharp, stay disciplined.
Smart Forex Analysis | Weekly Setups
Clean charts. No noise. Just levels.

AUDJPY Breakout on Rising Yields – Path Open to 95.70AUDJPY is maintaining strong bullish structure after breaking through key resistance around 91.65. Price is forming higher lows supported by an ascending trendline, indicating healthy buyer momentum. Fibonacci retracement levels show price holding above the 50% and 61.8% zones, strengthening the bullish case.
🔑 Key Levels:
Current Price: 91.65
Support Zone: 90.85 – 91.00 (previous structure + fib support)
Resistance Targets:
TP1: 93.15 (previous swing high)
TP2: 95.70 (full recovery move from March highs)
✅ Bullish Confluence Factors:
Ascending triangle breakout in progress
Strong higher lows and clean market structure
Holding above major 61.8% Fib retracement
Australian dollar supported by improved risk sentiment globally
BOJ expected to stay dovish and delay hikes, keeping the yen weak
🧠 Fundamental Context:
Japan Outlook: BOJ to hold rates steady at 0.5% amid US tariff risks. IMF projects a downgrade in Japan’s growth, weakening JPY outlook.
Sentiment on JPY: No strong intervention support for yen despite media noise. Japan’s government denied any push for stronger yen.
Australia Outlook: Risk sentiment steady, equities firmer globally, and higher AUD correlations to risk-on tone favor upside continuation.
💡 Trade Idea:
Bias: Bullish above 91.00
Entry: On confirmation bounce above 91.60
Target 1: 93.15
Target 2: 95.70
Stop Loss: Below 90.50
📌 Note: Watch for possible mild pullback into 91.30-91.50 zone before new upside leg. Strong US data midweek could temporarily lift JPY but broader BOJ dovishness remains the driver.
