Impulsewave


GBPCAD Impulse & corrective wavesif you see any mistake on my charts please let me know and always trade according to your own strategy. Thanks

AUDUSD - Nice Risk Reward Short Opportunity The price is going to the (E) point so lets short with a close stop loss and see if we get a profitable impulse wave

SILVER FALLING WEDGE BREAKOUT ON WEEKLYSilver tested wedge breakout and should continue this strong move to the upside.

Down to 98.900It looks like we are in the fifth way down to a price level below 100.
I have calculated 2 confluence zones where the second one near 98.900 is my favorite.
Target 1: 99.200
Target 2: 98.900
Feel free to check my other ideas, too.


Corn - Bottom seen at 312.00On August 4 - 2016 I said, that we either had seen a bottom at 319.40 or needed one more decline closer to 310.00.
With a low seen at 312.00 followed by a rally above minor resistance at 328.60 the low is in place for a long term rally to 440.40 and above here confirms the rally to 519.00.

EOG Resources Short SetupHi Everyone, we discussed this stock in our us energy stock screencast and identified that this was a short setup to keep an eye on.
Only a few days later now it has slipped sharply down and has broken out and down. We're waiting now for a correction and also to confirm that it won't reenter the trend line on a shorter time frame for the short entry.

GBPCAD LONG TRADE IDEA ON H2Possible impulsive wave starting on GBPCAD, trade with care and good luck.

USOIL - 1HR - Bigger Correction or Long now?USOIL Long unless correction lasts longer
USOIL is at a crucial point to break higher or correct lower for a bigger correction
It is either in a impulsive 1 wave or it is forming a D and will correct lower down to an E before going long

xagusdagain silver. im going to look for a good long entry.
went through .382 but is still in correction i think.
comments and likes are appreciated.
from january:
key areas up:

(Daily) The start of wave 3 of 5 or the Bullish Bat // IF=THEN ®FX:AUDCAD
iMPULSE LEG:
Wave 2 = 61.8% of wave 1 (Prices usually do not retrace more than 61.8% of the wave one gains;
Can never exceed the start of wave 1);
wave 3 = 161% ext of wave 1 (can never be the shortest impulse wave);
wave 4 = 38.2% to 50% of wave 3 (can never overlap wave 1 );
wave 5 = wave 1
BAT:
Point B:
38.2% to 50% XA
Point C:
38.2% to 88.6% AB
Point D:
88.6% XA
Targets:
TP1 38.2% AD
TP2 61.8% AD
Safe Trades;
open.spotify.com

AUDUSD Potential Elliott Wave third wave tradeElliott wave's principle is that the market moves in waves. In a mouvement, there is 5 waves or impulses.
Here with AUDUSD, there is a clear double bottom reversal ending the bearish trend we were in for a few years. After the double bottom, we saw the first wave already completed and right now we are in the second wave, which is a corrective one. We should begin the third wave soon and right now AUDUSD is trading at the 50% fibonacci retracement, the 100 days moving average and the span B of ichimoku's kumo cloud.
To me this looks like the perfect setup to trade the second wave, which is the institutional wave and the longest wave of the 5.

USD/JPY LONG SETUP!Consolidation till 109.50 area, then long till 110.50-60 area. If price closes below the high of wave 1, the pattern becomes invalid.
Happy Trading!


(D) 5 waves iMpulse // IF=THEN ®FX:EURUSD
iMPULSE LEG:
Wave 2 = 61.8% of wave 1 (Prices usually do not retrace more than 61.8% of the wave one gains;
Can never exceed the start of wave 1);
wave 3 = 161% ext of wave 1 (can never be the shortest impulse wave);
wave 4 = 38.2% to 50% of wave 3 (can never overlap wave 1 );
wave 5 = wave 1
CORRECTiON:
Wave A = usually around the 50%/61.8% of wave 5
Wave B = Usually 50% of Wave A and Should not exceed 75% of wave A
Wave C = Wave A (AB=CD)
161% ext Wave A
262% ext Wave A
Safe Trades;
open.spotify.com

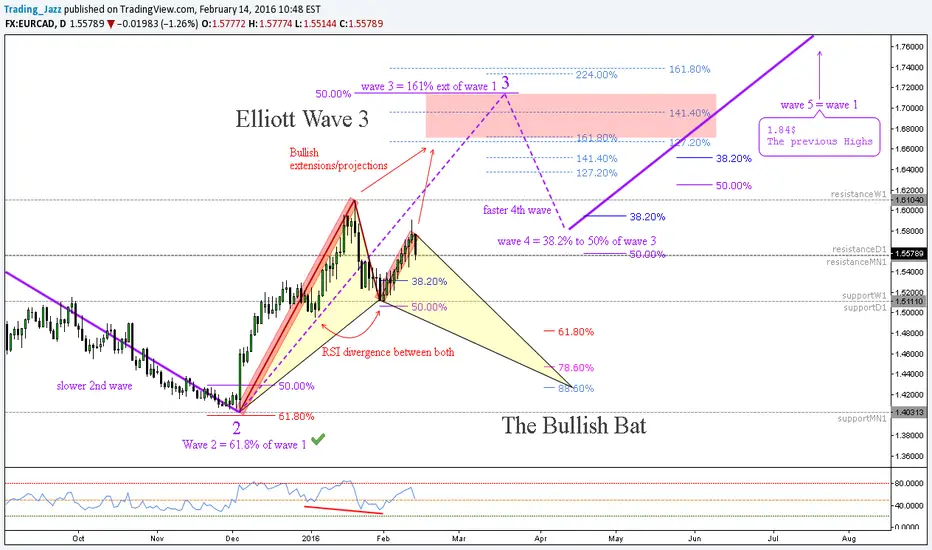
(Daily) The Bullish Bat & The Third Elliott Wave // IF=THEN ®FX:EURCAD
iMPULSE LEG:
Wave 2 = 61.8% of wave 1 (Prices usually do not retrace more than 61.8% of the wave one gains;
Can never exceed the start of wave 1);
wave 3 = 161% ext of wave 1 (can never be the shortest impulse wave);
wave 4 = 38.2% to 50% of wave 3 (can never overlap wave 1 );
wave 5 = wave 1
CORRECTiON:
Wave A = usually around the 50%/61.8% of wave 5
Wave B = Usually 50% of Wave A and Should not exceed 75% of wave A
Wave C = Wave A (AB=CD)
161% ext Wave A
262% ext Wave A
BAT:
Point B:
38.2% to 50% XA
Point C:
38.2% to 88.6% AB
Point D:
88.6% XA
Targets:
TP1 38.2% AD
TP2 61.8% AD
Safe Trades;
(D) C to D for a Cypher // IF=THEN ®FX:GBPUSD
CYPHER:
Point B:
38.2% to 61.8% XA
Point C:
127% to 141% ext XA
Point D:
78.6% XC
Target:
TP1 38.2% CD
TP2 61.8% CD
Safe Trades;
open.spotify.com

(2H) Harmonics // 5-waves impulse // Cluster // IF=THEN ®FX:GBPJPY
BAT:
Point B:
38.2% to 50% XA
Point C:
38.2% to 88.6% AB
Point D:
88.6% XA
Targets:
TP1 38.2% AD
TP2 61.8% AD
CYPHER:
Point B:
38.2% to 61.8% XA
Point C:
127% to 141% ext XA
Point D:
78.6% XC
Target:
TP1 38.2% CD
TP2 61.8% CD
Safe Trades;
open.spotify.com


(4h) Harmonics Combustion // IF=THEN ®FX:USOIL
CYPHER:
Point B:
38.2% to 61.8% XA
Point C:
127% to 141% ext XA
Point D:
78.6% XC
Target:
TP1 38.2% CD
TP2 61.8% CD
BUTTERFLY
Point B:
78.6% XA
Point C:
38.2% AB
88.6% AB
Point D
161% ext BC
261% ext BC
Targets:
TP1 61.8% CD
TP2 127% CD
iMPULSE LEG:
Wave 2 = 61.8% of wave 1 (Prices usually do not retrace more than 61.8% of the wave one gains;
Can never exceed the start of wave 1);
wave 3 = 161% ext of wave 1 (can never be the shortest impulse wave);
wave 4 = 38.2% to 50% of wave 3 (can never overlap wave 1 );
wave 5 = wave 1
Safe Trades;
open.spotify.com

EURUSD Enters Support Zone - 1.0982 Key LevelThe break above 1.1087 on Feb 3 eliminated the bearish impulse and left us with higher probability patterns of:
*A 5 wave move higher beginning Dec 2015 that likely overcomes 1.1720 (bullish)
*A bearish diagonal such that last week's 1.1376 high was wave 2 of the diagonal (near term bearish to below 1.0517)
Though prices have sold off 200+ pips from last week, we're still leaning towards the bullish wave count. Why?
First, FXCMSSI has been ranging between -1.4 and -2.0 We saw -2.0 at last week's highs. The current reading is -1.45 (catch trader positioning in real time here ). This indicates traders were not believing this bullish run. We know from past experiences that the majority of traders tend to be wrong so this lack of belief in the up trend is a bullish undertone.
Secondly, though prices rejected swiftly at last week's purple trend line, this sell off is typical and within normal bounds based on the wave count depicted on the chart. Said another way, if the bulls are going to take over, 1.1000 - 1.1135 is the price zone where that is likely to take place. The divergence on RSI is indicating slowing momentum to the downside. Below 1.0982, then we'll need to reconsider the higher probability patterns.
So lack of shift to bullish positioning and wave positioning has me leaning towards the bull camp with a good risk to reward ratio opportunity approaching. (1.1122 and 1.1087 and 1.1011 are areas of interest)
Good luck traders!
