USDJPY H4 - LONGPrices broke out of structure, with a range to work with. We will be looking for confirmations at our demand area to catch a buy entry.
Liquidation

#CAD JPY# 1:6 RRR SELL TRADE PLAN I am looking for sell on cad jpy 1:6 RRR sell side possible liquidation ,thanks.

USDCAD H1 - LONGPrices broke out of structure, leaving behind a demand area for us to get involved. Look for confirmations on the LTF, otherwise... look to buy at demand.

EURNZD H1 - SHORTPrices tapped into H4 supply zone, shifted on the LTF and we are potentially looking for sells if we get a pullback confirmation.

The Weakness of BitcoinAs Bitcoin continued to rise, there was some point where it was due for a massive liquidity Grab. Couple of days ago, it just did that. Bitcoin dropped over 18%. As of now, Bitcoin is currently consolidating. Base on my TA, I am waiting for the Break down and a re-test for confirmation. Below 30k, there is a lot of Liquidity and I would not be surprise if there is a giant wick that liquidates the area.
For now, there is no trade because we are in a ranging area, If you know how to trade consolidation, go for it,
Also, keep in mind Altcoins has been exploding even though bitcoin has been falling, this indicates that the top is almost in.
Good luck to all.

EURAUD H1Prices broke immediate swing low, leaving behind a supply area for us to get involved, targeting a refined area for a BUY opportunity towards the HTF liquidity highs.

USDCHF H1Prices are between 2 areas of interest. A HTF supply area where prices got rejected from, into a potential demand area that failed to break HTF supply area. We'll see how prices reacts at the demand level.

Time to remain watchful now| Expect a sideways momentumIf you find the analysis useful, please like and share our ideas with the community. Any feedback and suggestions would help in further improving the analysis!
Quick glance: Bitcoin recovered a bit after the terrible slump yesterday. Despite this minor recovery, BTC’s troubles are not yet over. The market dominance took a dip, and is currently at a trendline resistance. The rest of the month looks poised to be a difficult one for BTC traders and investors. What we observed yesterday was not a black-swan event. The crypto market is known for such moves and therefore, we always suggest our followers to keep a strict and a trailing stop-loss in place.
Market in the last 24hrs
In a massive liquidation event that happened over the past 24 hours, approximately 330,000 traders were liquidated as their accounts ran out of margin. Bitcoin witnessed a major slump after it fell from near $53,000 levels to approximately $43,000.
Today’s Trend analysis
BTC’s market dominance stood at approximately 42.3%. If we take a look at the BTC.D chart, we see that it faces a trendline resistance, and has been on a downtrend for some time. Moreover, the absence of any significant external factors presents a dull picture for BTC for the current month.
On a medium time frame, there seems to be a demand zone at $46,250. The large wicks at the bottom of the 2 consecutive daily candles indicate that there is a demand zone near that level. However, it is important to wait for a confirmation before taking a trade right now.
If the $46,250 level breaks, BTC could likely head to $42,000 in the short term. Similarly, if we see volume and BTC taking support at this level and going higher, we might see it heading for the $50,000 level again.
It’s best to avoid leverage in such crappy markets and always use a stop-loss. Traders who enter into trades considering a good risk : reward setup, end up being profitable in the long run.
Price volatility remained high at approximately 6.63%, with the day's range between $44,436.93 — $47,386.72.
Price at the time of publishing: $46,466.80
BTC's market cap: $877.96 Billion
Out of 11 Oscillator indicators, 8 are neutral, 2 are bearish and 1 is bullish.
Out of 15 Moving average indicators, 1 is 'NEUTRAL', 8 are bearish and 6 are bullish.
Indicator summary is giving a ‘ SELL ’ signal on BTCUSD .
Volumes have remained high in the past 24 hours.
----------------------------------------------------------------------------------------
The analysis is based on signals from 26 technical indicators, out of which 15 are moving averages and the remaining 11 are oscillators. These indicator values are calculated using 24-hour candles.
Note: Above analysis would hold true if we do not encounter a sudden jump in trade volume .
----------------------------------------------------------------------------------------
Do give a follow if you liked the content.
Keep supporting:)
-Mudrex

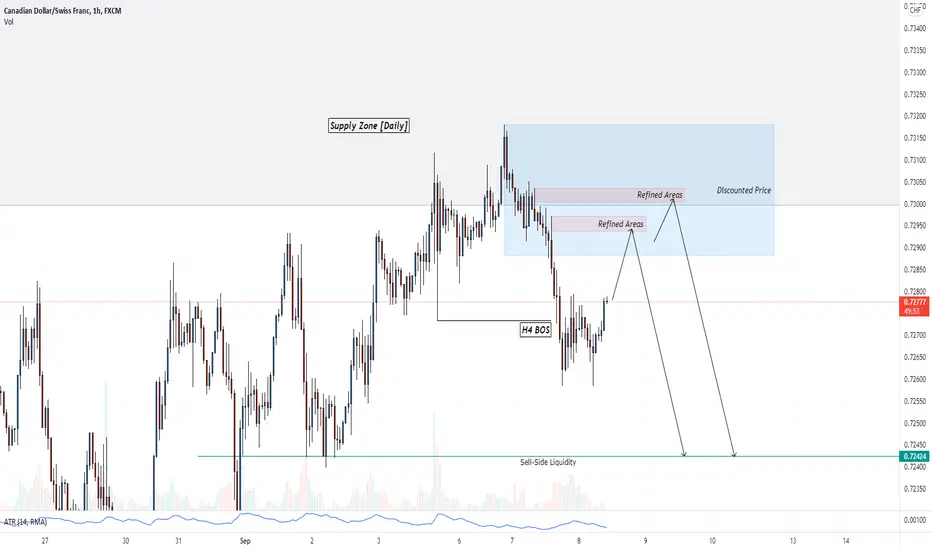
CADCHF H1 - SHORTPrices tapped into Daily supply area, gave us a shift on the H4 timeframe and now and now looking for sells. 2 ways you could find an entry:
1. Set a Sell limit orders onto the refined areas by means of supply on the lower timeframe.
2. Confirm these areas on the LTF by means of structural shift or CHOCH
DXY H8 - LONGPrices are likely to reach out for liquidity highs after getting rejected from a demand area.

CADJPY H2 - SHORTPotential SELLS onto CADJPY, shifted on the LTF as prices taps into the HTF supply area.

GBPUSD H8 - LONGPrices broke out of structure and left behind several demand areas for us to get involved. Wait for the tap into the respective areas, look for the shift in structure on the LTF before taking BUYS.

GBPUSD 15M - SHORTPrices broke down from a H1 supply, looking for a pullback onto the supply area. LTF traders can look for BUYS into the supply area that we've identified. Otherwise, simply wait for the pullback and look for the structural shifts.

CHFJPY H1 BUY TO SELLPrices broke out of structure, leaving behind a demand zone for us to get involved, to buy into the H4 supply above, potentially distributing towards the liquidity lows by means of trendline.

USDJPY H4 - SHORTWaiting prices to tap into our supply area, give us a transfer of WH>SH before taking sells.

AUDCHF H1 - LONGPrices broke out of structure, leaving behind a demand zone for us to get involved. Wait for confirmation by means of structural shift on the LTF to get involved.

EURCAD H1 - LONGPrices tapped into demand zone, gave us a shift in structure and now looking for a LONG position if we get retest confirmation onto demand zone.

USDJPY H1 - LONGIf we get a deep pullback, we can catch buys into liquidity highs. Otherwise, go down to the LTF to catch continuation moves as of current prices.

GBPNZD H1 BUY > SELL > BUYPrices just broke out of structure, looking for lower areas to be met. We can potentially catch a BUY up into the Supply zone, liquidating the EQH then SELL at Supply zone for the last demand area to catch BUYS higher.


GBPCHF H1 - SHORT & LONGTrendline liquidity waiting to be met, potential pullback onto demand zone before moving upside.

CHFJPY H1We could SELL to BUY, ultimately BUY-SIDE bias to catch a LONG position at lower prices, targeting the liquidity trendline for an upside move towards the supply zone.

GBPJPY H1 - SHORTWaiting for prices to move into our supply zone, give us a shift before taking sells.
