JPY/USD – Clean Rejection from Mini Resistance | Bearish Move🔻 1. Major & Mini Resistance Zones
Mini Resistance Zone: This is a key supply area that aligns with previous highs and recent structure points. As the price approaches this level, it tends to react due to unfilled sell orders and trapped buyers.
The chart shows a rejection from this mini resistance zone — visible through strong bearish candles. This suggests institutional selling pressure has entered the market.
Major Resistance is still untouched above, which becomes a clear invalidation level for any short bias. If price breaks and sustains above it, the bearish idea would be invalidated.
🔄 2. MMC (Mirror Market Concepts) at Work
The MMC idea is clearly illustrated. The price movement after the last major drop is mirrored on the right side:
Strong rally > Formation of lower highs > Resistance retest > Sharp decline
These mirrored behaviors often hint at psychological repetition in the market, driven by trader memory and order placement.
The bearish movement after retesting the mini resistance looks nearly identical to the previous leg on the left — reinforcing the idea that we may see a similar downside structure repeat.
🌀 3. Central Zone Area – Liquidity Trap and Reaction Point
The Central Zone Area is labeled where a previous sharp bounce occurred. This zone is critical for several reasons:
It acted as support multiple times.
It’s also where a liquidity grab occurred — shown with a long wick — before a reversal rally.
In current price action, this zone may again act as a magnet for price, as institutions seek liquidity to fuel further moves. Once price reaches it, expect a temporary bounce or reaction.
📐 4. 50% Fibonacci Retracement Confluence
The projected target sits right on the 50% retracement level of the previous bullish leg.
Institutions frequently target the 50%–61.8% Fibonacci zones to rebalance orders and create continuation moves.
This target zone is marked in purple and is aligned with historical support, adding confluence.
📉 5. Sharp Bearish Reversal from Structure
You can observe a very clear shift in momentum:
The uptrend was broken with a strong bearish engulfing candle.
That move wiped out several minor bullish structures — a sign of structure collapse.
This breakdown, combined with the resistance rejection and MMC mirroring, strongly supports a bearish continuation bias.
📊 6. Previous Targets and Structure Memory
The previous targets and historical swing points are not just annotations — they represent real zones of order flow memory.
When price revisits these levels, you often see reactions (reversals, consolidations, or continuation).
🎯 Trade Plan (Based on Chart):
Bias: Bearish
Entry Zone: After rejection confirmation at mini resistance
Target Zone: 0.00675 area (50% retracement)
Invalidation: Close above 0.00715 (Major Resistance)
✅ Conclusion:
This JPY/USD 4H chart beautifully showcases the power of technical structure, Mirror Market Concepts, and liquidity-focused trading. With a clean rejection from mini resistance, a history of mirrored bearish setups, and a confluence target at the 50% zone, this chart suggests a high-probability short opportunity for disciplined traders.
Priceaction

Silver (XAG/USD) | MMC Retest in Play – Eyes on $33.55 TargetThis 1-hour chart of Silver (XAG/USD) presents a clean and compelling bullish setup, applying Mirror Market Concepts (MMC) in combination with classical price action, support/resistance flips, and trendline analysis. It outlines a likely bullish continuation scenario based on how price respects key structural levels.
🧩 1. Mirror Market Concepts (MMC) Overview
MMC views the market as a symmetrical organism, where past price behavior on one side of a pattern tends to be “mirrored” on the other side. Here, we see the market reflecting previous structural behaviors through:
Symmetrical lows and highs
Balanced corrective structures
Repeatable retests of trendline support
This creates a roadmap for anticipating price reactions, especially around previously respected levels.
🔸 2. Trendline Support – Anchoring Bullish Momentum
The rising trendline is a major structural feature. It's been respected three times previously (highlighted with blue circles), providing strong bullish support.
Current price is once again approaching this trendline.
A bounce here would confirm continued higher-low structure.
If trendline is broken, it may invalidate the bullish setup — so this acts as the key decision point.
🔸 3. SR Interchange Zone (Support/Resistance Flip)
The chart marks a wide SR Interchange Zone, previously resistance, now turned into support. This flip is a critical area for accumulation and re-entry by institutional players.
Price bounced from this zone earlier.
The current structure suggests price may retest this zone again during a potential fakeout or liquidity grab.
This level is a magnet zone for stop-hunting before continuation.
🔸 4. “Type of Retesting” – MMC Style
This chart specifically labels a "Type of Retesting", which refers to a deeper liquidity sweep where:
Price breaks minor support to tap trendline or SR zone liquidity.
Then reclaims the structure and resumes the uptrend.
This is a mirror market behavior — where past retests serve as a template for future ones. Expectation is for the same type of bounce from the trendline/SR area as seen before.
🔸 5. Projected Path – Bullish Scenario
The expected flow includes:
Price dips back into the trendline + SR Interchange confluence.
Forms a higher low (marked with arrows).
Breaks minor resistance levels toward Major Resistance at $33.556.
This zone acts as the target — derived from the previous swing high and structural mirror projection.
The target zone aligns with a key Fibonacci and historical resistance level — giving extra weight to this forecast.
🔸 6. Volume and Confirmation (Trader Tip)
While volume is not shown on this chart, experienced traders would:
Watch for volume divergence or spikes near the SR zone.
Seek candle confirmation (like bullish engulfing, pin bars, or strong wicks) near the trendline/SR confluence before entering.
🎯 Trading Plan Summary:
Entry Zone: Near trendline + SR Interchange support zone.
Stop Loss: Below the SR zone or swing low.
First Target: Return to $33.20–33.30 range.
Main Target: $33.556 (marked target zone on chart).
Invalidation: Strong break and close below trendline + SR zone, with no bounce.
📘 Educational Notes (For Traders):
Trendline retests are best traded in confluence with horizontal levels.
SR flips provide high-confidence zones for reaction.
MMC adds a predictive edge by recognizing repeating behavior and structure across mirrored segments of the chart.
This setup rewards patience, especially during consolidation near major support.
⚠️ Risk Management Reminder:
Always manage risk properly. Even with high-probability setups like this, price may wick below or fake out. Wait for confirmation. Avoid over-leveraging or premature entries.

BTCUSD Curve Breakout & MMC Structure | Targeting $111KIn this idea, we apply Mirror Market Concepts (MMC), a method of analyzing symmetrical price behavior to forecast key market moves. This BTC/USD 15-minute chart showcases a beautiful execution of MMC principles, blending curved structure analysis, SR interchange, and trendline dynamics to capture a compelling bullish opportunity.
🧩 Chart Structure Analysis (Detailed Breakdown):
🔸 1. Curve Line Formation & Mirror Market Concepts (MMC):
The centerpiece of this analysis is the curved market structure, which resembles a cup-like formation. Using MMC, the market is seen as reacting in mirrored patterns — left side = right side. In this context, the curve mimics the balance of supply and demand over time, providing a visual roadmap of potential price behavior.
Curve Line Resistance: The upper black arc served as dynamic resistance.
Curve Line Support: The lower arc acted as dynamic support.
Once price broke above the curved resistance, it confirmed a bullish market structure shift, triggering a key breakout signal.
🔸 2. Breakout & Retest Pattern:
Following the curve line resistance breakout, price pulled back for a retest, validating the structure. This is a high-probability continuation setup where:
The breakout confirms bullish interest.
The retest confirms that former resistance is now support.
This retest occurred exactly near the intersection of:
Curve Line Support
SR Interchange Zone (gray shaded area)
Trendline Support
This confluence adds strength to the bullish outlook.
🔸 3. SR Interchange Zone (Support/Resistance Flip):
The horizontal SR Interchange area is a key pivot zone, where price previously faced resistance. After the breakout, price came back to this level and found strong buying interest, flipping it into support.
This acts as a reaccumulation zone.
Price rejected from this zone with a clean bullish impulse.
🔸 4. Trendline Support Validation:
After the retest, price formed a new ascending trendline, respected multiple times by price. This ascending trendline acts as a guide for trailing stop placements or re-entry zones. Price remained above this trendline, reinforcing bullish structure integrity.
🔸 5. Central Zone & Liquidity Sweep:
The Central Zone marked a midpoint in the curve, which:
Acts as a balance point between the mirrored halves.
Is often used as a liquidity grab area before direction continuation.
Price dipped into this zone, likely collecting stop orders or liquidity before reversing higher — a classic MMC behavior.
🔸 6. 50% Retracement Level:
A horizontal marker near the 50% retracement level serves as a psychological and technical barrier. As of the last candle:
Price is hovering around this midpoint.
A breakout above this level would trigger further bullish movement toward the target zone.
Traders often look for volume expansion at this point to confirm conviction.
🔸 7. Target Zone (Projected via Curve Symmetry & Range Extension):
The target zone is marked near $111,600, based on:
Mirror projection of the curve's depth (height symmetry).
Range extension from the curve’s breakout.
Potential measured move based on pre- and post-breakout range.
This level represents a logical exit or partial TP zone for long positions.
📈 Trading Plan Summary:
Entry Zone: After breakout and retest around the SR Interchange/Curve Support/Trendline Confluence.
Support Confirmation: Trendline holding and bullish structure above central zone.
Mid-Target: 50% retracement breakout ($110,400).
Main Target: $111,600+ target zone based on curve projection.
Invalidation: Clear break below trendline and loss of SR flip zone.
🔍 Educational Takeaways:
Mirror Market Concepts (MMC) are highly effective in anticipating symmetrical price behavior.
Confluence of curved breakout, SR flip, and trendline validation provides high confidence in trade setups.
Market symmetry helps define logical targets, entries, and risk zones.
Always look for a pullback to structure — the best trades often come after the breakout and confirmation.
🚨 Risk Management Reminder:
As always, proper risk management is crucial. Wait for confirmation before entering, and use stop-losses below structural levels (such as the trendline or SR Interchange zone) to limit downside risk.

Failed Wedge, New Setup. Is SUI About to Break Out?In my previous post about BYBIT:SUIUSDT , I mentioned a potential falling wedge pattern. However, the breakout above the 4.0040 resistance turned out to be a false breakout, and the price eventually dropped to the invalidation level at 3.5868. This made the setup invalid.
But despite the failed wedge breakout, BYBIT:SUIUSDT remains in a bullish trend overall. During the current consolidation, the price appears to be forming a new bullish pattern — a Descending Broadening Wedge (DBW).
This pattern typically starts with low volatility and gradually widens. Once price reaches its lower boundary, it often experiences a strong breakout to the upside.
Let’s break down the key price action in this DBW setup:
Price is moving within a Descending Broadening Wedge and is currently near the lower boundary of the pattern.
It’s also sitting around a key support level at 3.4833.
A rejection candle formed right at 3.4833, showing the market’s response to this support area.
A reversal confirmation would come if the price breaks above 3.6102.
A bullish divergence is also visible — price is forming lower lows, while the stochastic indicator is forming higher lows.
Based on these five price action signals, it seems that buyers are still in control, even though short-term volatility has created a series of lower lows.
That’s why I still believe BINANCE:SUIUSDT has more room to go up. What’s your take on this?

Gold Price Action Analysis – Using MMC (Mirror Market Concepts) 🔍 Overview:
In this idea, we dive deep into XAU/USD's (Gold) short-term bearish move using a blend of Mirror Market Concepts (MMC) and Smart Money Concepts (SMC). The 15-minute chart provides an excellent visual of market psychology shifting, with CHoCHs, supply-demand zones, SR flips, and the Black Mind Curve highlighting the story of price.
🧩 Market Structure Breakdown:
🔵 1. Major Resistance Zone Formed
Price pushed aggressively upward but met strong rejection near the major resistance zone.
This zone acts as a ceiling for the bullish momentum—setting the first signal for a possible reversal.
🔵 2. Black Mind Curve Activated
A descending Black Mind Curve was plotted to reflect the psychological shift from bullish to bearish.
Price failed multiple times to break above this curve, highlighting strong internal weakness.
The Black Mind Curve visually reinforces the bearish tone and offers a roadmap for probable lower highs.
🔵 3. Minor Resistance + SR Interchange
As price dropped, it created a minor resistance.
When price returned to this area and rejected it, this confirmed an SR Flip (Support-Resistance Interchange)—a classic MMC feature.
Mirror Market Concepts suggest that old demand often mirrors into new supply. That's exactly what happens here.
🔵 4. Major CHoCH: Change of Character
A decisive break of the bullish structure signaled a Major CHoCH, confirming bearish order flow.
This is the moment smart money starts repositioning for shorts—liquidity has been grabbed above previous highs, and the direction shifts.
🔵 5. 50% Retracement
After the impulsive drop, price retraced nearly 50%—a key area of interest for MMC traders.
This level often acts as a decision point. In this case, price rejects the retracement, creating an ideal zone for re-entries.
🔵 6. Targeting the Demand Zone
The projected target lies in a prior demand zone, which mirrors earlier supply structure.
This aligns with MMC’s principle of "market reflection"—what was resistance becomes support again, and vice versa.
🎯 Trade Bias: Bearish
Entry Confirmation: After CHoCH + rejection from 50% level + re-alignment with Black Mind Curve.
SL: Just above the 50% retracement or last minor high.
TP: At the marked target zone near historical demand.
🧠 Why MMC Works Here:
MMC helps you see the market in reverse—where previous zones mirror and reflect. Combined with smart money triggers like CHoCHs, BOS, liquidity sweeps, and SR flips, this makes for a precise trading model that goes beyond basic support and resistance.
The beauty of MMC is that it reveals where the crowd is wrong and where the real momentum lies.
🔑 Key Takeaways for Traders:
The Black Mind Curve helps visualize hidden resistance paths.
CHoCHs are crucial in understanding market intent.
MMC allows traders to anticipate instead of react.
High probability setups form where multiple MMC/SMC elements converge.
Always wait for confirmation, not assumption.

XRPUSDT 4H | Untested Demand Zone RevisitIn this 4-hour chart analysis of XRPUSDT, I’m focusing on a clear and well-defined untested demand zone between 2.05–2.13 USDT . Unlike the first demand zone (already tested and played out), this second zone has not been retested since its formation, making it a fresh area of interest for a potential long setup.
Why this matters :
Untested demand zones often act as powerful magnets for price when revisited, as they represent areas where large buy orders might be waiting to be filled. Because this zone has not been revisited yet, there’s a higher probability for a bullish reaction when price returns to it.
Key Technical Factors :
✅ The 2.05–2.13 demand zone was formed following a significant bullish impulse that created a clear break of structure to the upside.
✅ Price is currently consolidating above this demand zone and also above a potential bearish CHoCH at 2.0784 . This suggests that the bullish structure is still valid unless price breaks below 2.0784.
✅ My bullish target is 2.65 USDT , where previous highs were formed and potential liquidity exists.
✅ My stop loss is set just below the demand zone, around 2.05 , to protect against a deeper retracement or a shift in market structure.
My Thought Process :
I expect that if price returns to the demand zone, there will be a strong chance for buyers to step in and push the market higher. However, I’m aware that if price breaks below 2.0784 , it would signal a bearish CHoCH and invalidate the long scenario. Therefore, patience is key — I’ll wait for price to either test the zone and react strongly or stay above 2.0784 to keep the bullish bias intact.
Clear Trade Setup :
📌 Entry Zone : 2.05–2.13
🛑 Stop Loss : Below 2.05
🎯 Take Profit : 2.65
🧩 Invalidation : Break below 2.0784
💬 Let me know if you have a similar zone marked out or if you see a different setup! Let’s share ideas and refine our strategies together.

GJ-Tue-27/05/25 TDA-4hFVG respected, possible upside continue!Analysis done directly on the chart
Follow for more, possible live trades update!
Consolidation, structure, breakout
Again
Consolidation, structure, breakout
Market is fractal, it repeats itself again
and again. But to understand it deeply,
it's not easy at all.
Not financial advice, DYOR.
Market Flow Strategy
Mister Y

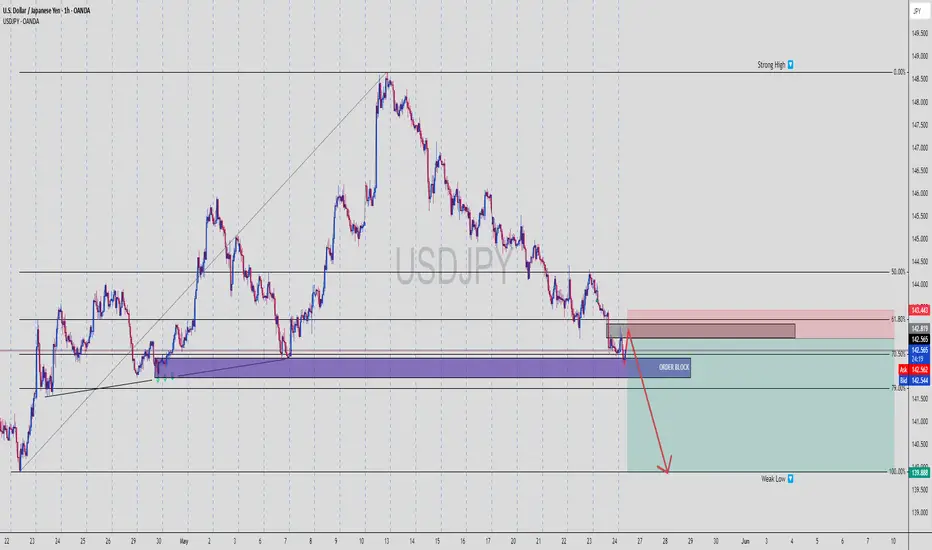
USDJPY | FVG + OB + Weak Low Target = Textbook SMC Setup📊 USDJPY | 1H Bearish Play – Smart Money In Control
We’re seeing a classic setup where price retraces into a bearish zone of confluence and prepares for a selloff toward internal liquidity. Check the breakdown:
🔻 1. Structure Shift Confirmed
Price broke structure on the downside after forming a lower high
Current move is a retracement into discount OB zone
Clear rejection is forming, signaling short momentum incoming
🟪 2. Zone Confluence
📌 Order Block (OB): Sitting just under the 61.8% Fib
📌 Fair Value Gap (FVG): Mitigated perfectly
📌 Fib Retracement: Price reacts between 61.8% and 70.5% — classic Smart Money play
📌 Previous Demand Turned Supply: This level is now acting as a rejection zone
This is stacked confluence — just how Smart Money likes to move.
💣 3. Entry Strategy
Entry Zone: 142.55 (midpoint of the OB reaction area)
Stop Loss: Above 143.443 (above OB + liquidity wick)
Take Profit: 139.888 (weak low, previous liquidity resting point)
⚖️ 4. Risk-to-Reward Ratio (RRR)
🎯 TP = 139.888
📍 Entry = 142.550
🔐 SL = 143.443
✅ RRR ≈ 1:3.5
A great example of high-probability short setup using pure Smart Money logic.
📉 5. Why This Works
Retail traders will try to long at this zone hoping for a breakout
Smart Money uses this zone to engineer liquidity
They tap into the FVG/OB, then target internal liquidity and weak lows
Clean, controlled sell-off expected down to 139.888
🧠 SMC Insights
This chart is all about liquidity engineering:
Push up into OB
Reject at premium pricing
Drive down to weak low to collect stops
Possibly reverse or continue trend from there
💬 Comment “FVG TAP + OB = 🔥” if you spotted this setup early
💾 Save it before the drop happens
📤 Share with a fellow SMC trader who needs this breakdown
BTC Short Locked – FVG + 79% Fib = Liquidity Grab Incoming📉 BTCUSD | 1H Smart Money Short – Premium Rejection in Play
Bitcoin just tapped into a nasty supply zone that aligns with:
🟥 Fair Value Gap (FVG)
🔻 79% Fibonacci Retracement
💥 Previous Breaker Block Zone
🧠 Clean Internal Liquidity sweep
🚩 Structure still bearish – no HH
🔍 1. Market Structure Breakdown
Price broke down aggressively from the top (early signs of redistribution)
We’re now retesting the FVG + OB zone
No candle close above the Strong High = still valid bearish context
🧱 2. Zone Confluence
📍 FVG (Fair Value Gap): Imbalance created during impulsive sell-off
📍 OB + Breaker: Strong resistance holding inside 70.5%–79% retracement
📍 Strong High: Still protected
📍 Weak Low: Below = prime target for liquidity sweep
Price kissed the edge of that 79% Fib and immediately rejected = 🔥 confidence for a swing short
🎯 3. Trade Plan
Entry: Around 110,800 (inside FVG zone)
Stop Loss: Above 112,400 (Strong High)
Take Profit: 105,248 (below Weak Low liquidity)
⚖️ 4. RRR (Risk-Reward Ratio)
📥 Entry: 110,800
🔒 SL: 112,400
💰 TP: 105,248
✅ RRR ≈ 1:3.5
Solid asymmetric setup with clearly defined structure, inducement, and imbalance = Smart Money textbook trade.
📉 5. Why This Works
Retail longs are entering late = exit liquidity for big players
Price filled the FVG but failed to break structure
Weak low below is clean AF, likely to be swept for continuation
1H/4H alignment = high conviction short
💬 Type "SHORTED BTC 💥" if you saw this setup before the drop!
📌 Bookmark this – confluence stacking is how you win consistently
👊 Share this with someone still buying the top 📈🙃

GU-Tue-27/05/25 TDA-Great pullback, good structure is forming!Analysis done directly on the chart
Follow for more, possible live trades update!
Consistency, show up daily is not easy. Many
in fact will quit. If you want to really get good
at something you need to put into hard work.
Short cuts will benefit short term, but long term
it will cost you!
Not financial advice, DYOR.
Market Flow Strategy
Mister Y

27.05.25 Morning ForecastPairs on Watch -
FOREXCOM:COFFEE
FX:GBPAUD
A short overview of the instruments I am looking at for today, multi-timeframe analysis down to what I will be looking at for an entry. Enjoy!

2025-05-26 - priceactiontds - daily update - dax
Good Evening and I hope you are well.
comment: Back where we started on Friday and I do think one more big leg down will finally be enough for the persistent btfd crowd to scale it down a bit. So far it has been profitable and that’s why bears need a big gap that does not close or otherwise we just continue sideways to up. Bulls need to get trapped for this to end.
current market cycle: broad bull channel
key levels: 23000 - 24300
bull case: Watch the 1h 20ema tomorrow. If we stay above, we can make another ath and it’s possible we see more upside above 24200. Since all my bull targets are met and I have no interest in buying this, I won’t be your guide in looking for longs here. I think buying above 24000, while we wait for 50% tariffs to the US, qualifies for most stupid the trade of the year. I’m happy for you if you make money on any side though.
Invalidation is below 23300.
bear case: Even if tariffs won’t be 50% and only 10%, it would still mean less business for everyone. Markets are not pricing the risks right and are begging to get rug pulled. Only a couple times a year markets are so miss-aligned with reality that in hindsight you feel unwell for not risking more. Having said that, now is not the time to short. We need way more selling pressure again. Wait for big bears to appear. Below 23900 we could see a test of 23800 but it will likely be an easy trap for bears so only take it if we either move very strongly down or if we move down over a long time without any decent bounce up.
Invalidation is above 24300.
short term: Neutral. Sitting on hands until bulls run for the exits and big bears come out.
medium-long term from 2025-05-25: My rough guess from early May was down over the summer and up into year end. POTUS certainly helped with the 50% tariffs. I need to see market reaction next week and if there is no 180° reversal until Friday, they will become reality the week after and dax should do 20-30% down over the next months. Markets were not positioned for any risk what so ever. Now we got the atomic trade bomb.
trade of the day: Long since Globex open. Tough.

Bitcoin : Impulse up or Flat Trap!?If you find this information inspiring/helpful, please consider a boost and follow! Any questions or comments, please leave a comment!
BTC has staged a solid move off the May 25 low — but the context matters. We’re facing two distinct, high-stakes scenarios here: one bullish, one bearish. What happens next hinges on whether the May 25 rally is the start of a new impulse or the final leg (C wave) of an expanded flat off the all-time high.
Structure Breakdown
Bearish View: We’re completing a textbook expanded flat from the ATH:
A wave started May 23
B wave pushed to a lower low.
C wave began May 25 and is likely wrapping up now
If valid, this sets the stage for a powerful Wave 3 down.
Bullish View: The May 25 low marked the end of a corrective phase:
Rally from that low is an impulsive Wave 1
A pullback to the 108k golden zone would represent Wave 2
Wave 3/C up could follow from that base
What to Watch
The area around 108,000–107,100 is a magnet. If price retraces into this zone with a corrective look and holds, bulls could be in control. But if we roll over hard from here, it supports the expanded flat thesis — and a much deeper move likely follows.
Outlook
This is a moment for sharpen focus. The chart structure is clean, but the outcome isn't binary until we see what kind of retrace (if any) forms.
Watch 108k like a hawk. If bulls defend it, there’s room to talk new highs. If we break impulsively from here, expect acceleration lower — fast.
Trade safe, trade smart, trade clarity.

EUR/GBP Bullish Breakout Forming – Falling Wedge & Retest SetupEUR/GBP has been in a prolonged downtrend over the past several weeks, characterized by lower highs and lower lows. However, the recent price action shows signs of exhaustion in selling pressure, as the candles begin to compress into a Falling Wedge pattern — a classic bullish reversal formation.
The wedge is defined by two descending, converging trendlines. As price moves closer to the apex of this wedge, volatility contracts and volume typically dries up (not shown here, but conceptually expected). This signals that market participants are preparing for a directional breakout, most likely to the upside in this context.
🔍 Key Technical Elements:
🔸 1. Falling Wedge Pattern:
The Falling Wedge is a bullish setup that forms during a downtrend and signals a potential reversal when confirmed. Price here has followed a steady decline, but the slowing momentum and structure of the wedge suggest the sellers are losing control.
The wedge acts as a compression zone, where bearish moves are becoming less impactful.
Price touches both upper and lower wedge boundaries multiple times, increasing pattern validity.
A breakout has already occurred, and the pair is now undergoing a textbook retest of the broken wedge resistance (now acting as support).
🔸 2. Retest at Key Support Zone (SR Interchange):
The retest is happening precisely at a former support/resistance flip zone, labeled SR – Interchange on the chart. This is a historically significant area where price has reacted multiple times, adding confluence to the setup.
If this level holds during the retest, it may invite strong buying interest, fueling the bullish breakout move.
🔸 3. Resistance Zones & Targets:
Inner Resistance (~0.8460): First hurdle for bulls; breaching this will signal strong momentum.
Minor Resistance (~0.85618): This is the primary target of the setup, based on previous structure and wedge height projection.
Major Resistance (~0.8740): A longer-term bullish objective if momentum sustains beyond the first two targets.
These zones serve as logical areas for profit-taking and reassessment.
📐 Measured Move & Target Projection:
The projected breakout target of 0.85618 is derived using a combination of:
The vertical height of the wedge at its thickest point.
Previous market structure resistance zones.
Fibonacci and price symmetry (if analyzed further).
This target also aligns with a previous supply zone, making it a strong magnet for price if bullish momentum kicks in.
💡 Trading Plan (Not Financial Advice):
This setup provides a good risk-to-reward opportunity if executed with patience and proper confirmation:
Entry Zone: After bullish confirmation at the retest (e.g., bullish engulfing candle, pin bar, or break of minor lower high).
Stop Loss: Below the SR Interchange zone or recent swing low (~0.8350–0.8360).
Target 1: Inner Resistance (~0.8460)
Target 2: Minor Resistance (~0.85618)
Target 3 (extended): Major Resistance (~0.8740)
🔄 Market Psychology:
This chart setup reflects a shift in momentum and sentiment:
Sellers have driven the price down consistently but have failed to create new significant lows with force.
Buyers are stepping in at key demand zones, creating higher lows within the wedge.
The breakout suggests smart money accumulation, and the current retest offers one of the last low-risk entries before a broader move.
🔔 Confirmation to Watch:
Bullish reversal candlestick patterns at the retest zone.
Break above local lower highs near 0.8440–0.8460.
Momentum indicators (if used) showing divergence or crossover confirmation.
📉 Bias:
Short-Term Bullish
Valid if support at 0.8390–0.8400 holds and price confirms breakout continuation.
🧠 Minds Post (Expanded Explanation)
Title: EUR/GBP Bullish Reversal Developing – Falling Wedge Breakout Retest
EUR/GBP has broken out of a textbook falling wedge on the 4H chart, which often signals the end of a downtrend and beginning of a new bullish phase. The price is currently pulling back, testing the breakout zone — a crucial step in confirming the validity of the breakout.
If this retest holds, we may see a sharp move toward the 0.8460 and 0.8560 levels — both key resistances based on past price action.
This pattern reflects a deeper market psychology shift — from consistent bearish dominance to a potential bullish takeover. Smart money may already be positioning here.
I’m watching for confirmation at the support zone around 0.8390. If price holds and breaks above local highs, a continuation toward the upper resistance is likely.
Let the market come to you. Don’t chase. Wait for structure, then trade with confidence.

EUR/USD Breakdown Imminent – Rising Wedge at Major ResistanceOn the 1H chart, EUR/USD has developed a Rising Wedge pattern, a classical bearish reversal formation. The pair has been moving higher within a tightening structure, marked by converging trendlines—indicating weakening bullish momentum.
What makes this pattern more compelling is that it’s occurring just below a well-defined Major Resistance Zone around 1.1380–1.1400, where previous attempts to break higher have failed. This area has historically acted as a strong supply zone, increasing the probability of a reversal.
🔍 Key Technical Components:
Rising Wedge Pattern: The wedge reflects a temporary uptrend with weakening strength. Bullish candles are getting smaller, and volume appears to be fading (not shown here but typically expected in this setup).
Black Mind Curve Support: A custom support curve illustrating the underlying parabolic trend. Once this is broken, it often leads to a steeper selloff.
Change of Character (CHOCH): Around the 1.1260 level, there's a possible shift from bullish to bearish structure. If price breaks and closes below this level, it will likely confirm a momentum reversal.
Target Projection: The measured move and previous structural support suggest a drop toward 1.11479, which coincides with a prior demand zone. This also aligns with a potential liquidity sweep beneath recent lows.
🔔 Price Action Signals to Watch:
Bearish engulfing candles or strong rejections from the wedge’s upper boundary.
Breakdown below the lower wedge line and the curved support.
CHOCH confirmation – market structure shift from bullish to bearish around 1.1260.
Retest of the wedge breakout level, followed by continuation to the downside.
📌 Trading Plan (Not Financial Advice):
Entry: On break and retest of wedge support.
Stop Loss: Above the wedge high or resistance (~1.1400).
Target: 1.11479 for first take-profit level; partials can be taken at 1.1260 if needed.
📉 Bias:
Short-Term Bearish – Only upon wedge breakdown and confirmation.
🧠 Minds Section (Expanded for Traders' Perspective)
EUR/USD is approaching a critical technical juncture. We are seeing a textbook rising wedge formation into a major resistance zone, signaling exhaustion of bullish strength. While the pair has enjoyed upward momentum, price action is showing signs of slowing, and the structure is no longer sustainable.
This pattern often traps late buyers before reversing. We are closely watching the lower wedge boundary and curved support—a breakdown here will likely trigger bearish momentum, especially with the CHOCH area near 1.1260 acting as a structure-defining level.
If sellers gain control and the breakdown confirms, there’s high probability for a fall to 1.11479, targeting prior demand zones and potential liquidity pockets.
Now is the time to be cautious if long, or begin planning short setups. Wait for confirmation—no need to rush the trade.

EURUSD - SHORT PREDICTION - MONDAY, 26TH MAY 2025A pullback appears to be underway, following a sweep of inducement around the 15-minute level at 1.13900—marking our first significant Change of Character (CHoCH). This shift aligns with the broader narrative from the 1-hour timeframe, suggesting the potential for a deeper retracement into the extreme 1H order block.
With the current price trading around 1.13777, we anticipate a move back up to the 1.14078 level. This area is of interest for initiating short positions, in line with the ongoing correction.
Our first take-profit target is set at 1.13368, where we expect an initial reaction. Should bearish momentum continue, we foresee price extending lower to sweep the previous daily low at 1.12771 and potentially tapping into the daily external order block at 1.12664.
From there, we’ll closely monitor price behavior. If bullish intent begins to form, we’ll assess the potential for long setups targeting a move back toward the weekly high at 1.14190.

JPY/USD Rising Wedge Breakdown – Bearish Reversal in Play🔎 Technical Breakdown:
1. Rising Wedge Formation:
The pair has been trading within a Rising Wedge, a bearish reversal pattern that forms when price makes higher highs and higher lows but with diminishing momentum. The wedge is visible from the swing low on May 13, where price began to climb aggressively but within increasingly narrow price action. This narrowing range signals weakening bullish strength.
2. Key Resistance Zone:
The wedge forms right below a Major Resistance Zone marked earlier in the chart (around 0.007050), where price had previously faced heavy selling pressure. This adds confluence to the bearish bias, as the zone historically acted as a turning point.
3. SR Interchange Zone:
Below the wedge lies a Support-turned-Resistance (SR) Interchange level, a critical price area where past support may now act as resistance if the price attempts to retrace. This is a commonly watched level by institutional and technical traders.
4. Breakdown Confirmation:
The price has broken below the wedge's lower trendline, which is often considered the breakdown signal. A valid breakdown typically includes a close outside the wedge body followed by a retest or continuation.
5. Bearish Target:
The projected move is toward 0.006796, derived by measuring the wedge height and applying it from the breakdown point. This level aligns with a historical support zone, adding more confluence to the target.
🧠 Psychological & Structural View:
Bullish exhaustion: Buyers pushed price higher into resistance, but momentum slowed, signaling exhaustion.
Trapped longs: Traders who entered late in the wedge may now be trapped, potentially accelerating a sell-off as they exit.
Smart money behavior: Rising wedges near resistance often signal distribution by smart money before a drop.
🛠️ Trading Plan Suggestion (Not Financial Advice):
Entry: After a clear wedge breakdown, consider short entries on a retest of the broken trendline or a bearish candle confirmation.
SL: Above the wedge high or major resistance zone.
TP: Staggered exits below 0.006850 and final target around 0.006796.
🔁 What to Watch For:
Retest of the wedge breakdown (potential short entry zone)
Momentum confirmation via volume or bearish candles
Price reaction at SR Interchange and final support target
🧠 Minds Section – Condensed Summary
JPY/USD formed a Rising Wedge below major resistance, signaling bullish exhaustion. Price has broken down from the wedge, confirming bearish momentum. A clean breakdown targets 0.006796, with SR interchange acting as a minor support. A retest of the wedge breakdown could offer a good short opportunity.

XAGUSD Technical Analysis : MMC Breakdown from Resistance ZoneChart Concept: By Using MMC – Mirror Market Concepts
🔎 1. Major Resistance Zone – The Brick Wall
At the top of the chart, around $33.85–$34.00, we see a strong major resistance zone. This area has acted as a ceiling for price multiple times in the past. Think of it like a brick wall where the bulls keep trying to break through but get pushed back. When price touches this level and fails to break above it, that’s a clear rejection.
This rejection gives the first sign that buyers are losing steam and sellers are stepping in.
🧠 2. Mirror Market Concept (MMC) in Action
Using the MMC (Mirror Market Concept), we’re treating the chart like a reflection — what happened on one side of the move is likely to mirror or repeat on the other.
So when price aggressively moved up into resistance, you look for a symmetrical move back down once it's rejected — just like looking in a mirror. This concept helps predict where price might land based on previous movements, levels, and psychological patterns.
🧱 3. SR Interchange Zone (Support ↔ Resistance Flip)
Look around the $33.10–$33.25 area — this is a critical SR interchange zone. Price used this zone as resistance in the past, broke above it, and then used it as support.
Now that price has rejected from the top, it’s coming back down to retest this SR zone. If it breaks below this area, it confirms a shift in market structure—from bullish to bearish.
🌀 4. Black Mind Curve Support – Dynamic Support
That curved black line? That’s not just a drawing — it's called Mind Curve Support in MMC. This curve helps map out dynamic support based on price memory and human psychology.
As long as the price respects that curve, the structure is bullish. But once it breaks below it — like it’s threatening to do now — it often means momentum has shifted and a correction is underway.
⛓️ 5. Bearish Breakdown Structure
Once price touched the major resistance, it formed two swing highs labeled TP1 and TP2. That’s very similar to a double top pattern, which is a strong bearish reversal signal. After the second peak, price dropped sharply — that’s your early confirmation of a potential move lower.
And now, price is forming lower highs and lower lows, another classic sign of bearish momentum taking over.
🎯 6. Target Zone – Why $32.72?
Here’s where MMC really helps:
The projected target zone is $32.72, which is marked in the chart.
Why this exact level?
It’s previous market structure (support zone from earlier)
It aligns with the 50% Fibonacci retracement
It’s the mirror reflection of the bullish move, completing the MMC concept
This is a high-probability area where buyers may step in again.
💼 Trade Setup Summary (Educational Only)
Parameter Level
Entry Below $33.20 after confirmation candle
Stop Loss Above $33.85 (recent high)
Take Profit $32.72 (MMC Mirror Target)
🧠 Final Thoughts – The MMC Edge
This chart isn’t just about lines and levels. It’s about understanding how traders think — where they get excited, scared, greedy, or exhausted. That’s what Mirror Market Concepts (MMC) are built on.
By recognizing structure, psychological curves, and SR flips, you're not just guessing—you’re reading the market’s mind.
⚠️ Risk Disclaimer
This is not financial advice. Always use proper risk management and confirm setups with your own trading plan before entering any trade.

Bitcoin (BTC/USD) Bullish Breakout – Targeting $116K Using MMCBitcoin has printed one of the most powerful continuation setups in technical analysis — a Bullish Pennant — and it's playing out beautifully, backed by Mirror Market Concepts (MMC). Let's break down the structure, the reasoning behind this move, and how smart money could be driving this price action.
📈 1. Market Context – The Impulsive Rally That Set the Stage
The first thing to notice is the strong bullish move that occurred before the pennant started forming. This rally is important because a Bullish Pennant is a continuation pattern, and without a strong preceding trend, the pattern loses its credibility.
This initial move acts as the “pole” of the pennant — a clean, impulsive leg upward, driven by demand and momentum.
Such moves are often the result of strong buying from institutions, retail FOMO, or positive macroeconomic catalysts.
🧠 Psychology Insight: The rally injects confidence into the market. Buyers who missed the move now wait for a pullback, while early buyers prepare to scale in on continuation.
🔺 2. Bullish Pennant Structure – The Calm Before the Next Storm
After the bullish pole, the price enters a tight consolidation phase, forming a symmetrical triangle:
Lower highs and higher lows compress price into a pennant shape.
Volume usually declines during this phase, showing that the market is resting, not reversing.
The market is essentially "charging up" for the next big move.
💡 Why This Matters: The Pennant shows temporary equilibrium between buyers and sellers. A breakout typically signals which side wins — and in this case, buyers have taken control.
🪞 3. Mirror Market Concepts (MMC) – The Secret Weapon
This chart also showcases the power of MMC (Mirror Market Concepts), a strategy based on the idea that the market tends to reflect its previous behavior, structure, and reactions.
Here’s how MMC applies:
The price broke out of the pennant, then came back to retest the breakout area, just like it did during the previous breakout from the consolidation zone.
The Mini SR – Interchange zone acted as resistance before, and now it’s acting as support — a classic Support/Resistance flip (SR flip).
The retest behavior mirrors the earlier breakout structure, offering a confirmation that the market is following a familiar rhythm.
📊 Trading Logic: When a market behaves similarly at two different points in time, it’s often a signal of institutional activity — "smart money" repeating proven entry points and exits.
🔁 4. Retesting – The Entry Opportunity for Smart Traders
After the breakout from the pennant, price didn’t just shoot up — it pulled back to retest the broken structure. This is a high-conviction setup in technical trading:
✅ Retest confirms the breakout was valid (not a fakeout).
✅ It provides a safe entry point for traders who missed the initial impulse.
✅ Volume and bullish candle structure post-retest indicate buyer interest.
📌 The Mini SR – Interchange zone, around $106,631.69, acted as the perfect launchpad for the next bullish leg.
🎯 5. Trade Setup – High R:R Swing Opportunity
Let’s look at the exact setup this chart offers:
Entry: After the breakout and retest near $107K–$108K
Stop Loss (SL): Below the support zone at $106,631.69
Target (TP): At $116,105.65 — derived by projecting the height of the pole from the breakout zone
This gives an excellent reward-to-risk ratio, a key principle in sustainable trading.
🧠 6. Psychological Fuel – Why This Move Has Legs
Traders who missed the earlier rally are now watching closely for entries.
Retail traders are seeing confirmation.
Institutions may already be in from lower levels and are now defending support zones.
Sentiment is bullish post-retest, increasing volume and momentum.
It’s a self-fulfilling prophecy: as more traders recognize the pattern and the confluence, the trade becomes even more likely to play out.
🗓️ 7. What to Watch Next – Smart Risk Management
Even though the pattern looks strong, smart traders always remain cautious:
✅ Move SL to breakeven once price moves halfway toward the target.
🔄 Consider taking partial profits near interim resistance zones (like $112K).
📆 Stay alert for economic events or Bitcoin news that could cause sudden volatility.
📘 Conclusion: Bullish Setup with Proven Structure and MMC Confirmation
This BTC/USD chart is a textbook example of a Bullish Pennant breakout, with added strength from Mirror Market Concepts and a clean SR Flip retest. For swing traders and price action lovers, this setup offers a structured, strategic, and smart opportunity to ride the next wave of Bitcoin momentum.

GBPAUD - One More Leg for Bears to Take Over!Hello TradingView Family / Fellow Traders. This is Richard, also known as theSignalyst.
📈GBPAUD has been overall bullish trading within the rising channel marked in blue.
However, it is currently approaching the upper bound of its channel acting as an over-bought zone.
And the $2.1 - $2.104 is a strong resistance zone.
🏹 Thus, the highlighted red circle is a strong area to look for sell setups as it is the intersection of resistance and upper blue trendline acting as a non-horizontal resistance.
📚 As per my trading style:
As #GBPAUD is around the red circle zone, I will be looking for bearish reversal setups (like a double top pattern, trendline break , and so on...)
📚 Always follow your trading plan regarding entry, risk management, and trade management.
Good luck!
All Strategies Are Good; If Managed Properly!
~Rich
Disclosure: I am part of Trade Nation's Influencer program and receive a monthly fee for using their TradingView charts in my analysis.

Gold (XAU/USD) Technical Analysis – Rising Wedge Breakdown & MMC🧠 2. Introduction to Mirror Market Concepts (MMC):
MMC, or Mirror Market Concepts, is a powerful technique that views price action as symmetrical or repetitive in nature. In this scenario, we notice that the right side of the chart mirrors the left — suggesting that after this bullish climb, the market might repeat its earlier bearish behavior but in a reflected pattern.
This adds confluence to our bearish outlook and makes the forecast more robust.
🔺 3. Rising Wedge Pattern – Bearish Reversal Signal:
The most critical part of this analysis is the formation of a Rising Wedge — a classic reversal pattern. Let’s break down what it means:
Structure: The wedge is formed by two upward-sloping trendlines converging at the top.
Volume Behavior: Volume typically decreases as the wedge matures, showing that bulls are losing strength.
Psychology: Buyers keep pushing the price higher, but each move has less momentum than the last. Sellers are quietly preparing for a breakdown.
The moment price breaks below the wedge’s lower trendline, it usually triggers panic selling or aggressive short entries.
🔄 4. Key Price Levels & Zones:
Minor Resistance Zone: Price rejected near a historical resistance area, showing sellers are still active.
Previous Target Zone: This area acted as a ceiling before the rejection — important for reversal confirmation.
SR Interchange Zone: A classic zone where support becomes resistance — this adds strong confluence to the reversal idea.
🎯 Bearish Trade Plan & Take-Profit Levels:
Once the wedge breaks down, the projected move is based on measured moves and prior support levels. Here’s the breakdown:
✅ TP1 (Take Profit 1): 3,275.30 – This is the first key support level right after the wedge breakdown. Ideal for partial profits.
✅ TP2: 3,205.64 – Previous support zone from earlier consolidation. High probability target.
✅ TP3: 3,169.18 – A more extended target that aligns with historical price memory and full wedge depth.
Each TP level is supported by historical price structure and previous volume clusters.
⚠️ Risk Factors & Trade Management:
While this setup looks strong, always consider:
False Breakouts : Wedges can fake out traders. Wait for candle close confirmation below the wedge.
News Events : Macroeconomic announcements (especially U.S. dollar data) can reverse technical setups.
Risk-to-Reward: Don’t enter without calculating your stop loss above the wedge and aiming for at least a 1:2 ratio.
🧠 Conclusion – What This Setup Tells Us:
This chart is a perfect blend of price action + market symmetry (MMC). The rising wedge signals that bulls are running out of steam, while MMC suggests a mirrored decline could follow.
If price action confirms the breakdown with momentum and volume, this could be a high-probability short setup for swing traders and intraday players alike.

GBPCHF: Long Setup – Bounce from Trendline + EMA CrossThe price has bounced from the lower boundary of the ascending channel and confirmed a bullish reversal after EMA cross. Current momentum supports a long position.
📌 Entry: Market buy (current price ~1.1142)
🎯 Targets:
TP1: 1.1291 – minor resistance
TP2: 1.1394 – upper channel border
🛡️ Stop-loss: Below 1.1090 (under channel + EMAs)
This setup favors continuation of the bullish trend after liquidity grab and structure shift.

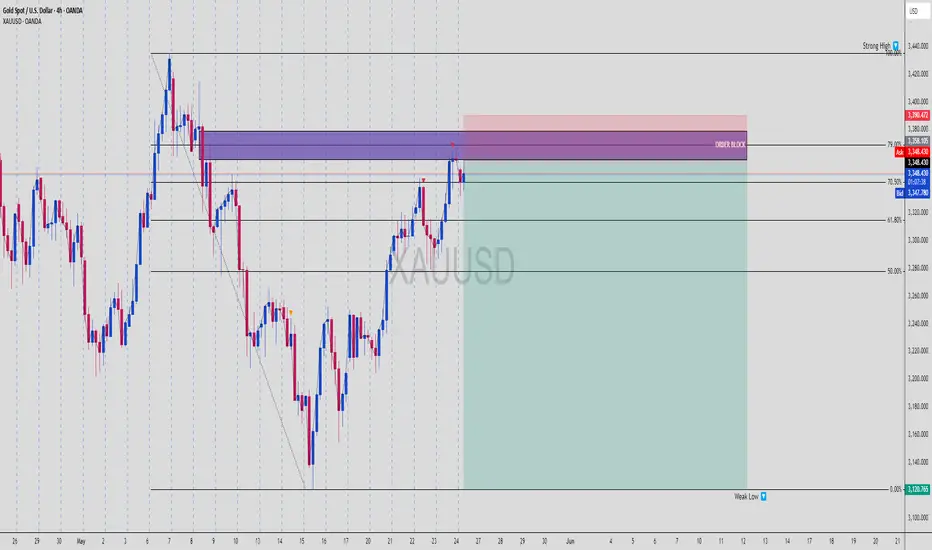
GOLD Short Setup – OB Rejection + FVG Play to Weak Low 📉 XAUUSD | 4H Short Setup – Classic Smart Money Reversal Zone
Gold is giving us a prime reversal opportunity off a stacked supply zone, aligning with:
🔵 79% Fibonacci Retracement
🟪 High-Timeframe Order Block (OB)
🚫 Failure to create a new high (bearish intent confirmed)
Let’s break it down:
🔻 1. Price Structure Insight
Clean swing high printed near 3400
Retraced down to a discount zone, then sharply reversed
Price now tapping into a premium supply zone between 70.5% – 79% Fib
🟣 2. Key Zone Confluence
📍 Order Block: The final up-candle before a massive drop = institutional sell zone
📍 Fibonacci Levels: 70.5%–79% = premium sell levels
📍 Internal Liquidity: Price swept local highs before stalling
📍 Strong High Above: Untouched = inducement for future sweep (or rejection fuel)
Everything screams Smart Money Sell Setup 📉
🎯 3. Trade Idea
Sell Entry: Around 3,348
Stop Loss: Above OB & Strong High ~ 3,390
Take Profit: 3,120 (clear weak low = liquidity pool)
⚖️ 4. Risk-Reward Ratio (RRR)
📥 Entry: 3,348
🔒 SL: 3,390
💰 TP: 3,120
✅ RRR ≈ 1:5.4
Perfect textbook SMC setup—high confluence + asymmetric RRR = 🔑
🧠 5. Why This Setup Works
Retail traders are lured into longs after bullish push
Smart Money taps OB, rejects hard at premium
Target: internal liquidity resting at weak low (3120)
This creates a controlled sell-off that avoids grabbing the strong high
🟢 Drop a “GOLDEN SHORT 🪙💥” if you caught this setup before the crowd
💾 Save it for reference – this is how institutions trap liquidity
📤 Share with your trading fam — this setup is 🔥🔥🔥