XAUUSD Daily Sniper Plan – July 14, 2025Hey team 👋 and welcome to a fresh new week on the charts!
We’re starting this Monday without any major news — just pure price action, clean zones, and structure doing all the talking. No distractions. No excuses. Let’s lock in our focus and let the market show us where the edge is.
🔸 Bias: Bearish while below 3390
Last week’s rejection from the H1 premium zone (around 3375) created clear signs of exhaustion. Price is now forming lower highs and lower lows, with clean CHoCHs on both H1 and M15. Until we reclaim 3390, we remain bearish — waiting for the next lower high to form.
🔽 Sniper Sell Zones (above current price)
3360–3370 → H1 premium FVG + CHoCH OB + EMA5 cap
3380–3390 → Inducement zone + internal imbalance + RSI divergence
🔼 Sniper Buy Zones (below current price)
3310–3320 → Discount FVG + BOS base + HL support
3280–3290 → Final HL structure zone + fib 61.8% + OB + RSI oversold
🟡 Decision Zone:
3330–3340 → Neutral zone
→ Wait for break and retest or rejection confirmation.
→ No setup = no trade.
🧠 Battle Plan – Execution Scenarios:
🔴 Scenario A – Bearish Setup Active:
If price returns to 3360–3370 or 3380–3390 and shows M15/M30 rejection → enter short.
Target: 3330 → 3310.
If 3390 is broken and held → cancel short bias.
🟢 Scenario B – Bullish Setup Activated:
If price sweeps 3320 or 3290 and reacts with strong bullish PA (engulfing or CHoCH) → enter long.
Target: 3340 → 3360.
No confirmation = stay flat, do not anticipate.
🟡 Scenario C – No Reaction / Choppy Flow:
If price consolidates between 3330–3340 without clean rejection or break → wait.
Let price show its hand. Today is Monday — we need clarity, not emotion.
Every level in this plan was drawn with purpose — no shortcuts, no borrowed zones.
If you value structure, discipline, and originality in your trading, you’re in the right place.
Your support means everything — I see every 🚀 and every comment, and I appreciate this community deeply.
Let’s keep growing, with real work and real structure.
Follow GoldFxMinds — we stay sharp, we stay true. 💛
📎 Trade Nation Disclaimer
Chart and structure based on Trade Nation broker feed on TradingView. For educational purposes only — not financial advice.
Sniperentry

Gold Setup for July 3th: Don’t Get Caught in the Liquidity Net🌙 Good evening, sniper — lock in, load up, and let’s dance with Thursday’s chaos 💣
🌍 Macro & Geopolitical Pulse
Thursday’s setup is not for amateurs:
🔸 Non-Farm Employment Change
🔸 Unemployment Rate
🔸 Initial Jobless Claims
🔸 ISM Services PMI
🔸 Factory Orders
Add to that:
• A Fed still talking tough on rates
• Geopolitical flare-ups in the Black Sea and Middle East
• Gold trading deep into premium…
💡 This is where markets hunt weak hands, then flip direction without mercy.
We don’t chase candles. We wait for exhaustion. Then we execute.
🎯 Bias Snapshot (D1 → H4 → H1)
• Daily closed bullish but deep into old CHoCH + OB
• H4 printed HHs, but structure now presses into stacked supply
• H1 shows momentum fading — RSI divergence + weakening push
📌 Core bias: Still bullish — but every pip above 3360 is loaded with risk.
If 3380 fails to break cleanly, expect rejection.
If it breaks — the market likely wants full liquidity above 3400.
🗺️ Battlefield Zones
🟢 Buy Zone #1 – 3310 to 3320
The sniper’s discount pullback: Fibo 38.2%, M30 OB, EMA 50, and clean imbalance.
Wait for news spike + bullish confirmation to go long.
🟢 Buy Zone #2 – 3285 to 3295
The deep reaction zone.
Fibo 61.8% + OB + gap. Enter only on violent wick and rejection — but RR is exceptional.
🟡 Flip Zone – 3334 to 3340
This is where momentum flips:
• Hold above = continuation toward premium
• Break below = bearish reversal unlocked
No entries here — this is your compass, not your trigger.
🔴 Sell Zone #1 – 3357 to 3366
Classic CHoCH retest. H1/H4 OB with layered liquidity.
If price rejects here on post-news spike — short it back toward the flip.
🔴 Sell Zone #2 – 3387 to 3395
Top-of-range sweep.
If gold blows through zone 1, this becomes liquidity trap central.
Wait for rejection wick + bearish PA confirmation.
🔴 Sell Zone #3 – 3410 to 3420
The final premium kill zone.
This is where the market finishes stop-hunting every breakout buyer.
Fibo extension 1.272–1.618 hits here. If we wick this zone and stall — sniper short back to 3380–3366.
⚔️ Execution Blueprint
Wait for news to trigger the chaos — early entries are a donation.
Short 3357–3366 on exhaustion → target flip zone.
If price overextends into 3387–3395, get ready for the reversal play.
Extreme spike to 3410–3420? That’s your killshot short — ride it back down.
If price retraces into 3310–3320, it’s your safe sniper long.
Panic into 3285–3295? Deep long entry, only with confirmation.
Watch the flip zone (3334–3340) — above = bullish bias holds; below = bears back in control.
🎯 No guesswork. No hope. Just precision. Wait, confirm, and strike.
💬 Let’s stay sharp tomorrow — market will offer clean setups, but patience and clarity are key.
If this plan helped, drop a comment or share your thoughts below.
👉 Follow GoldFxMinds for daily sniper-entry plans crafted with precision.
Smash that🚀🚀🚀 if this plan sharpened your edge.
📝 You already know — we don’t guess, we execute. 🦅
Good night, snipers 💛
⚠️ Disclosure
I’m part of TradeNation’s Influencer Program and use their TradingView charts for analysis & educational content.

GoldFxMinds XAUUSD Daily Sniper Plan – July 1🌅 Good morning, gold hunters!
The start of a new month is here, and price action is as wild as ever! Yesterday’s liquidity raids swept both sides, leaving most traders guessing – but structure never lies. Let’s break down exactly where the real money sits for July 1, so you never get caught on the wrong side of gold.
🌎 Macro, News & Geopolitics
Macro: US data is in focus (ISM PMI, JOLTS, Powell speech), keeping volatility high and liquidity pools exposed.
Geopolitics: Tensions persist globally but no fresh headlines – market is pure price-driven.
Sentiment: Bulls got trapped high, sellers are hungry for a deeper sweep. Don’t trust easy breakouts!
🏛️ HTF Bias Recap
Weekly: Bullish structure, but overextended. Pullback zones active, buyers get best deals only at true discount.
Daily: Strong wick rejections at supply, sellers showing teeth. Watch for lower highs and failed breakouts.
H4: Range between 3332 and 3258, liquidity building at both edges. Smart money will hunt stops before any trend is real!
🔑 H4 Key Structural Levels
Premium Supply: 3320–3332 (main unmitigated supply block)
Mid Range Decision: 3296–3306 (watch for PA shift, don’t force entries here)
Discount Demand: 3272–3258 (clean OB/imbalance confluence)
Deep Discount Demand: 3232–3218 (ultimate liquidity pocket)
🎯 Sniper Zones (M30/M15 Refined)
SELL Zones:
3320–3332:
The untouched supply – only sell if PA prints a reversal after a NY liquidity grab. Don’t jump in early!
3345–3360:
Extreme extension zone. If price overreaches, look for signs of exhaustion. This is the bear’s last stand!
BUY Zones:
3272–3258:
True discount! Wait for a stop run below 3275, then catch the bounce ONLY if you see confirmation (engulfing, CHoCH, RSI support).
3232–3218:
No hope trades here. Only for flash crash or panic sell-offs with obvious absorption! Wait for a real PA reversal.
Decision Zone:
3296–3306
If price is stuck here, sit on your hands! Let the market show its hand first.
🚦 Quick Recap
Avoid already-mitigated zones – only hunt where liquidity is fresh!
NY session wicks and fake breakouts are the biggest traps. Be patient, let the stop hunt finish before you engage.
Confirmation over prediction. Discipline is your edge, not drawing boxes.
🎁 Bonus Tip
"Missing a sniper entry? The best traders never chase. Let gold come to you. There’s always a second chance for those with patience!"
📣 Like what you see?
Smash that like🚀🚀🚀 , drop your thoughts in the comments , and don’t forget to follow GoldFxMinds for more high-precision gold plans!
Analysis powered by Trade Nation chart feed – built for the sharpest minds in gold.

Battle Plan – 30 JuneHey, Snipers! It’s Sunday night, the real ones are back on the charts and the tourists are out of the game.
Last week, gold tried every trick in the book: fake bounces, liquidity sweeps, endless bearish grind. Every move up got sold. If you traded like a sniper, you’re still standing. If you chased dips blindly, you’re probably licking your wounds.
🌍Macro snapshot:
Dollar’s holding firm — no rescue from US news, just choppy reactions.
War headlines are everywhere, but structure is king: EMAs are stacked, every rally is just bait for liquidity.
Market’s running on fear and patience. Fast money gets chopped, disciplined money survives.
Sniper Mindset:
⛔No bias, no forced trades. The real win is in the waiting.
Structure will show you who’s in control — your job is to react, not predict.
🥷 GoldFxMinds Battle Plan – 30 June (Trade Nation Feed)
Demand (Buy) Zones:
3265–3245: The “half-mitigated” trap. Most buyers are already underwater — we wait for a real PA shift. First green candle? Ignore it. Let them get trapped.
3215–3200: This is the sniper zone for real discount hunters. If price freefalls, we watch for exhaustion, divergence, and a proper story. One clean engulfing here and the bounce can be massive.
3180–3160: Only for flash crash days — this is where pain turns into opportunity. But you wait for panic, not “hope trades.”
Supply (Sell) Zones:
3287–3300: First sell window — if price spikes, watch for that classic NY liquidity grab and an instant rejection.
3320–3335: The “don’t even try to buy here” zone. OB, FVG, and every EMA lines up — if the market gets here, expect a brutal fade.
3345–3360: Premium fantasy land for sellers. If bulls get cocky, this is where the big shorts reload for the next leg down.
🧠Sniper Mindset:
EMAs stacked above? No dreams, only discipline.
No confirmation in your zone? Stand down — the market isn’t your friend.
Most traders buy “cheap” — we buy right.
If the story’s not clear, patience pays. The first bounce is a trap, the second is the setup.
📝June’s about to end. Let’s close it out with surgical entries and sniper exits.
Stay sharp, stay humble, and let the crowd chase while we collect.
🧠Remember: green candles aren’t invitations, they’re traps for the impatient.
Wait for confluence, act on logic, and journal every single lesson.
Gold rewards discipline — not luck.
If you’re serious about gold, learn this:
Zone + confluence + confirmation = sniper entry.
Anything else is just gambling with a nice chart.
Review your trades, journal your mistakes, and stop blaming the market for your impatience.
Hit like🚀, follow, and drop your trading question if you want the next level.
See you on the Trade Nation feed.

XAUUSD BATTLE PLAN — 16 JUNE 2025GoldFxMinds — Sniper Liquidity Execution
👋 Hello traders — we’re entering a highly tactical week where liquidity rotation dominates both sides of the board. This is no longer trend-following — this is liquidity chess.
🔎 Market Narrative
Gold remains structurally bullish after a clean sequence of higher lows: 3120 → 3246 → 3448.
Last week’s sweep above 3447 cleared weak hands, activated premium liquidity traps, and left price fully positioned inside extended premium expansion. Smart money continues rotating liquidity aggressively as markets prepare for this week’s heavy catalysts.
With FOMC, Powell’s press conference, Fed projections, and Middle East tensions all unfolding, institutional positioning is building quietly beneath surface price moves.
For us, this is not a moment to guess or force trades — this is the phase where patience and structure offer the only real edge.
🎯 GoldFxMinds Bias for 16 June 2025
🔼 Short-term:
Price remains inside premium expansion, with open liquidity layers above 3450 → 3480 → 3505 still uncollected. We allow price to finish hunting late buyers before considering any premium exhaustion reactions. No blind shorting inside premium unless exhaustion signals confirm.
🔽 Medium-term positioning:
Controlled pullbacks into 3368 and deeper recalibration zones offer the cleanest tactical long opportunities, aligned with higher timeframe bullish structure for potential future premium expansions.
❌ No aggressive directional conviction intraday:
The current structure demands discipline, patience, and reactive execution — not early bias.
🔼 Premium Supply Zones (Sniper Calibrated)
Price Zone Explanation
3450 – 3462 🔸 Premium inducement zone — early liquidity pocket where price may react mildly before sweeping deeper premium levels.
3480 – 3495 🔸 Liquidity collection extension — gap zone drawing in late buyers and liquidity build-up above recent highs.
3505 – 3515 🔸 Premium exhaustion — final sweep level for late liquidity grabs before potential higher timeframe recalibrations.
🔽 Demand Defense Zones (Sniper Calibrated)
Price Zone Explanation
3410 – 3400 🔸 Micro pullback — short-term liquidity refill zone valid for scalps, not for strong swing positioning.
3368 – 3352 🔸 Tactical bullish recalibration — strong HTF OB + FVG combo, valid for tactical swing positioning with structure confirmation.
3308 – 3292 🔸 Institutional re-accumulation base — deeper liquidity recalibration where larger players likely step in for new expansions.
🎯 Execution Flow & Tactical Outlook
We let liquidity fully expose itself before positioning:
Above 3450: Expect continued liquidity sweeps. Monitor sharp reactions above 3480 for exhaustion setups — only trade short-side if clear rejection signals emerge.
Into pullbacks: Minor dips toward 3410 offer quick reactive scalps only. The real positioning opportunities open inside 3368 and deeper zones, where recalibration offers cleaner entries aligned with HTF bullish structure.
Discipline is key: No chasing. No prediction. Only reaction to clean liquidity behavior.
🧠 Trader’s Mindset for This Week
We're facing one of the heaviest institutional risk weeks:
🏛 FOMC Interest Rate Decision → Major market-moving catalyst.
🏛 Powell’s Press Conference → Immediate tone-shifting potential.
📊 Fed Projections → Will influence short-term USD positioning.
📊 Retail Sales & Housing Data → Potential intraday volatility triggers.
🌍 Middle East Tensions → Underlying risk bid remains supportive for gold.
Each event is fuel for liquidity displacement. We don't react emotionally — we position where liquidity delivers.
🚀 If this battle plan helps you stay fully locked — drop a 🚀, share your views, and follow GoldFxMinds for sniper liquidity updates throughout the week.
Stay sharp — liquidity always moves first.
— GoldFxMinds

XAUUSD H4 Outlook — 16 June 2025👋 Hello team, here’s where we stand before the upcoming key week:
🔎 The Narrative
Gold remains in bullish control after weeks of controlled expansion.
The clean breakout above previous major highs triggered liquidity resets that cleared significant weak-handed positions.
Last week’s sweep into 3447 activated premium liquidity, trapping late buyers at the edge of impulsive highs. But the game is far from over — smart money continues to rotate liquidity at these extreme levels, using premium expansion to build further trap pockets both above and below.
Behind this technical expansion, macro tensions continue to fuel underlying gold demand. Geopolitical uncertainties remain elevated with the Middle East escalation risk growing, while recent Fed positioning keeps rate path expectations flexible.
The upcoming FOMC decision later this week will likely act as the true liquidity catalyst — until then, gold remains positioned for further inducement cycles as both buyers and sellers continue to get baited into traps.
🔼 Premium Supply Zones
Price Zone Description
3447 – 3470 Weak high sweep — premium liquidity trap fully active
3500 – 3525 Main extension liquidity pocket — Fibonacci cluster (1.272 & 1.414 extensions)
3550 – 3570 Exhaustion inducement — full 1.618 premium extension stack
🔽 Demand Defense Zones
Price Zone Description
3415 – 3395 Minor imbalance recalibration — short-term liquidity refill zone
3365 – 3345 Core breakout OB + FVG overlap — main recalibration zone if pullbacks extend
3285 – 3265 HTF bullish structure base — BOS origin + deep recalibration defense level
🎯 Where We Stand Right Now
✅ Smart money holds full control inside premium expansion.
✅ Inducement layers remain open both above and below current price.
✅ We expect short-term liquidity sweeps before any major expansion unfolds.
✅ No change in bias — bullish structure remains valid while 3285 holds.
🔐 The Mindset
👉 This is not the place for aggressive chasing.
👉 Liquidity will continue to hunt both sides into key events ahead.
👉 Our job is not to predict, but to position with discipline once liquidity confirms displacement inside the calibrated zones.
🚀 If this breakdown helps you stay locked:
💬 Drop a 🚀, leave your thoughts & follow for full sniper-level updates as we approach a volatile week ahead.
Stay sharp — the trap is already in play.
— GoldFxMinds
BTC Short Setup! Break of Structure + OB + 70.5% Premium TapBitcoin (BTCUSD) | 30-Min Chart – Clean Bearish SMC Setup
BTC just delivered a textbook Break of Structure (BoS) to the downside, and price is now retracing into a high-confluence premium zone packed with Smart Money signals: a bearish Order Block (OB), Fair Value Gap (FVG) alignment, and multiple Fibonacci retracement levels. This setup is precision-crafted for patient traders who wait for institutional footprints before striking.
🔍 Trade Breakdown:
🔺 Market Structure Shift:
Price broke decisively below the internal range, forming a clear BoS (Break of Structure). The lower low confirms bearish intent. Any retracement into premium is now a potential short opportunity.
📉 Bearish Order Block:
Marked just above the 61.8% Fib
Originated the strong bearish impulse that created the BoS
This is where Smart Money likely entered the move — we look to join them
🟣 Fair Value Gap (Imbalance Zone):
Gap within the OB
Price is likely to rebalance this inefficiency before continuing the bearish trend
📐 Fibonacci Levels (Swing High to Low):
50%: 103,617 (current price)
61.8%: 103,963
70.5%: 104,800
79%: 105,200
This premium zone (104,400–104,951) overlaps with the OB and FVG — massive confluence.
🧠 Smart Money Playbook:
🔹 Entry Zone:
From 103,963 to 104,951 — OB + FVG + 61.8–70.5% retrace = sniper entry window
🔻 Stop Loss:
Above 105,000 (protect against OB invalidation and final liquidity sweep)
📉 Take Profit:
100,464 — aligned with the low of the full fib swing and prior liquidity pocket
⚖ RRR:
Over 1:4 — clean sniper risk-reward with clear structure validation
📉 Bearish Continuation Expectation:
Price enters OB → taps imbalance → reacts at 70.5% level
Expected move: Sell-off toward the discount zone + full swing completion
Look left — no major support zones until the 100,400–100,600 level, making it a liquidity magnet and realistic TP zone.
💬 Ninja Wisdom:
Structure + Liquidity = Foundation
OB + FVG + Fib = Precision Tools
Trade where Smart Money enters — not where retail hopes. 🥷💸
📍 Save this chart – this setup could play out fast
🔁 Share your thoughts: will BTC respect the OB or break above?
👣 Follow @ChartNinjas88 for daily sniper-level BTC/ETH/Gold trades

BTC Long Triggered from OB, Smart Money Played This Perfectly!BTCUSD | 30-Min Chart – Long Setup Execution
Bitcoin has just activated a clean long entry from a well-defined bullish Order Block at a key structural level. This move follows textbook Smart Money Concepts (SMC) — the kind of play institutional traders thrive on.
🔍 Setup Breakdown:
🔹 Order Block (OB):
Identified near 105,636 — aligned with previous support
Precise reaction zone after consolidation, showing institutional interest
OB respected after fakeout below short-term liquidity
🔸 Liquidity Sweep:
Quick wick below 105,250 acted as a stop hunt for early shorts
Price reclaimed the OB immediately after → classic Smart Money trap
🟩 Entry Zone (OB Zone):
105,636–105,250 range
Confluence with minor bullish imbalance and structure support
Price barely tapped the zone before launching higher
📈 Upside Target:
TP marked at 108,979 — prior liquidity pocket and untested highs
Large green zone shows ideal RR (approx. 1:6)
First obstacle: minor resistance at 106,750, but momentum looks strong
🟥 SL Placement:
Safely below OB at ~105,161
Below liquidity sweep zone = strong invalidation
🧠 Why This Setup Works:
✔ Price moved impulsively into the OB
✔ OB lines up with previous structure support
✔ Rejection + strong bullish candle = confirmation
✔ No significant resistance until higher liquidity zones (108K+)
This is classic SMC execution: trap, sweep, OB tap, and send. Let retail panic — we follow footprints.
💬 Ninja Wisdom:
"Smart Money doesn’t chase price — it traps and collects."
This was a clean confirmation of a bullish continuation after reclaiming control from liquidity grabs.
📍 Save this chart – this setup could explode into a full bullish swing
💬 Drop your thoughts: Are we headed to 109K or pausing at resistance?
👣 Follow @ChartNinjas88 for more sniper-level BTC/ETH/Gold plays

BTCUSD Rejection Brewing? OB + 79% Fib Tap Could Trigger Short!Bitcoin (BTCUSD) | 30-Min Sell Setup – Order Block + Deep Fib Confluence
This is a classic Smart Money short setup. Price swept lows, rebounded into premium pricing, and is now approaching a high-probability rejection zone — just the way institutional traders like it. 🧠💰
🔍 Breakdown:
Market Structure:
Recent move formed a lower low ➝ market structure is bearish
Current retracement is corrective, moving toward premium sell-side levels
Key Confluences:
🔴 Order Block (purple zone): ~105,200–105,300
🔴 Fib Confluence:
61.8% = 105,178
70.5% = 105,298
79% = 105,388
🔴 Price is tapping OB + 70.5–79% fib zone = sniper territory for shorts
Liquidity Perspective:
Earlier liquidity grab below 104,500 triggered this move
Now climbing back into premium pricing — potential trap before drop
Above the OB: resting liquidity + stop hunts expected
Execution Strategy:
✅ Entry confirmation: Look for M5–M15 bearish engulfing / BOS in OB zone
🎯 Entry area: 105,280–105,388 (limit or confirmation-based)
🛡 SL above 105,400 (above OB & 79%)
💰 TP zone: 104,500 (liquidity pool + fib 0%)
⚠️ Risk-to-Reward Ratio: 1:3+ potential — ideal for scalpers and intraday traders alike
🧠 Chart Ninja Notes:
You’re not chasing highs — you’re stalking where Smart Money sells to the crowd. This is premium pricing in a bearish leg, and BTC is approaching the kill zone. Patience = profit. 😤💸
📈 Game Plan Summary:
🔹 Entry Zone 105,280 – 105,388 (OB + 70.5–79% fib)
🔻 SL Zone Above 105,400
📉 Target 104,488 zone (fib 0%, equal lows)
🎯 RRR Potential 1:3+
💬 Pro Tip:
Wait for price to enter OB and stall before pulling the trigger.
The best trades happen after liquidity is swept — not before.
You’re not a retail trader. You’re a sniper. 🥷💥
📥 Save this setup & review it post-trade
🔁 Share your entry plan in the comments
⚡️ Follow @ChartNinjas88 for daily Smart Money BTC plays

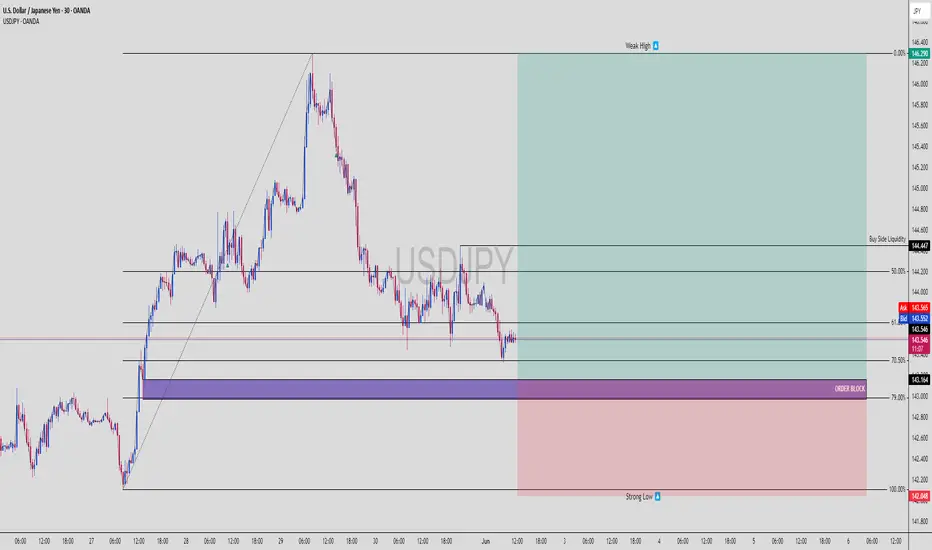
USDJPY Ready to Bounce – Sniper Long from Smart Money OBUSDJPY | 30-Min Bullish Setup – Premium to Discount + Order Block Reaction
USDJPY looks primed for a bullish reversal from a smart money perspective. Let’s walk through why this setup could be the cleanest long of the week 📈🧠
📌 1. Current Market Narrative:
Price retraced deep into discount levels (beyond 70.5%) after a strong bullish leg
Tapped into a refined bullish Order Block (OB) sitting just above a strong low
Multiple liquidity grabs have already occurred, leaving internal structure vulnerable to a reversal
Smart money has likely accumulated below recent lows… ready to pump toward Buy Side Liquidity 🧲
🧠 2. Key Technical Levels:
✅ Order Block Zone (Entry): 143.164
🔻 Strong Low: 142.048 (protected)
🟢 Buy Side Liquidity Target: 144.447
🔼 Weak High (Magnet): 146.290
Entry Point: Within OB (143.1–143.2)
TP Zones: 144.447 (main), 146.290 (stretch target)
SL: Below OB – around 142.048
RR: ~1:4+ — sniper grade 🥷
📊 3. Smart Money Flow:
OB aligned with 70.5–79% Fibonacci discount zone (deep retrace = strong reaction)
Structure shows signs of exhaustion on the sell side
Price may now reverse with displacement toward upside inefficiencies
Buyers likely stepping in aggressively from this level
🚀 4. Execution Plan (LTF Confirmation Entry):
✅ Wait for:
M5–M15 BOS (bullish break of structure)
FVG or mitigation entry confirmation
Maintain tight SL below OB (2–3 pips buffer)
Bonus: If price holds above 143.2 with strong M5 bullish candle close, that’s go-time for smart money longs.
🧨 5. Why This Setup is 🔥:
High probability bounce zone (OB + deep fib retrace)
Clean RR structure with solid target at buy side liquidity
Market structure shift likely as lower highs start breaking
Liquidity swept under recent lows = trap complete
This is the kind of setup that institutional algos are coded to exploit 🤖
💬 Type “USDJPY Long Sniper 🥷💴” in the comments if you’re in this setup too
🔁 Save this for trade journaling or future backtest
📊 Follow @ChartNinjas88 for smart money plays every day!
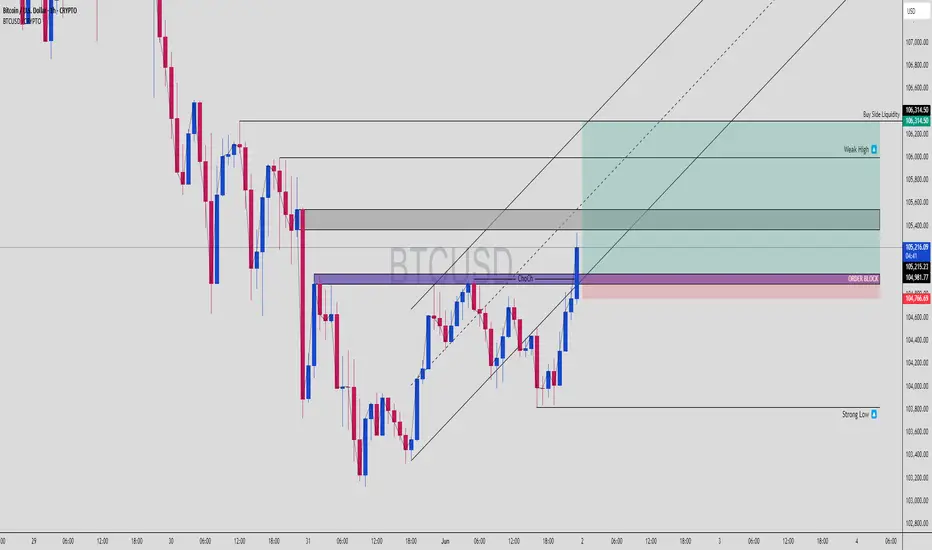
BTCUSD Hits Premium FVG – Liquidity Raid Incoming?BTCUSD | 4H Chart Breakdown – FVG, Order Block, and Smart Money Confluence
Here’s a killer SMC-based short opportunity forming on BTCUSD. Let’s decode this clean setup:
⚙️ 1. Market Structure Snapshot
Change of Character (ChoCH) confirmed on lower timeframe
Price aggressively retraced into a premium zone
Now tapping a combo zone:
✅ Fair Value Gap
✅ Order Block
✅ Sell-side OB mitigation
✅ Sitting right below Buy-Side Liquidity
We’re in prime territory for a liquidity raid followed by a sharp rejection.
📊 2. Key Price Zones
📈 Current Price: ~105,257
🟪 OB + FVG Zone: 104,766 – 105,257
🟦 Weak High (Target for Raid): ~106,200
🔻 Sell Setup Activation: If price shows rejection at OB zone
📉 Sell Target: 103,800 (Strong Low + liquidity pocket)
This is textbook bearish structure after a sweep of weak highs — time to watch the market respond.
🧠 3. SMC Logic Breakdown
ChoCH marks the first sign of bullish intent
But price is now entering a premium zone above equilibrium
Liquidity lies just above the weak high
We expect:
Raid of the weak high / buy-side liquidity
Rejection at the OB + FVG
Sharp drop to take out the strong low
This pattern = a high-probability SMC trap short.
📉 4. Risk-Reward Plan
🛑 Stop Loss: Just above 106,314.50
🎯 Take Profit: Near 103,800 (Strong Low)
🔁 RR: ~1:3 to 1:4 if you enter after a M5 rejection
🧼 Partial TP: Midway at 104,200 to reduce exposure
🧩 5. Entry Strategy
Monitor M5–M15 around OB + FVG zone
Wait for bearish engulfing / BOS
Refine entry with tighter SL
Let it play toward sell-side liquidity
⚔️ 6. Trader Notes:
Don't short early. Wait for reaction and structure shift
This is liquidity engineering – smart money lures in longs before nuking
Pair this chart with volume divergence confirmation if available
💣 Type "Liquidity Trap 💀" in the comments if this setup matches your bias
🔁 Save this if you scalp or swing SMC-based setups
🔔 Follow @ChartNinjas88 for clean smart money plays
BTCUSD Trendline Trap? Smart Money Short at FVG
🔍 1. Trade Idea Summary
Trendline gets violated ➝ retail panic
Price retests Fair Value Gap at a premium level
Confluence:
✅ Trendline break liquidity
✅ FVG mitigation
✅ Bearish order block zone
✅ Lower high structure formation
Targeting the weak low sweep around $100,773.
📊 2. Key Chart Levels
Entry Zone: $104,800 – $105,200 (FVG)
Stop Loss: Above $105,209
Take Profit: $100,773 (Weak Low / Sell-side liquidity)
RR: ~1:3+, textbook sniper setup
🧩 3. Smart Money Concept Breakdown
Trendline Break = Liquidity Grab
Price taps into a premium zone FVG + OB
Expecting:
Rejection candle formation
Lower time frame BOS
Sell-side liquidity target @ weak low
This is a setup you can replay again and again — pure institutional footprint.
⚙️ 4. Execution Plan
Monitor retest reaction near FVG zone
Look for M5 or M15 bearish BOS/CHoCH
Refine entry on confirmation
Lock partials near midpoint, TP at weak low sweep
⚔️ 5. Pro Tips:
Trendline breaks are often traps — always check where the liquidity hides
FVGs act like magnets — price often returns to fill the imbalance before real moves
Volume dying into FVG = 🔥 clue for rejection
📉 Comment "BTC Trap Sniper 🎯" if you saw this setup too
🔁 Save this chart for future reference
⚔️ Follow @ChartNinjas88 for more SMC breakdowns & fib-paired traps

BTCUSD – 5M Premium Zone Rejection | Short Setup Activated🧩 BTCUSD – 5-Minute Breakdown | May 4, 2025
The BoS has happened, but don’t let it fool you — price just entered the danger zone. This is where Smart Money loves to trap late longs and send price tumbling.
🧠 SMC Playbook:
🔨 BoS Identified: Minor bullish BoS after initial reaction from the previous low.
🟥 Supply Zone (Entry Area): 79%–100% retracement zone from the latest swing high to low.
🔄 Reversal Point: Entry just above the 79% zone (95,499–95,629).
🎯 Target: Weak Low = 95,200
🧼 Stop-Loss: Above 95,629 (structure invalidation)
📏 RR Ratio Potential: 1:3 to 1:4+
🔎 Narrative:
Price is engineered to grab liquidity before making the real move. The Strong High acts as protection — Smart Money is defending this area. Once the premium fills, we expect a clean breakdown back into the discount zone.
📊 Key Observations:
❌ Buyers are likely trapped.
📍OB tapped + Fibonacci 79–100% = High confluence.
💥 Expecting liquidity sweep → sharp sell-off.
⏰ Execution timeframe = M1/M5 confirmation (engulfing, CHoCH, etc.)
📣 How to Trade It:
Monitor price action inside red zone (79–100%).
Wait for lower timeframe confirmation (e.g. bearish engulfing, M1 CHoCH).
Short from ~95,500 with SL above 95,630.
TP at Weak Low → potential extension to 94,800 if momentum kicks in.
🧠 Chart Ninja Tip:
“Don’t chase price — trap it. Let price come to you and confirm. The premium zone is where trades go from good to god-tier.”
💬 Drop a 🧠 if you’re watching this level too.
📈 Save this chart for your next sniper entry.
🔁 Share it with your SMC crew and ride the liquidity wave!

USDJPY Long Setup: Triple Confluence Zone Locked InSmart money traders love one thing more than anything — confluence. This BTCUSD setup hits all the marks:
📈 Structure Breakdown:
Market breaks structure to the upside ✅
Impulsive bullish leg breaks prior high ✅
Pullback into 61.8% golden zone + OB ✅
Rejection wick = perfect entry confirmation ✅
This is a high-probability continuation setup after BTC made a clear bullish BOS (Break of Structure) on the M30 timeframe.
🟦 Order Block Zone:
OB Range:
Top: ~106,989
Bottom: ~106,759
This OB was the last down candle before the big bullish impulse that broke structure. Price returned to mitigate here, then instantly rejected = Smart Money entry confirmed 🔒
🧮 Fibonacci Levels:
61.8%: Sliced right into it
70.5% – 79%: Deeper liquidity zone just below
The entry wick taps right into the sweet OB/Fib confluence zone and launches 🚀. It’s giving sniper precision with a low drawdown entry.
🎯 Trade Parameters:
Entry: ~106,759
SL: Below the OB zone
TP: 108,022 (previous high)
That’s an RRR of around 3.5–4.0x — a clean asymmetric play, just the way smart money wants it.
🔍 Confirmation Factors:
Bullish BOS on M30
Price returns to OB zone + golden ratio
Clean rejection candle with demand absorption
No internal structure break = bullish narrative still valid
🧠 Key Lesson:
“When OB meets Fibonacci, don’t ask why. Load up — the market just told you why.”
Let setups like this come to you. No chasing, no emotions. Let the algo-driven footprints guide you to the money.
📈 Missed this one? Save it for your playbook — this is how high-probability trades are built.
Drop a 💰 if you caught the same move!

BTCUSD: 61.8% Fib + OB = Precision Long PlaySmart money traders love one thing more than anything — confluence. This BTCUSD setup hits all the marks:
📈 Structure Breakdown:
Market breaks structure to the upside ✅
Impulsive bullish leg breaks prior high ✅
Pullback into 61.8% golden zone + OB ✅
Rejection wick = perfect entry confirmation ✅
This is a high-probability continuation setup after BTC made a clear bullish BOS (Break of Structure) on the M30 timeframe.
🟦 Order Block Zone:
OB Range:
Top: ~106,989
Bottom: ~106,759
This OB was the last down candle before the big bullish impulse that broke structure. Price returned to mitigate here, then instantly rejected = Smart Money entry confirmed 🔒
🧮 Fibonacci Levels:
61.8%: Sliced right into it
70.5% – 79%: Deeper liquidity zone just below
The entry wick taps right into the sweet OB/Fib confluence zone and launches 🚀. It’s giving sniper precision with a low drawdown entry.
🎯 Trade Parameters:
Entry: ~106,759
SL: Below the OB zone
TP: 108,022 (previous high)
That’s an RRR of around 3.5–4.0x — a clean asymmetric play, just the way smart money wants it.
🔍 Confirmation Factors:
Bullish BOS on M30
Price returns to OB zone + golden ratio
Clean rejection candle with demand absorption
No internal structure break = bullish narrative still valid
🧠 Key Lesson:
“When OB meets Fibonacci, don’t ask why. Load up — the market just told you why.”
Let setups like this come to you. No chasing, no emotions. Let the algo-driven footprints guide you to the money.
📈 Missed this one? Save it for your playbook — this is how high-probability trades are built.
Drop a 💰 if you caught the same move!

USDJPY Tap and Dump – Perfect Lower Timeframe ReversalSmart Money Scalpers, it’s time to eat 🍽️
USDJPY just played into a beautiful supply zone rejection on the 30-minute chart, with clean confluence from structure, trendlines, and OB reaction. Let’s break it down like a pro:
🧠 Market Structure Narrative:
🔻 Strong bearish momentum
🔹 Price created a clear lower low
🔹 Pullback into a premium zone = sniper short entry setup
You’re looking at textbook bearish order flow, with price rejecting hard from the 143.805 zone, which served as a high-risk institutional POI (Point of Interest).
🟥 Supply Zone / OB Zone:
📌 OB Range:
Top: 143.805
Bottom: 143.639
This red zone triggered the last bearish impulse and was just tapped and rejected with precision.
The reaction candle wick shows clear rejection = institutions likely mitigating and initiating shorts.
📐 Trendline Confluence:
You’ve got a perfect descending channel running down with clean touches on both trendlines.
Price bounced off the upper line → trendline + OB = double whammy setup 💥
🎯 Entry Plan:
Entry: 143.512
SL: 143.805 (above OB)
TP: 142.358 (next liquidity pocket)
This gives a juicy RRR of around 3.9–4x, depending on your exact fill.
🎯 Why This Works:
Price reacted to a clear OB
Inside a descending channel
Weak bullish push = no conviction
Favorable RRR = asymmetrical edge
Perfect combo of SMC + structure + execution = sniper-grade entry 🔫
🧠 Key Lesson:
“Let price come to you. Smart Money doesn’t chase — it traps and snaps.”
This is a trap sprung with surgical precision. Execution was key — and you nailed it.
🗣️ If this setup hit your radar too, drop a “🎯” in the comments
📌 Save this — these are the trades that build your bankroll over time.

#XRP #XRPUSD #XRPUSDT #Ripple #Analysis #Eddy#XRP #XRPUSD #XRPUSDT #Ripple #Analysis #Eddy
I have identified the important supply and demand zones of the higher timeframe for you.
This analysis is based on a combination of different styles, including the volume style with the ict style.
Based on your strategy and style, get the necessary confirmations for this analysis to enter the trade.
Don't forget about risk and capital management.
The responsibility for the transaction is yours and I have no responsibility for your failure to comply with your risk and capital management.
💬 Note: Important liquidity is marked on the chart. Be careful of liquidity hunting. In my opinion, the important entry point for buying spot and long futures is at 1.0987$, and it will most likely be a sniper entry. The first target from the specified point will be $4 and the second target will be $10.
Be successful and profitable.

USDCHF 30min | Fibonacci + Order Block Combo Reversal Setup💵 USDCHF 30-Min Smart Money Breakdown — May 14, 2025
This is a prime example of a multi-confluence reversal trade. Let’s walk through this sniper setup:
🔍 1. Market Structure & Context
Price has been flowing within a solid descending channel
We just witnessed a sharp impulse leg downward, now reacting from a key demand area
Channel bottom + OB + fib = confluence stacker heaven
🧱 2. Zone Confluence
Price taps into a high-probability Order Block (highlighted purple)
Lining up with the 61.8% fib retracement, one of the most powerful golden pockets
Immediate reaction seen with bullish wick rejection — evidence of smart money stepping in
📈 3. Entry Logic
Entry: Around 0.83350
SL: Below 0.83200 (protected under 70.5%)
TP: Near 0.84700
RRR ≈ 1:5+ — perfect for prop firm funded traders or swing-style scalpers
🔁 Management & Outlook
Key confirmation = break above midline channel
Scale out at 0.83700 (50% fib), then trail SL for runners
If price rolls back under 0.83200, it may seek the 79% or deeper liquidity zone
💡This type of setup is what separates reactive traders from anticipatory Smart Money traders. You’re not chasing—you're waiting in the kill zone.
💬 Comment “🔥” if you’d take this setup.
🔁 Repost if you love OB + Fib sniper logic.
📲 Follow @ChartNinjas88 for next-level breakdowns.

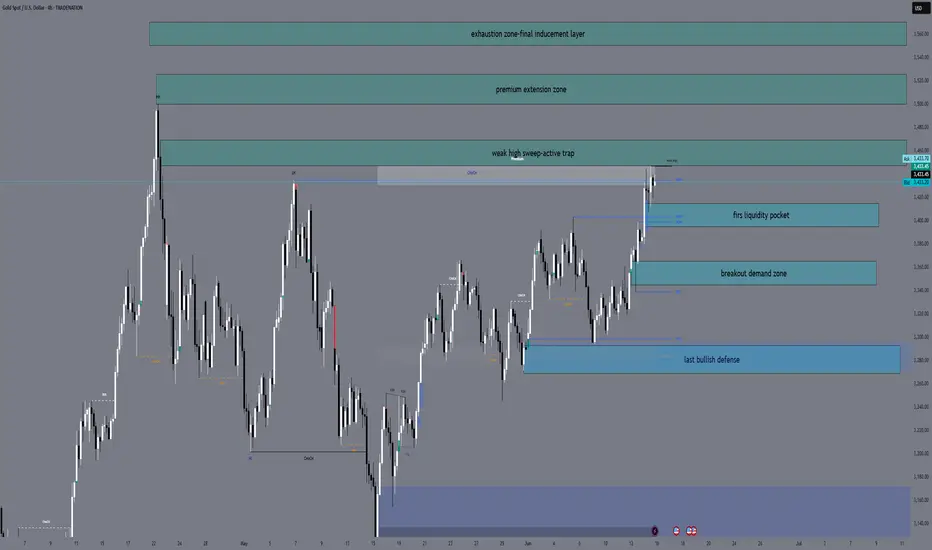
XAUUSD Sniper Zones – May 9 Structure Locked. Zones Refined. Let’s Hunt Clean Entries.
Current Price: 3334
Bias: Mixed (HTF Bullish | LTF Bearish Premium Rejection)
Flow: In consolidation after sweep & rally — waiting for liquidity shift and clear SMC confirmations.
🔻 SELL ZONES (No entries without confirmation!)
🔴 Zone 1: 3365–3375
📍Confluence: LH + unmitigated OB + FVG inside premium
🔍 Wait for clear M5 CHoCH + bearish BOS before pulling trigger.
🔴 Zone 2: 3410–3422
📍Confluence: FVG + Internal Range Premium Liquidity
🔍 Only short after SMC reversal + candle body rejection in zone.
🔴 Zone 3: 3448–3455
📍Confluence: High timeframe OB + Weekly Supply + Final liquidity trap
🔍 This is the kill-shot sniper zone — wait for aggressive reaction or internal M5 break.
🔹 BUY ZONES (No buys unless structure shifts clean!)
🟢 Zone 1: 3306–3314
📍Confluence: Last BOS + bullish breaker block + EQ area
🔍 Look for M5 BOS + retest confirmation.
🟢 Zone 2: 3264–3274
📍Confluence: Untapped demand + internal liquidity sweep
🔍 Watch for aggressive rejection wick + bullish CHoCH confirmation.
🟢 Zone 3: 3225–3235
📍Confluence: Strong LTF OB + higher timeframe discount zone
🔍 High RISK/High REWARD sniper swing area. Wait for clear LTF BOS + strong bounce.
⚔️ Key Zones Above Price:
🔹 3365 (minor premium flip)
🔹 3410–3422 (major supply/FVG)
🔹 3448–3455 (HTF kill zone)
🛡️ Key Zones Below Price:
🔹 3306–3314 (LTF OB + structure demand)
🔹 3264–3274 (liquidity pocket)
🔹 3225–3235 (HTF reentry demand)
🧠 Final Note:
This isn’t for gamblers. You don’t "predict" Gold — you react to liquidity, imbalance, and SMC shifts. These sniper zones are valid only with confirmation. No CHoCH/BOS = no entry. Full stop.
✨ We’re building something smarter than just signals — it’s a sniper mindset. If this helped your vision, show some love below.
💬 Drop a comment, leave a like, and follow for more clean logic and zero fluff.
🔐 Let’s trade like pros!
With you in the flow,
GoldFxMinds (GoldMindsFX) 💛

BTCUSD – 1H Long Setup | Discount Entry With RR 1:5+🧩 BTCUSD – 1H Reversal Play | May 5, 2025
We’re deep in Discount Territory, and the market just showed signs of strength with a bullish reaction from the OB. The Risk-to-Reward on this one is chef’s kiss 👨🍳💋
🧠 Smart Money Breakdown:
📉 Market Context: Prolonged bearish leg forming equal lows — liquidity engineered ✅
📍 Entry Point: EQ/OB level @ ~$93,736
🟢 SL: Below OB at ~$92,730
🚀 TP: Previous structure high ~97,912
🧮 RRR: Around 1:5+ (massive potential)
🔎 Narrative & Confluence:
🔄 Price reacting to OB zone after taking liquidity
🧲 Potential inducement below = liquidity swept
⚠️ Engulfing bullish candle = signs of LTF accumulation
📈 Expectation: Push back into premium zone above 97K
🧠 Execution Tips:
Set and forget, or trail aggressively above 94,800
Watch M15-M5 for CHoCH + order flow confirmation
Add to position on micro pullbacks with tight risk
Partial TP around 96,000 zone, full exit at 97,912
📣 Chart Ninja Tip:
“Discount isn't just a price zone — it's where patience meets precision. Let price hunt liquidity, then strike!”
💬 Drop a 💎 if you caught this sniper long.
📊 Save this setup and tag a fellow price action beast.
🔁 Share if your RR game strong today!

XAUUSD – 30m Buy Setup | Fair Value Gap + Fib + Liquidity Sweep📈 GOLD LONG – May 6, 2025 | Smart Money Trade Setup
We're seeing an incredibly clean bullish setup form on Gold (XAUUSD) with textbook Smart Money Confluences:
🔍 KEY CONFLUENCES:
🟥 FVG (Fair Value Gap): Price tapped the FVG perfectly and respected it
📐 Fib Zone: Confluence of 70.5–79% retracement with demand reaction
💧 Liquidity Grab: Below short-term equal lows before bullish push
📉 Divergence: Internal lower highs vs external equal lows = engineered setup
🧱 Structure: Short-term bullish BOS (Break of Structure) above recent swing
📊 Trade Plan (Long Setup):
🎯 Entry: ~$3,325.6 (FVG zone base)
⛑️ SL: Below FVG at ~$3,323
🚀 TP: $3,404 zone (clean inefficiency magnet)
💥 RRR: 1:5+ sniper trade
🧠 Execution Notes:
Wait for LTF bullish structure shift confirmation (5m BOS)
Add confluence with volume divergence or SMT (Smart Money Toolkits)
Manage the trade once it reaches 3,350 zone
Break-even and partials at mid-Fib zone (around 3,352–3,360)
💬 Chart Ninja Wisdom:
"Price doesn’t lie—liquidity does. When price leaves a gap, Smart Money’s coming back for it."
📌 SETUP OVERVIEW:
Timeframe: 30m
Entry Type: Limit (FVG tap zone)
Bias: Bullish
Target: Clean inefficiency above
Type: High-probability setup with strong RR and structure support
💥 Tap 💾 to save this sniper setup.
📣 Tag your gold-trading crew & get ready for that pump!
📆 Watch how this plays out live—discipline > hype.

BTCUSD – Discount Zone Play | Long Setup Loading📉 BTCUSD – 15-Minute SMC Breakdown | May 3, 2025
Bitcoin is cooking up something spicy inside this discount zone. All the ingredients are there for a bullish reversal — we just need the final confirmation to execute the long.
🧠 SMC Breakdown:
POI Identified: Price has broken into a key OB discount zone (61.8%–79%), tapping 70.5% and chilling near the 79% fib retracement.
Weak High: Noted above at ~96,950 – a liquidity target ready to get swept.
Price Structure: Series of lower highs and lows forming bearish structure, but no momentum break yet. We're in accumulation range.
🎯 Entry Criteria (Potential):
Wait for CHoCH (Change of Character) on lower timeframes (e.g., 1min or 5min) to confirm reversal intent.
Ideal entry = bullish engulfing or BOS from within the 70–79% zone
SL = below 95,900 (clear invalidation level)
TP = Weak High → 96,950+
RR Potential = ~1:5+
📌 Why This Matters:
Price is deep in premium vs. discount logic.
Smart Money loves entries in the 70–79% retracement zones — it’s the sniper's nest.
That Weak High = unfinished business. Expecting bullish expansion if this zone holds.
📊 Pro Tips:
Wait for confirmation, don’t blindly buy in the zone.
Look for signs of absorption or bullish reaction candles.
Always map invalidation level BEFORE entering.
🔥 Final Note:
This is the “load-the-clip” zone for Smart Money. No hype, just structure. If BTC reacts here, we could see a clean 1:5 RR into that Weak High.
💬 What do YOU think happens next?
💾 Save this setup – it’s textbook.
🔁 Share this with your trading squad & don’t miss the next wave.

"USDJPY | Smart Money Premium Trap | Mitigation Block Rejection"⚡ USDJPY Analysis – 30M Timeframe | April 30, 2025
📊 Price Action Summary:
USDJPY has aggressively tapped into the Premium Zone, aligning perfectly with a Mitigation Block and Fibonacci 61.8% golden pocket.
We’re seeing early signs of Smart Money rejection — time to stay sharp! 🧐
🔥 Key Moves:
Premium Zone Entry: Price retraced right into the 61.8–70.5% fib region.
Mitigation Block respected: A known Smart Money zone where trapped sellers from previous moves get wrecked.
Liquidity Build-Up Below: Eyes on the unprotected lows — Smart Money LOVES to grab those.
🧠 What’s Really Going On Behind the Scenes:
Retail traders: "It’s bouncing! Let’s go long!" 🟢💸
Smart Money: "Perfect… let’s trap them for liquidity." 🧊📉
This move screams classic Premium Trap — draw them in, then nuke it. ☠️
🧩 Why This Setup Matters:
Mitigation Block + FVG combo = High-probability rejection zone
Sellers are likely reloading positions here
The Strong High has been established — room to target Weak Lows below
🎯 Trade Setup Idea:
Entry: Inside or just below the Mitigation Block (confirmation from bearish rejection)
Stop Loss: Just above the Strong High (~142.813)
Take Profit Zones:
TP1: Mid-discount (~141.400)
TP2: Weak Low (~139.899) — the real liquidity target 🎯
💬 Pro Tip:
"Mitigation blocks are the sniper’s nest for Smart Money. Get in, get out, get paid." 🎯
Watch the reaction closely inside the purple zone. It’s not just a block — it’s a liquidity recycling station.
🚀 Summary:
✅ Price entered Premium
✅ Mitigation Block tested
✅ Liquidity below waiting
✅ High RRR bearish setup aligning
🧘♂️ Be patient. Wait for confirmation. Let Smart Money leave the trail — then follow.
✍️ Save this chart and study how Mitigation Blocks get respected over and over. It’s not magic — it’s mechanics.
➡️ Comment "SNEAKY SHORT" if you're watching the block trap unfold!
➡️ Tag a trader who still doesn’t believe in Premium/Discount theory. 😂📉📈
