USDJPY | Buying OppurtunityDay : Took sellside LQ hence bullish trend in 15m, Marked Day time frame Demand Zone
15m : After Mitigation of Day TF demand zone, wait for 15m Bullish Confirmation
1m : take Long entry after 1m bullish confirmation
Note : take an entry during killzone time, if no confirmation until market reaches to non-killzone, wait until next kill zone or take the reversal entry if any 15m and 1m confirmation towards Bearish
Tradingstrategies

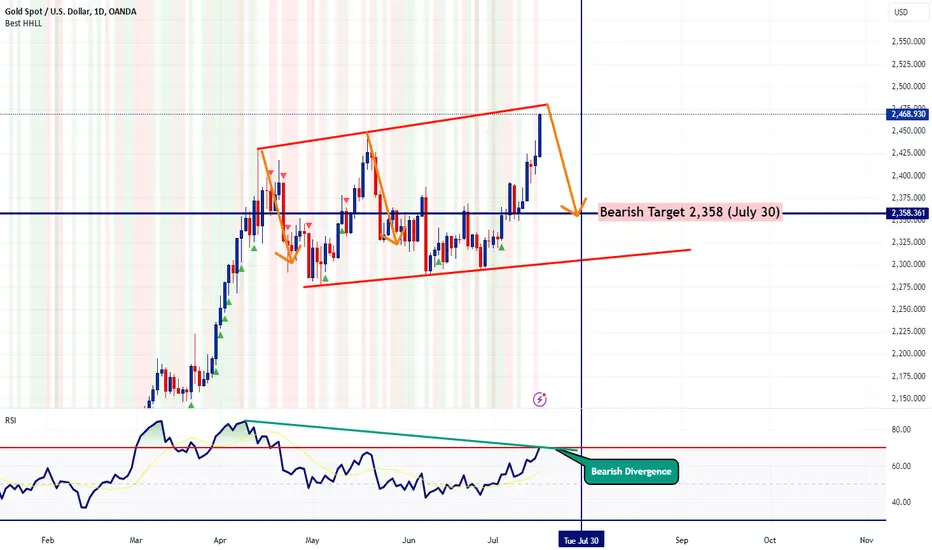
Gold's Next Explosive Move: Is a Massive Surge or Dramatic Drop?Major Support / Resistance Zone:
This zone is marked clearly on the chart and acts as a significant level where price has previously reversed or consolidated. It's crucial to monitor how price reacts around this area.
Wave Analysis:
The chart shows a clear Elliott Wave structure, with a 5-wave pattern identified. Waves (1) to (5) represent the motive waves, and the correction waves are seen in between.
Bearish Flag #1 and #2:
These flags indicate periods of consolidation following a downward movement, suggesting potential for continuation to the downside. They are often characterized by lower highs and lower lows forming within a channel.
Descending Channel:
The descending channel provides a clear bearish structure, with price making lower highs and lower lows. This channel acts as a guide for potential price movement, indicating bearish sentiment as long as the price remains within this structure.
Daily Bull Flag:
This larger bullish flag formation suggests a longer-term bullish potential if price breaks above the flag's upper boundary. It's a key pattern to watch for potential upside.
1HR LQZ / Reversal Zone:
This liquidity zone (LQZ) is marked as an area where a significant amount of orders might be present, potentially leading to reversals or significant price reactions.
4HR LQZ:
Similar to the 1HR LQZ, but observed on the 4-hour timeframe, suggesting a more significant potential reversal or consolidation area.
Bullish Potential:
If the price breaks above the 1HR LQZ / Reversal Zone and the descending channel, there is a bullish potential up to the levels marked on the chart. The structure would need confirmation through higher highs and higher lows.
Bearish Potential:
If the price fails to break above the descending channel and instead moves below the 4HR LQZ, a bearish continuation is likely, potentially targeting lower support levels.
Summary
The chart indicates a potential for both bullish and bearish scenarios depending on how the price reacts to the identified key levels (major support/resistance zone, 1HR and 4HR LQZs, and the descending channel).
Bullish scenario: Break above the 1HR LQZ and the descending channel, leading to a continuation towards higher levels.
Bearish scenario: Failure to break above the descending channel and a move below the 4HR LQZ, indicating a continuation to the downside.
This analysis should help in making informed trading decisions based on the observed technical patterns and key levels.

Types of Entry Models in SMC ConceptsIn Smart Money Concepts (SMC) trading, there are different types of entry models that traders use to enter the market. These include aggressive entry, actual entry, and order flow entry models. Here’s a simple explanation of each:
1. Aggressive Entry Model (15m): @Manipulation
Entry Criteria: During Liquidity (LQ) Sweeps at Killzones + Stack Entries at Lower Time Frame (LTF, 1m)
Description:
Traders enter trades during significant liquidity sweeps, particularly in key market zones known as killzones (high-activity periods).
They stack their entries by analyzing the 1-minute chart to find optimal entry points.
This approach aims to catch early moves by entering immediately after liquidity has been swept, indicating potential reversals or strong market moves.
Order Type: Market Order(post candle confirmation)
Traders execute a market order as soon as their entry criteria are met on the 1-minute chart, entering the trade immediately at the current market price.
Time Frame: 1 minute (LTF)
2. Actual Entry Model (15m): Post Manipulation
Entry Criteria: At Valid Supply or Demand or Flip Zones
Description:
Traders enter trades at well-defined supply and demand zones or flip zones (areas where the market changes from supply to demand or vice versa).
They wait for the price to reach these significant zones on the 15-minute chart, providing a more confirmed entry point that aligns with market structure and potential reversals.
Order Type: Limit Order
Traders place a limit order on the 1-minute chart at a specific price level they believe the market will reach, ensuring a better entry price.
Time Frame: 1 minute (LTF)
3. Order Flow Entry Model (15m): @Distribution
Entry Criteria: At Unmitigated Order Flow
Description:
Traders look for areas of unmitigated order flow on the 15-minute chart.
Unmitigated order flow refers to price levels where significant orders have not yet been fully absorbed by the market, indicating potential areas of strong buying or selling pressure.
Traders place their entries at these levels, often waiting for a candle confirmation to ensure the validity of the order flow analysis.
Order Type: Limit Order (post candle confirmation)
Traders wait for a candle confirmation on the 1-minute chart before placing a limit
order.
They analyze the order flow and wait for a confirming candle that aligns with their analysis before setting a limit order to enter the trade.
Time Frame: 1 minute (LTF)

GOLD ROUTE MAP UPDATEHey Everyone,
Great start to the week with our chart idea playing out once again.
As analysed and shared yesterday; we will see price play between both weighted levels until one locks with ema5 to confirm the next range.
Yesterday we stated that we had 2400 open gap and will need ema5 to lock above 2400 to confirm the range above. This target was hit perfectly today with no lock above confirming the rejection into 2376 weighted support. We will now need to see ema5 cross and lock below 2376 to open the range below or a rejection here will follow with a retest back upto 2400.
We will keep the above in mind when taking buys from dips. Our updated levels and weighted levels will allow us to track the movement down and then catch bounces up.
We will continue to buy dips using our support levels taking 30 to 40 pips. As stated before each of our level structures give 20 to 40 pip bounces, which is enough for a nice entry and exit. If you back test the levels we share every week in the past 24 months, you can see how effectively they were used to trade with or against short/mid term swings and trends.
BULLISH TARGETS
2400 - DONE
EMA5 CROSS AND LOCK ABOVE 2400 WILL OPEN THE FOLLOWING BULLISH TARGET
2423
POTENTIALLY 2438
EMA5 CROSS AND LOCK ABOVE 2438 WILL OPEN THE FOLLOWING BULLISH TARGET
2459
POTEITNALLY 2475
BEARISH TARGETS
2376 - DONE
EMA5 CROSS AND LOCK BELOW 2376 WILL OPEN THE FOLLOWING BEARISH TARGET
2360
2344
EMA5 CROSS AND LOCK BELOW 2344 WILL OPEN THE SWING RANGE
SWING RANGE
2313- 2298
As always, we will keep you all updated with regular updates throughout the week and how we manage the active ideas and setups. Thank you all for your likes, comments and follows, we really appreciate it!
Mr Gold
GoldViewFX

GOLD 1H CHART ROUTE MAP & TRADING PLAN FOR THE WEEK Hey Everyone,
Please see our updated 1h chart levels and targets for the coming week.
We are seeing price between two weighted levels. We have 2400 Goldturn resistance and 2376, as Goldturn support.
We will see levels tested side by side until one of the weighted levels break and lock to confirm direction for the next range.
We have 2400 open gap and will need ema5 to lock above 2400 to confirm the range above. We also have 2376, as the weighted support area and will need ema5 lock below this level to open 2360, 2344 and a cross and lock below 2344 will open the swing range for the extended swing.
We will keep the above in mind when taking buys from dips. Our updated levels and weighted levels will allow us to track the movement down and then catch bounces up.
We will continue to buy dips using our support levels taking 30 to 40 pips. As stated before each of our level structures give 20 to 40 pip bounces, which is enough for a nice entry and exit. If you back test the levels we share every week in the past 24 months, you can see how effectively they were used to trade with or against short/mid term swings and trends.
BULLISH TARGETS
2400
EMA5 CROSS AND LOCK ABOVE 2400 WILL OPEN THE FOLLOWING BULLISH TARGET
2423
POTENTIALLY 2438
EMA5 CROSS AND LOCK ABOVE 2438 WILL OPEN THE FOLLOWING BULLISH TARGET
2459
POTEITNALLY 2475
BEARISH TARGETS
2376
EMA5 CROSS AND LOCK BELOW 2376 WILL OPEN THE FOLLOWING BEARISH TARGET
2360
2344
EMA5 CROSS AND LOCK BELOW 2344 WILL OPEN THE SWING RANGE
SWING RANGE
2313- 2298
As always, we will keep you all updated with regular updates throughout the week and how we manage the active ideas and setups. Thank you all for your likes, comments and follows, we really appreciate it!
Mr Gold
GoldViewFX

GOLD 4H CHART ROUTE MAP & TRADING PLAN FOR THE WEEK Hey Everyone,
Please see our updated 4h chart levels and targets for the coming week.
We are seeing price between two weighted levels. We have 2406 Goldturn resistance and 2360, as the Goldturn weighted support. We also have 2406 as an open gap above and 2383 open gap below.
We will see levels within this range tested side by side until one of the weighted levels break to confirm direction for the next range.
We will need ema5 to above 2406 to confirm the range above. We also have 2360, as the weighted support area and will need ema5 lock below this level to open 2360 and a cross and lock below 2360 will open the swing range for the extended swing.
We will keep the above in mind when taking buys from dips. Our updated levels and weighted levels will allow us to track the movement down and then catch bounces up.
We will continue to buy dips using our support levels taking 30 to 40 pips. As stated before each of our level structures give 20 to 40 pip bounces, which is enough for a nice entry and exit. If you back test the levels we share every week in the past 24 months, you can see how effectively they were used to trade with or against short/mid term swings and trends.
BULLISH TARGETS
2406
EMA5 CROSS AND LOCK ABOVE 2406 WILL OPEN THE FOLLOWING BULLISH TARGET
2429
EMA5 CROSS AND LOCK ABOVE 2429 WILL OPEN THE FOLLOWING BULLISH TARGET
2461
BEARISH TARGETS
2383
2360
EMA5 CROSS AND LOCK BELOW 2360 WILL OPEN THE SWING RANGE
SWING RANGE
2328 - 2302
As always, we will keep you all updated with regular updates throughout the week and how we manage the active ideas and setups. Thank you all for your likes, comments and follows, we really appreciate it!
Mr Gold
GoldViewFX

GOLD DAILY CHART UPDATE Hey Everyone,
Please see update on our daily chart structure that we have been tracking successfully for a while now..
Previously we had the cross and lock above 2355, leaving a gap open to 2405 and same with 2405 opening 2464.
- Both gaps were hit and completed, as analysed.
We were then left with a candle body close gap above 2464 leaving a long range/term gap to 2521 and will need EMA5 lock above 2464 to further confirm this. Failure to lock above this level last week confirmed the rejection that followed.
We are now seeing 2355 retracement range providing support and the re-actional bounce, as analysed. We will either look for a ema5 lock below this level to open the range below or a failure to lock below this level will follow with the upper range tests again.
We have marked the charts with our unique weighted levels and will use them to track the movement up and down, confirmed with ema5 cross and lock confirmation.
We will use our smaller timeframe analysis and trading plans to navigate the range in true level to level fashion.
Our long term bias is Bullish and therefore we will continue to use our smaller timeframes to buy dips using our levels and setups.
Buying dips allows us to safely manage any swings rather then chasing the bull from the top.
Thank you all for your likes, comments and follows, we really appreciate it!
Mr Gold
GoldViewFX

GOLD WEEKLY CHART MID/LONG TERM/RANGE ROUTE MAP Hey Everyone,
Please see update on our weekly chart idea.
Previously we had 2434 open gap hit perfectly completing this range target and the channel top test.
We mentioned last week that although we have the final Axis target at 2505, we are expecting resistance and reaction here at 2434, at the channel top and will probably need a few attempts before cracking open the range above.
- This played out perfectly, as we got the rejection after hitting our final target and the channel top provided the dynamic resistance and re-action we were expecting, which followed with the perfect rejection end of last week.
We would need to see a candle body close above 2434 in the coming weeks/months to confirm this gap or an ema5 cross and lock for a double confirmation.
The levels within the channel will provide the bounces, inline with our plans to buy dips in true level to level fashion, using our smaller time-frames.
Buying dips allows us to safely manage any swings, instead of chasing the bull from the top.
Thank you all for your likes, comments and follows, we really appreciate it!
Mr Gold
GoldViewFX

Profitable Triangle Trading Strategy Explained
Descending triangle formation is a classic reversal pattern . It signifies the weakness of buyers in a bullish trend and bearish accumulation .
In this article, I will teach you how to trade descending triangle pattern. I will explain how to identify the pattern properly and share my trading strategy.
⭐️ The pattern has a very peculiar price action structure :
1. Trading in a bullish trend, the price sets a higher high and retraces setting a higher low .
2. Then the market starts growing again but does not manage to set a new high, setting a lower high instead.
3. Then the price drops again perfectly respecting the level of the last higher low, setting an equal low .
4. After that, one more bullish movement and one more consequent lower high , bearish move, and equal low .
Based on the last three highs , a trend line can be drawn.
Based on the equal lows , a horizontal neckline is spotted.
❗What is peculiar about such price action is the fact that a set of lower highs signifies a weakening bullish momentum : fewer and fewer buyers are willing to buy from horizontal support based on equal lows.
🔔 Such price action is called a bearish accumulation .
Once the pattern is formed it is still not a trend reversal signal though. Remember that the price may set many lower highs and equal lows within the pattern.
The trigger that is applied to confirm a trend reversal is a bearish breakout of the neckline of the pattern.
📉Then a short position can be opened.
For conservative trading, a retest entry is suggested.
Safest stop is lying at least above the level of the last lower high.
However, in case the levels of the lower highs are almost equal it is highly recommendable to set a stop loss above them all.
🎯For targets look for the closest strong structure support.
Below, you can see the example of a descending triangle trade that I took on NZDCAD pair.
After I spotted the formation of the pattern, I was patiently waiting for a breakout of its neckline.
After a breakout, I set a sell limit order on a retest.
Stop loss above the last lower high.
TP - the closest key support.
90 pips of pure profit made.
Learn to identify and trade descending triangle. It is one of the most accurate price action patterns every trader should know.

Live Trading Session 263: Open trade on BTC,Gold and moreIn this live trading session video,we look at our open positions on Bitcoin,Gold,potential trades coming up on the other instruments and the thinking behind them. The concepts you learn from this video are cross transferrable principles onto any strategy.

He could not break the supportAlthough it reached the support, it was unable to break it, so we will have a rise in the coming days.

GOLD 1H CHART ROUTE MAP UPDATEHey Everyone,
After completing the range target yesterday at 2421, we also had ema5 leave a gap to 2438. We got the push up into the range but left the gap short before the rejection. This is why we always buy from dips and not from the top.
We got the test into 2380 weighted Goldturn support that we stated yesterday. Cross and lock below 2380 opened 2359, which was also hit perfectly. We will now need to see ema5 lock below 2359 to open the swing range or we will see a reaction here
So far, even with the rejection into the support zones; each of the weighted Goldturns gave the 30 to 40 pip bounces, inline with our plans to buy dips and as analysed. Once again we were able to capitalise on this by tracking the movement down and catching the bounces up.
We will continue to buy dips using our support levels taking 30 to 40 pips. As stated before, each of our level structures give 20 to 40 pip bounces, which is enough for a nice entry and exit. If you back test the levels we share every week in the past 24 months, you can see how effectively they were used to trade with or against short/mid term swings and trends.
BULLISH TARGETS
2400 - DONE
2421 - DONE
EMA5 CROSS AND LOCK ABOVE 2421 WILL OPEN THE FOLLOWING BULLISH TARGET
2438
EMA5 CROSS AND LOCK ABOVE 2438 WILL OPEN THE FOLLOWING BULLISH TARGET
2458
BEARISH TARGETS
2380 - DONE
EMA5 CROSS AND LOCK BELOW 2380 WILL OPEN THE FOLLOWING BEARISH TARGET
2359 - DONE
EMA5 CROSS AND LOCK BELOW 2359 WILL OPEN THE SWING RANGE
SWING RANGE
2331 - 2317
As always, we will keep you all updated with regular updates throughout the week and how we manage the active ideas and setups. Thank you all for your likes, comments and follows, we really appreciate it!
Mr Gold
GoldViewFX

Discover How Thinking Like a Consultant Can Improve Your Trades█ Self–other decision making and loss aversion
You might think that I have discussed this topic in depth before, and you would be right. However, there is still much more to explore. This article delves into an excellent research paper by Evan Polman, which examines changes in decision-making behavior when choices are made for oneself versus for others. By studying self-other decision-making, we can uncover varying degrees of loss aversion and gain insights to enhance trading strategies and risk management practices.
█ Results
Polman's research reveals that individuals exhibit lower levels of loss aversion when making decisions for others compared to themselves. The study found that people are more willing to take risks and are less sensitive to potential losses when the consequences affect others rather than themselves. This reduction in loss aversion is attributed to increased psychological distance and a more abstract level of thinking when making decisions on behalf of others.
█ How Understanding Self–Other Decision Making Can Enhance Your Trading Strategies
In the dynamic world of trading, making the right decision at the right time is crucial. Yet, how often do we consider the psychological underpinnings that influence these decisions? Recent research on self-other decision making and loss aversion offers valuable insights that can transform our approach to trading and investment management.
█ Making Decisions for Yourself vs. Others
A study by Evan Polman from New York University found that people make different decisions for themselves compared to when they make decisions for others. The study showed that we tend to be less afraid of losses when deciding for others. This is known as having less "loss aversion."
Loss aversion means that people usually fear losing money more than they enjoy gaining the same amount. For example, losing $100 feels worse than gaining $100 feels good. This fear can make us overly cautious and miss out on good opportunities.
█ Psychological Distance and Construal Level Theory
According to the construal level theory (CLT) proposed by Trope and Liberman, the psychological distance between an individual and an event affects how they mentally construe that event. Greater psychological distance leads to higher-level, more abstract thinking, while lesser distance results in lower-level, more concrete thinking.
When making decisions for others, the increased psychological distance can lead to more abstract thinking, reducing the emotional impact of potential losses. This shift in perspective can decrease loss aversion, as decision-makers focus more on long-term outcomes and broader goals rather than immediate losses.
█ What This Means for Traders
Less Fear of Losses When Trading for Others:
When you trade for someone else, like giving advice to a friend, you’re less likely to be overly cautious. This can help you make more balanced decisions and potentially increase profits.
Psychological Distance:
When deciding for others, you think more abstractly and are less emotionally involved. Try to create this psychological distance when trading for yourself by imagining you’re making the decision for someone else. This can help you stay calm and make better choices.
Better Risk Management:
Knowing that you’re less afraid of losses when trading for others can help you manage risks better. Use this awareness to avoid being too conservative and missing out on profitable trades.
█ Practical Tips for Traders
Think Like a Consultant: When trading for yourself, pretend you’re advising a friend. This can help you stay objective and make better decisions.
Collaborate: Discuss your trading ideas with others. Getting different perspectives can help reduce individual biases and improve your strategy.
Review Your Trades: Regularly look back at your trades to see if you’re being too cautious. Learn from your mistakes and successes to improve future decisions.
Use Tools: Use trading tools and software that help you analyze risks and rewards clearly. These tools can support your decision-making process.
█ Reference
Polman, E. (2012). Self–other decision making and loss aversion. Organizational Behavior and Human Decision Processes, 119(2), 141-150. doi:10.1016/j.obhdp.2012.06.005
-----------------
Disclaimer
This is an educational study for entertainment purposes only.
The information in my Scripts/Indicators/Ideas/Algos/Systems does not constitute financial advice or a solicitation to buy or sell securities. I will not accept liability for any loss or damage, including without limitation any loss of profit, which may arise directly or indirectly from the use of or reliance on such information.
All investments involve risk, and the past performance of a security, industry, sector, market, financial product, trading strategy, backtest, or individual's trading does not guarantee future results or returns. Investors are fully responsible for any investment decisions they make. Such decisions should be based solely on evaluating their financial circumstances, investment objectives, risk tolerance, and liquidity needs.
My Scripts/Indicators/Ideas/Algos/Systems are only for educational purposes!

Q2 and 100k TC Performance ReviewIn this live trading session video,we look at our Q2 performance on our live trading room strategies as well as our 100k Traders Challenge(TC) Account performance. We then look at the improvements we have introduced and the key actions points going forward. The concepts and ideas in this video can be cross transferred onto any strategy.

GOLD 1H CHART ROUTE MAP UPDATEHey Everyone,
Another great day on the charts today with our chart idea playing out, as analysed.
Yesterday we had ema5 and candle body close above 2400 opening 2421, as a gap target. This target was hit today, completing this range. We are now seeing ema5 cross above 2421 to open the gap to 2438 and just need the lock to confirm.
We also have 2380, as the weighted support area for the range below and will need to keep this in mind, when we see rejections above.
We will keep the above in mind when taking buys from dips. Our updated levels and weighted levels will allow us to track the movement down and then catch bounces up.
We will continue to buy dips using our support levels taking 30 to 40 pips. As stated before, each of our level structures give 20 to 40 pip bounces, which is enough for a nice entry and exit. If you back test the levels we share every week in the past 24 months, you can see how effectively they were used to trade with or against short/mid term swings and trends.
BULLISH TARGETS
2400 - DONE
2421 - DONE
EMA5 CROSS AND LOCK ABOVE 2421 WILL OPEN THE FOLLOWING BULLISH TARGET
2438
EMA5 CROSS AND LOCK ABOVE 2438 WILL OPEN THE FOLLOWING BULLISH TARGET
2458
BEARISH TARGETS
2380
EMA5 CROSS AND LOCK BELOW 2380 WILL OPEN THE FOLLOWING BEARISH TARGET
2359
EMA5 CROSS AND LOCK BELOW 2359 WILL OPEN THE SWING RANGE
SWING RANGE
2331 - 2317
As always, we will keep you all updated with regular updates throughout the week and how we manage the active ideas and setups. Thank you all for your likes, comments and follows, we really appreciate it!
Mr Gold
GoldViewFX

GOLD 1H CHART ROUTE MAP UPDATEHey Everyone,
Please see update on our 1H chart idea.
We are seeing price range sideways with 2380 providing support for the range for the push up into 2400. We also have ema5 and candle body close above 2400 opening 2421, as a gap target.
We have 2421 open gap and will need ema5 to lock above 2421 to confirm the range above. We also have 2380, as the weighted support area and will need ema5 lock below this level to open 2359 and a cross and lock below 2359 will open the swing range for the extended swing.
We will keep the above in mind when taking buys from dips. Our updated levels and weighted levels will allow us to track the movement down and then catch bounces up.
We will continue to buy dips using our support levels taking 30 to 40 pips. As stated before each of our level structures give 20 to 40 pip bounces, which is enough for a nice entry and exit. If you back test the levels we share every week in the past 24 months, you can see how effectively they were used to trade with or against short/mid term swings and trends.
BULLISH TARGETS
2400 - DONE
2421
EMA5 CROSS AND LOCK ABOVE 2421 WILL OPEN THE FOLLOWING BULLISH TARGET
2438
EMA5 CROSS AND LOCK ABOVE 2438 WILL OPEN THE FOLLOWING BULLISH TARGET
2458
BEARISH TARGETS
2380
EMA5 CROSS AND LOCK BELOW 2380 WILL OPEN THE FOLLOWING BEARISH TARGET
2359
EMA5 CROSS AND LOCK BELOW 2359 WILL OPEN THE SWING RANGE
SWING RANGE
2331 - 2317
As always, we will keep you all updated with regular updates throughout the week and how we manage the active ideas and setups. Thank you all for your likes, comments and follows, we really appreciate it!
Mr Gold
GoldViewFX

GOLD 4H CHART ROUTE MAP UPDATEHey Everyone,
Great start to the week with our chart idea playing out, as analysed.
We are seeing price play between two weighted levels, 2406 resistance and 2482 support. We got our first Bullish target hit today at 2406. We now have a candle body close above 2406 opening 2428 but will need ema5 cross and lock to further confirm this.
Ema5 failed to lock above 2406 and therefore followed with the rejection into price heading towards 2382 support. Failure to cross and lock below 2382 will follow with a bounce for another re-test above at 2406.
We will see levels within this range tested side by side until one of the weighted levels break to confirm direction for the next range.
We will need ema5 to lock above 2406 and 2428 to confirm the range above. We also have 2382, as the weighted support area and will need ema5 lock below this level to open 2360 and a cross and lock below 2360 will open the swing range for the extended swing.
We will keep the above in mind when taking buys from dips. Our updated levels and weighted levels will allow us to track the movement down and then catch bounces up.
We will continue to buy dips using our support levels taking 30 to 40 pips. As stated before each of our level structures give 20 to 40 pip bounces, which is enough for a nice entry and exit. If you back test the levels we share every week in the past 24 months, you can see how effectively they were used to trade with or against short/mid term swings and trends.
BULLISH TARGETS
2406 - DONE
EMA5 CROSS AND LOCK ABOVE 2406 WILL OPEN THE FOLLOWING BULLISH TARGET
2428
EMA5 CROSS AND LOCK ABOVE 2428 WILL OPEN THE FOLLOWING BULLISH TARGET
2450
EMA5 CROSS AND LOCK ABOVE 2450 WILL OPEN THE FOLLOWING BULLISH TARGET
2467
2481
POTENTIALLY 2495
BEARISH TARGETS
2382
EMA5 CROSS AND LOCK BELOW 2382 WILL OPEN THE FOLLOWING BEARISH TARGET
2360
EMA5 CROSS AND LOCK BELOW 2360 WILL OPEN THE SWING RANGE
SWING RANGE
2330 - 2303
As always, we will keep you all updated with regular updates throughout the week and how we manage the active ideas and setups. Thank you all for your likes, comments and follows, we really appreciate it!
Mr Gold
GoldViewFX

GOLD 4H CHART ROUTE MAP & TRADING PLAN FOR THE WEEK Hey Everyone,
Please see our updated 4h chart levels and targets for the coming week.
We are seeing price between two weighted levels. We have 2428 Goldturn resistance and 2382, as Goldturn support. We also have 2406 as an open gap that will need a candle body close to open 2428.
We will see levels within this range tested side by side until one of the weighted levels break to confirm direction for the next range.
We will need ema5 to above 2428 to confirm the range above. We also have 2382, as the weighted support area and will need ema5 lock below this level to open 2360 and a cross and lock below 2360 will open the swing range for the extended swing.
We will keep the above in mind when taking buys from dips. Our updated levels and weighted levels will allow us to track the movement down and then catch bounces up.
We will continue to buy dips using our support levels taking 30 to 40 pips. As stated before each of our level structures give 20 to 40 pip bounces, which is enough for a nice entry and exit. If you back test the levels we share every week in the past 24 months, you can see how effectively they were used to trade with or against short/mid term swings and trends.
BULLISH TARGETS
2406
2428
EMA5 CROSS AND LOCK ABOVE 2428 WILL OPEN THE FOLLOWING BULLISH TARGET
2450
EMA5 CROSS AND LOCK ABOVE 2450 WILL OPEN THE FOLLOWING BULLISH TARGET
2467
2481
POTENTIALLY 2495
BEARISH TARGETS
2382
EMA5 CROSS AND LOCK BELOW 2382 WILL OPEN THE FOLLOWING BEARISH TARGET
2360
EMA5 CROSS AND LOCK BELOW 2360 WILL OPEN THE SWING RANGE
SWING RANGE
2330 - 2303
As always, we will keep you all updated with regular updates throughout the week and how we manage the active ideas and setups. Thank you all for your likes, comments and follows, we really appreciate it!
Mr Gold
GoldViewFX

GOLD DAILY CHART UPDATE Hey Everyone,
Please see update on our daily chart structure that we have been tracking successfully for a while now..
On our last two updates we had the cross and lock above 2355 leaving a gap open to 2405 and then same with 2405 opening 2464.
- Both gaps were hit and completed , as analysed.
We now have a candle body close gap above 2464 leaving a long range/term gap to 2521 and will need EMA5 lock above 2464 to further confirm this. Failure to lock now with ema5 confirmed the rejection we are seeing now
We have marked the charts with our unique weighted levels and will use them to track the movement up and down, confirmed with ema5 cross and lock confirmation.
We will use our smaller timeframe analysis and trading plans to navigate the range in true level to level fashion.
Our long term bias is Bullish and therefore we will continue to use our smaller timeframes to buy dips using our levels and setups.
Buying dips allows us to safely manage any swings rather then chasing the bull from the top.
Thank you all for your likes, comments and follows, we really appreciate it!
Mr Gold
GoldViewFX

GOLD WEEKLY CHART MID/LONG TERM/RANGE ROUTE MAP Hey Everyone,
Please see update on our weekly chart idea.
Last week we 2434 was hit perfectly completing this range target and channel top.
Although we have the final Axis target at 2505, we are expecting resistance and reaction here at the channel top and will probably need a few attempts before cracking open the range above.
We would need to see a candle body close above 2434 this coming week to confirm this gap or an ema5 cross and lock for a double confirmation.
The levels within the channel will provide the bounces, inline with our plans to buy dips in true level to level fashion, using our smaller time-frames.
Buying dips allows us to safely manage any swings, instead of chasing the bull from the top.
Thank you all for your likes, comments and follows, we really appreciate it!
Mr Gold
GoldViewFX

GOLD ROUTE MAP UPDATEHey Everyone,
A great finish to the week with all our chart ideas playing out perfectly and, as per our daily updates throughout the week.
After riding the move up inline with our plans to buy dips, we finished off yesterday with 2467 test and then advised that we needed ema5 to cross and lock above this weighted Goldturn to open the range above or a failure to lock will confirm the rejection.
- Failure to lock above 2467 confirmed the end of the run and the rejection with a drop into 2397 weighted level, which gave the perfect bounce, as analysed. We will now either need to see ema5 lock below 2397 weighted level to open the range below or we will see another run up to test 2416 weighted level.
BULLISH TARGETS
2416 - DONE
EMA5 CROSS AND LOCK ABOVE 2416 WILL OPEN THE FOLLOWING BULLISH TARGET
2425 - DONE
2437 - DONE
EMA5 CROSS AND LOCK ABOVE 2437 WILL OPEN THE FOLLOWING BULLISH TARGET
2449 - DONE
2460 - DONE
We will now come back Sunday with our Multi time-frame analysis, Gold route map and trading plans for the week ahead.
Have a smashing weekend!! And once again, thank you all for your likes, comments and follows, we really appreciate it!
Mr Gold

GOLD 4H CHART ROUTE MAP UPDATEHey Everyone,
Please see update on our 4H chart idea that we shared on Sunday.
Our 4h chart started with price between two weighted levels. We had 2416 Goldturn resistance and 2397, as Goldturn support.
The weighted support level held with no cross and lock below 2397 confirming the rejection for the bounce into 2416 followed with 2425 and 2437, which were both hit perfectly. We then had 2449 and 2460 to complete the range.
We are now looking for ema5 to cross and lock above 2467 to open the range above. Failure to lock above will see rejection into the lower Goldturns to find support and then track level to level once again.
We will see levels within this range tested side by side until one of the weighted levels break to confirm direction for the next range.
We will keep the above in mind when taking buys from dips. Our updated levels and weighted levels will allow us to track the movement down and then catch bounces up.
We will continue to buy dips using our support levels taking 30 to 40 pips. As stated before each of our level structures give 20 to 40 pip bounces, which is enough for a nice entry and exit. If you back test the levels we share every week in the past 24 months, you can see how effectively they were used to trade with or against short/mid term swings and trends.
BULLISH TARGETS
2416 - DONE
EMA5 CROSS AND LOCK ABOVE 2416 WILL OPEN THE FOLLOWING BULLISH TARGET
2425 - DONE
2437 - DONE
EMA5 CROSS AND LOCK ABOVE 2437 WILL OPEN THE FOLLOWING BULLISH TARGET
2449 - DONE
2460 - DONE
As always, we will keep you all updated with regular updates throughout the week and how we manage the active ideas and setups. Thank you all for your likes, comments and follows, we really appreciate it!
Mr Gold

XAUUSD Approaching Ascending ResistanceTaking a look at the daily timeframe, price action is approaching the ascending resistance around 2380. I believe based on previous price movements, this trendline should hold as we head into the next FOMC meeting at the end of the month.