Moving Averages

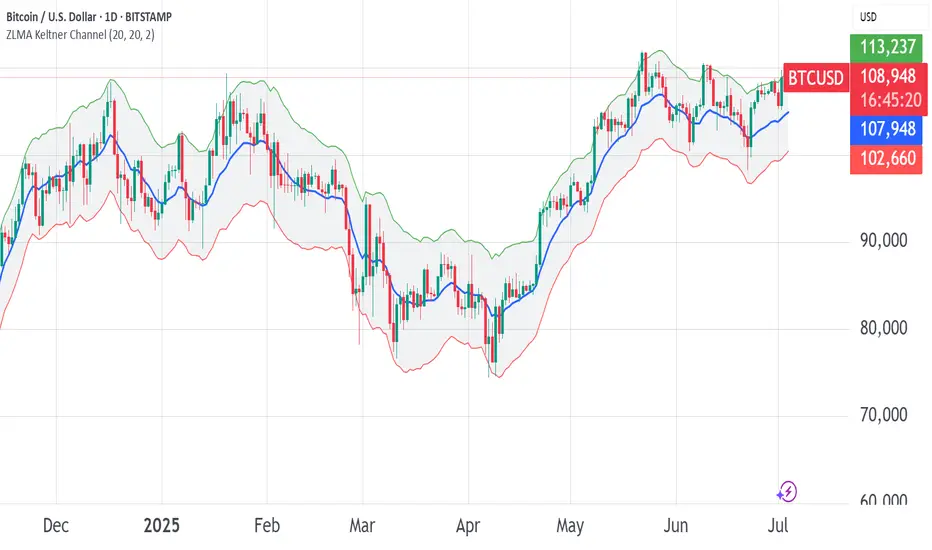
ZLMA Keltner ChannelThe ZLMA Keltner Channel uses a Zero-Lag Moving Average (ZLMA) as the centerline with ATR-based bands to track trends and volatility.
The ZLMA’s reduced lag enhances responsiveness for breakouts and reversals, i.e. it's more sensitive to pivots and trend reversals.
Unlike Bollinger Bands, which use standard deviation and are more sensitive to price spikes, this uses ATR for smoother volatility measurement.
Background:
Built on John Ehlers’ lag-reduction techniques, this indicator adapts the classic Keltner Channel for dynamic markets. It excels in trending (low-entropy) markets for breakouts and range-bound (high-entropy) markets for reversals.
How to Read:
ZLMA (Blue): Tracks price trends. Above = bullish, below = bearish.
Upper Band (Green): ZLMA + (Multiplier × ATR). Cross above signals breakout or overbought.
Lower Band (Red): ZLMA - (Multiplier × ATR). Cross below signals breakout or oversold.
Channel Fill (Gray): Shows volatility. Narrow = low volatility, wide = high volatility.
Signals (Optional): Enable to show “Buy” (green) on upper band crossovers, “Sell” (red) on lower band crossunders.
Strategies: Trade breakouts in trending markets, reversals in ranges, or use bands as trailing stops.
Settings:
ZLMA Period (20): Adjusts centerline responsiveness.
ATR Period (20): Sets volatility period.
Multiplier (2.0): Controls band width.
If you are still confused between the ZLMA Keltner Channels and Bollinger Bands:
Keltner Channel (ZLMA): Uses ATR for bands, which smooths volatility and is less reactive to sudden price spikes. The ZLMA centerline reduces lag for faster trend detection.
Bollinger Bands: Uses standard deviation for bands, making them more sensitive to price volatility and prone to wider swings in high-entropy markets. Typically uses an SMA centerline, which lags more than ZLMA.
[TH] กลยุทธ์ SMC หลายกรอบเวลา (V5.2 - M15 Lead)English Explanation
This Pine Script code implements a multi-timeframe trading strategy based on Smart Money Concepts (SMC). It's designed to identify high-probability trading setups by aligning signals across three different timeframes.
The core logic is as follows:
High Timeframe (HTF) - M15: Determines the overall market direction or bias.
Medium Timeframe (MTF) - M5: Identifies potential Points of Interest (POI), such as Order Blocks or Fair Value Gaps, in alignment with the M15 bias.
Low Timeframe (LTF) - Current Chart: Looks for a specific entry trigger within the M5 POI to execute the trade.
Detailed Breakdown
## Part 1: Inputs & Settings
This section allows you to customize the indicator's parameters:
General Settings:
i_pivotLookback: Sets the lookback period for identifying pivot highs and lows on the LTF, which is crucial for finding the Change of Character (CHoCH).
M15 Bias Settings:
i_m15EmaFast / i_m15EmaSlow: These two EMA (Exponential Moving Average) values on the 15-minute chart determine the main trend. A bullish trend is confirmed when the fast EMA is above the slow EMA, and vice-versa for a bearish trend.
M5 Point of Interest (POI) Settings:
i_showM5Fvg / i_showM5Ob: Toggles the visibility of Fair Value Gaps (FVG) and Order Blocks (OB) on the 5-minute chart. These are the zones where the script will look for trading opportunities.
i_maxPois: Limits the number of POI zones drawn on the chart to keep it clean.
LTF Entry Settings:
i_entryMode:
Confirmation: The script waits for a Change of Character (CHoCH) on the LTF (your current chart) after the price enters an M5 POI. A CHoCH is a break of a recent pivot high (for buys) or pivot low (for sells), suggesting a potential reversal. This is the safer entry method.
Aggressive: The script triggers an entry as soon as the price touches the 50% level of the M5 POI, without waiting for a CHoCH. This is higher risk but can provide a better entry price.
i_showChoch: Toggles the visibility of the CHoCH confirmation lines.
Trade Management Settings:
i_tpRatio: Sets the Risk-to-Reward Ratio (RRR) for the Take Profit target. For example, a value of 2.0 means the Take Profit distance will be twice the Stop Loss distance.
i_slMode: (New in V5.2) Provides four different methods to calculate the Stop Loss:
POI Zone (Default): Places the SL at the outer edge of the M5 POI zone.
Last Swing: Places the SL at the most recent LTF swing high/low before the entry.
ATR: Uses the Average True Range (ATR) indicator to set a volatility-based SL.
Previous Candle: Places the SL at the high or low of the candle immediately preceding the entry. This is the tightest and riskiest option.
i_maxHistory: Sets the number of past trades to display on the chart.
## Part 2: Data Types & Variables
This section defines custom data structures (type) to organize information:
Poi: A structure to hold all information related to a single Point of Interest, including its price boundaries, direction (bullish/bearish), and whether it has been mitigated (touched by price).
Trade: A structure to store details for each trade, such as its entry price, SL, TP, result (Win/Loss/Active), and chart objects for drawing.
## Part 3: Core Logic & Calculations
This is the engine of the indicator:
Data Fetching: It uses request.security to pull EMA data from the M15 timeframe and candle data (high, low, open, close) from the M5 timeframe.
POI Identification: The script constantly scans the M5 data for FVG and OB patterns. When a valid pattern is found that aligns with the M15 bias (e.g., a bullish OB during an M15 uptrend), it's stored as a Poi and drawn on the chart.
Entry Trigger:
It checks if the price on the LTF enters a valid (unmitigated) POI zone.
Based on the selected i_entryMode, it either waits for a CHoCH or enters aggressively.
Once an entry condition is met, it calculates the SL based on the i_slMode, calculates the TP using the i_tpRatio, and creates a new Trade.
Trade Monitoring: For every active trade, the script checks on each new bar if the price has hit the SL or TP level. When it does, the trade's result is updated, and the visual boxes are finalized.
## Part 5: On-Screen Display
This part creates the Performance Dashboard table shown on the top-right of the chart. It provides a real-time summary of:
M15 Bias: Current market direction.
Total Trades: The total number of completed trades from the history.
Win Rate: The percentage of winning trades.
Total R-Multiple: The cumulative Risk-to-Reward multiple (sum of RRR from wins minus losses). A positive value indicates overall profitability.
🇹🇭 คำอธิบายและข้อแนะนำภาษาไทย
สคริปต์นี้เป็น Indicator สำหรับกลยุทธ์การเทรดแบบ Smart Money Concepts (SMC) ที่ใช้การวิเคราะห์จากหลายกรอบเวลา (Multi-Timeframe) เพื่อหาจุดเข้าเทรดที่มีความเป็นไปได้สูง
หลักการทำงานของ Indicator มีดังนี้:
Timeframe ใหญ่ (HTF) - M15: ใช้กำหนดทิศทางหลักของตลาด หรือ "Bias"
Timeframe กลาง (MTF) - M5: ใช้หาโซนสำคัญ หรือ "Point of Interest (POI)" เช่น Order Blocks หรือ Fair Value Gaps ที่สอดคล้องกับทิศทางจาก M15
Timeframe เล็ก (LTF) - กราฟปัจจุบัน: ใช้หาสัญญาณยืนยันเพื่อเข้าเทรดในโซน POI ที่กำหนดไว้
รายละเอียดของโค้ด
## ส่วนที่ 1: การตั้งค่า (Inputs & Settings)
ส่วนนี้ให้คุณปรับแต่งค่าต่างๆ ของ Indicator ได้:
การตั้งค่าทั่วไป:
i_pivotLookback: กำหนดระยะเวลาที่ใช้มองหาจุดกลับตัว (Pivot) ใน Timeframe เล็ก (LTF) เพื่อใช้ยืนยันสัญญาณ Change of Character (CHoCH)
การตั้งค่า M15 (ทิศทางหลัก):
i_m15EmaFast / i_m15EmaSlow: ใช้เส้น EMA 2 เส้นบน Timeframe 15 นาที เพื่อกำหนดเทรนด์หลัก หาก EMA เร็วอยู่เหนือ EMA ช้า จะเป็นเทรนด์ขาขึ้น และในทางกลับกัน
การตั้งค่า M5 (จุดสนใจ - POI):
i_showM5Fvg / i_showM5Ob: เปิด/ปิด การแสดงโซน Fair Value Gaps (FVG) และ Order Blocks (OB) บน Timeframe 5 นาที ซึ่งเป็นโซนที่สคริปต์จะใช้หาโอกาสเข้าเทรด
i_maxPois: จำกัดจำนวนโซน POI ที่จะแสดงผลบนหน้าจอ เพื่อไม่ให้กราฟดูรกเกินไป
การตั้งค่า LTF (การเข้าเทรด):
i_entryMode:
ยืนยัน (Confirmation): เป็นโหมดที่ปลอดภัยกว่า โดยสคริปต์จะรอให้เกิดสัญญาณ Change of Character (CHoCH) ใน Timeframe เล็กก่อน หลังจากที่ราคาเข้ามาในโซน POI แล้ว
เชิงรุก (Aggressive): เป็นโหมดที่เสี่ยงกว่า โดยสคริปต์จะเข้าเทรดทันทีที่ราคาแตะระดับ 50% ของโซน POI โดยไม่รอสัญญาณยืนยัน CHoCH
i_showChoch: เปิด/ปิด การแสดงเส้น CHoCH บนกราฟ
การตั้งค่าการจัดการเทรด:
i_tpRatio: กำหนด อัตราส่วนกำไรต่อความเสี่ยง (Risk-to-Reward Ratio) เพื่อตั้งเป้าหมายทำกำไร (Take Profit) เช่น 2.0 หมายถึงระยะทำกำไรจะเป็น 2 เท่าของระยะตัดขาดทุน
i_slMode: (ฟีเจอร์ใหม่ V5.2) มี 4 รูปแบบในการคำนวณ Stop Loss:
โซน POI (ค่าเริ่มต้น): วาง SL ไว้ที่ขอบนอกสุดของโซน POI
Swing ล่าสุด: วาง SL ไว้ที่จุด Swing High/Low ล่าสุดของ Timeframe เล็ก (LTF) ก่อนเข้าเทรด
ATR: ใช้ค่า ATR (Average True Range) เพื่อกำหนด SL ตามระดับความผันผวนของราคา
แท่งเทียนก่อนหน้า: วาง SL ไว้ที่ราคา High/Low ของแท่งเทียนก่อนหน้าที่จะเข้าเทรด เป็นวิธีที่ SL แคบและเสี่ยงที่สุด
i_maxHistory: กำหนดจำนวนประวัติการเทรดที่จะแสดงย้อนหลังบนกราฟ
## ส่วนที่ 2: ประเภทข้อมูลและตัวแปร
ส่วนนี้เป็นการสร้างโครงสร้างข้อมูล (type) เพื่อจัดเก็บข้อมูลให้เป็นระบบ:
Poi: เก็บข้อมูลของโซน POI แต่ละโซน เช่น กรอบราคาบน-ล่าง, ทิศทาง (ขึ้น/ลง) และสถานะว่าถูกใช้งานไปแล้วหรือยัง (Mitigated)
Trade: เก็บรายละเอียดของแต่ละการเทรด เช่น ราคาเข้า, SL, TP, ผลลัพธ์ (Win/Loss/Active) และอ็อบเจกต์สำหรับวาดกล่องบนกราฟ
## ส่วนที่ 3: ตรรกะหลักและการคำนวณ
เป็นหัวใจสำคัญของ Indicator:
ดึงข้อมูลข้าม Timeframe: ใช้ฟังก์ชัน request.security เพื่อดึงข้อมูล EMA จาก M15 และข้อมูลแท่งเทียนจาก M5 มาใช้งาน
ระบุ POI: สคริปต์จะค้นหา FVG และ OB บน M5 ตลอดเวลา หากเจ้ารูปแบบที่สอดคล้องกับทิศทางหลักจาก M15 (เช่น เจอ Bullish OB ในขณะที่ M15 เป็นขาขึ้น) ก็จะวาดโซนนั้นไว้บนกราฟ
เงื่อนไขการเข้าเทรด:
เมื่อราคาใน Timeframe เล็ก (LTF) วิ่งเข้ามาในโซน POI ที่ยังไม่เคยถูกใช้งาน
สคริปต์จะรอสัญญาณตาม i_entryMode ที่เลือกไว้ (รอ CHoCH หรือเข้าแบบ Aggressive)
เมื่อเงื่อนไขครบ จะคำนวณ SL และ TP จากนั้นจึงบันทึกการเทรดใหม่
ติดตามการเทรด: สำหรับเทรดที่ยัง "Active" อยู่ สคริปต์จะคอยตรวจสอบทุกแท่งเทียนว่าราคาไปถึง SL หรือ TP แล้วหรือยัง เมื่อถึงจุดใดจุดหนึ่ง จะบันทึกผลและสิ้นสุดการวาดกล่องบนกราฟ
## ส่วนที่ 5: การแสดงผลบนหน้าจอ
ส่วนนี้จะสร้างตาราง "Performance Dashboard" ที่มุมขวาบนของกราฟ เพื่อสรุปผลการทำงานแบบ Real-time:
M15 Bias: แสดงทิศทางของตลาดในปัจจุบัน
Total Trades: จำนวนเทรดทั้งหมดที่เกิดขึ้นในประวัติ
Win Rate: อัตราชนะ คิดเป็นเปอร์เซ็นต์
Total R-Multiple: ผลตอบแทนรวมจากความเสี่ยง (R) ทั้งหมด (ผลรวม RRR ของเทรดที่ชนะ ลบด้วยจำนวนเทรดที่แพ้) หากเป็นบวกแสดงว่ามีกำไรโดยรวม
📋 ข้อแนะนำในการใช้งาน
Timeframe ที่เหมาะสม: Indicator นี้ถูกออกแบบมาให้ใช้กับ Timeframe เล็ก (LTF) เช่น M1, M3 หรือ M5 เนื่องจากมันดึงข้อมูลจาก M15 และ M5 มาเป็นหลักการอยู่แล้ว
สไตล์การเทรด:
Confirmation: เหมาะสำหรับผู้ที่ต้องการความปลอดภัยสูง รอการยืนยันก่อนเข้าเทรด อาจจะตกรถบ้าง แต่ลดความเสี่ยงจากการเข้าเทรดเร็วเกินไป
Aggressive: เหมาะสำหรับผู้ที่ยอมรับความเสี่ยงได้สูงขึ้น เพื่อให้ได้ราคาเข้าที่ดีที่สุด
การเลือก Stop Loss:
"Swing ล่าสุด" และ "โซน POI" เป็นวิธีมาตรฐานตามหลัก SMC
"ATR" เหมาะกับตลาดที่มีความผันผวนสูง เพราะ SL จะปรับตามสภาพตลาด
"แท่งเทียนก่อนหน้า" เป็นวิธีที่เสี่ยงที่สุด เหมาะกับการเทรดเร็วและต้องการ RRR สูงๆ แต่ก็มีโอกาสโดน SL ง่ายขึ้น
การบริหารความเสี่ยง: Indicator นี้เป็นเพียง เครื่องมือช่วยวิเคราะห์ ไม่ใช่สัญญาณซื้อขายอัตโนมัติ 100% ผู้ใช้ควรมีความเข้าใจในหลักการของ SMC และทำการบริหารความเสี่ยง (Risk Management) อย่างเคร่งครัดเสมอ
การทดสอบย้อนหลัง (Backtesting): ควรทำการทดสอบ Indicator กับสินทรัพย์และตั้งค่าต่างๆ เพื่อให้เข้าใจลักษณะการทำงานและประสิทธิภาพของมันก่อนนำไปใช้เทรดจริง

MVWAP 5/21/50 + LWMA 400Moving vwap de 5,21,50 y media movil ponderada de 400
se puede utilizar con cruces


Gattsreal EMASummary
The Gattsreal EMA indicator is a complete technical analysis tool designed to provide a clear and immediate view of the market trend and momentum across multiple timeframes. It combines long-term Exponential Moving Averages (EMAs) with a short-term EMA "ribbon," allowing traders to quickly identify the direction of the main trend and the strength of short-term movements.
Indicator Components
The Gattsreal EMA is composed of two main elements, both fully customizable:
Long-Term EMAs (Thick Lines):
EMA 200 (White): Considered the definitive line between a bull market and a bear market. Prices above the 200 EMA are generally considered to be in a long-term uptrend.
EMA 50 (Blue): An important medium-term trend line, often used as a dynamic level of support or resistance.
Short-Term EMA Ribbon:
Consists of a set of 9 EMAs (periods 9, 10, 15, 20, 25, 30, 35, 40, and 45).
The "ribbon" expands when volatility increases and contracts when volatility decreases.
The color of the ribbon's fill changes to indicate short-term momentum:
Green: The ribbon is in an uptrend (fastest EMA above the slowest), suggesting buying pressure.
Red: The ribbon is in a downtrend (fastest EMA below the slowest), suggesting selling pressure.
How to Use the Indicator
The Gattsreal EMA can be used in various ways to enhance your analysis and decision-making:
Main Trend Identification: The price's position relative to the 200 and 50 EMAs helps define your operational bias. It is preferable to trade in the direction of the main trend.
Entry and Exit Signals: The crossing of the price through the EMA ribbon can be used as a signal. For example, when the price crosses and closes above the entire ribbon and it turns green, it can be a buy signal.
Momentum Confirmation: The color and expansion of the ribbon serve as excellent confirmation of the strength of a move. A green and expanding ribbon confirms strong bullish momentum.
Dynamic Support and Resistance: All 11 EMAs can act as dynamic levels of support (in an uptrend) or resistance (in a downtrend).
This indicator is a powerful tool for traders of all levels looking for a visual and effective way to analyze market trends.

Relative Volume Strategy📈 Relative Volume Strategy by GabrielAmadeusLau
This Pine Script strategy combines volume-based momentum analysis with price action filtering, breakout detection, and dynamic stop-loss/take-profit logic, allowing for highly adaptable long and short entries. It is particularly suited for traders looking to identify reversals or continuation setups based on relative volume spikes and candle behavior.
🧠 Core Concept
At its core, this strategy uses a Relative Volume %R oscillator, comparing the current volume to its historical range using a Williams %R-like calculation. The oscillator is paired with dual moving average filters (Fast & Slow) to identify when volume is expanding or contracting.
Entries are further refined using a configurable price action filter based on the structure of bullish or bearish candles:
Simple: Basic up/down bar
Filtered: Range-based strength confirmation
Aggressive: Momentum-based breakout
Inside: Reversal bar patterns
Combinations of the above can be toggled for both long and short entries.
⚙️ Configurable Features
Trade Direction Control: Choose between Long Only, Short Only, or Both.
Directional Bar Modes: Set different conditions for long and short bar types (Simple, Filtered, Aggressive, Inside).
Breakout Filter: Optional filter to exclude trades near 5-bar highs/lows to avoid poor R/R trades.
Stop Loss & Take Profit System:
ATR-based dynamic SL/TP.
Configurable multipliers for both SL and TP.
Timed Exit: Optional bar-based exit after a fixed number of candles.
Custom Volume MA Smoothing: Choose from various smoothing algorithms (SMA, EMA, JMA, T3, Super Smoother, etc.) for both fast and slow volume trends.
Relative Volume Threshold: Minimum %R level for trade filtering.
📊 Technical Indicators Used
Relative Volume %R: A modified version of Williams %R, calculated on volume.
Dual Volume MAs: Fast and Slow MAs for volume trends using user-selected smoothing.
ATR: Average True Range for dynamic SL/TP calculation.
Breakout High/Low: 5-bar breakout thresholds to avoid late entries.
🚀 Trade Logic
Long Entry:
Volume > Fast MA > Slow MA
Relative Volume %R > Threshold
Price passes long directional filter
Optional: below recent breakout high
Short Entry:
Volume < Fast MA < Slow MA
Relative Volume %R < 100 - Threshold
Price passes short directional filter
Optional: above recent breakout low
Exits:
After N bars (configurable)
ATR-based Stop Loss / Take Profit if enabled
📈 Visualization
Orange Columns: Relative Volume %R
Green Line: Fast Volume MA
Red Line: Slow Volume MA
💡 Use Case
Ideal for:
Reversal traders catching capitulation or accumulation spikes
Momentum traders looking for volume-confirmed trends
Quantitative strategy developers wanting modular MA and price action filter logic
Intraday scalpers or swing traders using relative volume dynamics
Created by: GabrielAmadeusLau
License: Mozilla Public License 2.0
🔗 mozilla.org

Holy GrailThis is a long-only educational strategy that simulates what happens if you keep adding to a position during pullbacks and only exit when the asset hits a new All-Time High (ATH). It is intended for learning purposes only — not for live trading.
🧠 How it works:
The strategy identifies pullbacks using a simple moving average (MA).
When price dips below the MA, it begins monitoring for the first green candle (close > open).
That green candle signals a potential bottom, so it adds to the position.
If price goes lower, it waits for the next green candle and adds again.
The exit happens after ATH — it sells on each red candle (close < open) once a new ATH is reached.
You can adjust:
MA length (defines what’s considered a pullback)
Initial buy % (how much to pre-fill before signals start)
Buy % per signal (after pullback green candle)
Exit % per red candle after ATH
📊 Intended assets & timeframes:
This strategy is designed for broad market indices and long-term appreciating assets, such as:
SPY, NASDAQ, DAX, FTSE
Use it only on 1D or higher timeframes — it’s not meant for scalping or short-term trading.
⚠️ Important Limitations:
Long-only: The script does not short. It assumes the asset will eventually recover to a new ATH.
Not for all assets: It won't work on assets that may never recover (e.g., single stocks or speculative tokens).
Slow capital deployment: Entries happen gradually and may take a long time to close.
Not optimized for returns: Buy & hold can outperform this strategy.
No slippage, fees, or funding costs included.
This is not a performance strategy. It’s a teaching tool to show that:
High win rate ≠ high profitability
Patience can be deceiving
Many signals = long capital lock-in
🎓 Why it exists:
The purpose of this strategy is to demonstrate market psychology and risk overconfidence. Traders often chase strategies with high win rates without considering holding time, drawdowns, or opportunity cost.
This script helps visualize that phenomenon.

HEMA Trend by Rostek (Filters + ATR + RR) For testing by anyone. Enjoy! :)
HEMA Trend Levels with Gradient, ATR-based SL & TP, HTF Filter, and R/R Statistics
This advanced indicator is designed to help you detect high-quality trend crossovers using HEMA (Hull Exponential Moving Average) smoothing logic. It integrates dynamic visualization, strong multi-layer filters, and risk management levels — all in one package.
✅ Core Concept
The indicator plots two HEMAs (fast and slow), with a gradient fill between them that dynamically changes color based on the trend direction. Crossovers between these HEMAs generate potential trade signals (long or short).
🎨 Key Visual Features
Smooth gradient fill area between fast and slow HEMA.
Dynamic arrows marking crossover points (precisely above/below HEMA cross).
Optional ATR-based Stop Loss (SL) and Take Profit (TP) levels shown as dashed lines with labels.
Automatic display of calculated Risk/Reward (R/R) ratio next to TP level.
⚙️ Powerful Filters
You can enable/disable each of these filters individually:
✅ EMA Filter — Confirm signals only when the price is above/below a selected EMA (default: 100).
✅ ADX Filter — Confirms signals only if ADX value exceeds a set threshold (default: 20).
✅ RSI Filter — Filter signals based on RSI value (e.g., >50 for longs, <50 for shorts).
✅ Higher Time Frame (HTF) EMA Filter — Only take signals aligned with a higher timeframe EMA trend (e.g., daily EMA 100).
📏 Risk Management Features
ATR-based Stop Loss (SL): Dynamic stop level calculated using ATR, configurable multiplier (e.g., 1.5 × ATR).
ATR-based Take Profit (TP): Dynamic take profit level based on ATR, configurable multiplier (e.g., 3 × ATR).
Risk/Reward Statistics: Calculates and displays R/R ratio on the chart to help visually evaluate trade setups.
🔔 Alerts
A single unified alert condition for both long and short filtered signals, making it easy to set up TradingView alerts.
⚡ Usage Tips
Adjust HEMA lengths (default: 20 & 40) to tune responsiveness.
Enable/disable filters depending on your strategy and market conditions.
Fine-tune ATR multipliers for SL/TP based on your risk tolerance.
Use HTF filter to trade only in the direction of the main higher timeframe trend.
✅ Ideal for
Trend-following traders who want smoothed entries.
Traders looking for integrated visual risk management levels.
Users who want precise, customizable signals with strong filtering logic.

EMA/DEMA_group_stdThis indicator is like its sister indicator in that it measures dispersion but instead of being cumulative it measures distance between moving averages in each group.
Group 1:11, 13, 18, 21
Group 2:18, 21, 29, 34
Group 3: 29, 34, 47, 55
Group 4: 47, 55, 76, 89
Group 5: 76, 89 123, 144
Group 6: 123, 144, 199, 233
Group 7: 199, 233, 322, 377
How to use
1. Divergences
2. Moving average crosses
3. Momentum
Plotshape colors show when moving averages are nearing a crossover and level can be manually set in menu.

Price Extension from 8 EMAOverview
This indicator can be used to see how far away the price is from the 8 EMA. It compares this to the Average Daily Range % to see if the stock may be overextended. The "Extension Multiplier" represents how far the stock is extended away from the 8 EMA.
Core Concept
This indicator is best used for breakout trades that are trying to make sure they are not chasing the stock.
How to Use This Indicator
This tool is primarily intended for analyzing daily charts of individual stocks and is often used by breakout traders to evaluate potential entry areas.
If the stock is far away from the 8 EMA, it is likely not ready to break out. If it is close to the 8ema, it could be ready to move higher.
This indicator can also be used in the opposite way. For example, shorting or puts.
Understanding the colors
Green (Not Extended): Indicates the price is close to the 8 EMA. This often corresponds to periods of consolidation.
Yellow (Slightly Extended): The price is beginning to move away from the 8 EMA.
Orange (Extended): The price has moved a considerable distance from the 8 EMA.
Red (Very Extended): The price is at an extreme distance from the 8 EMA, historically increasing the likelihood of a pullback or consolidation.
Settings
Info Row Position: Adjusts the vertical position of the display table on the chart. Useful when using other indicators.
ADR Length: Sets the lookback period for calculating the Average Daily Range. Or the average range % for different timeframes.
Timeframe: Determines the timeframe for the EMA and ADR calculation (the default is Daily).

SPX Optimized EMA+VWAP+RSI IndicatorOptimized SPX EMA+VWAP+RSI indicators.
EMA9 = Orange
EMA21 =Blue
EMA50=Purple
EMA200=Red
VWAP=Teal

The SignalThe Signal — 9/21 EMA Cloud Indicator
“The Signal” is a clean, no-nonsense trend-following tool designed for traders who value clarity and precision.
This indicator plots a cloud between the 9-period and 21-period Exponential Moving Averages (EMAs), giving you immediate visual cues on trend direction and momentum. When the 9 EMA crosses above the 21 EMA, the cloud turns green — signaling bullish momentum. When the 9 EMA crosses below the 21 EMA, the cloud turns red — indicating potential bearish pressure.
🔍 Features:
- Minimalist design focused on the two most critical EMAs used by professional traders.
- Dynamic color-coded cloud: green for bullish, red for bearish.
- Optional EMA lines to fine-tune entries/exits.
- Offset control to project the EMAs forward and visualize leading momentum.
🧠 Strategy Recommendations
Basic Strategy:
- Buy Entry: When 9 EMA crosses above 21 EMA and the cloud turns green.
- Sell Entry: When 9 EMA crosses below 21 EMA and the cloud turns red.
- Use a trailing stop-loss or recent swing low/high for exits.
- CME_MINI:NQ1! Combine with volume confirmation or RSI divergence for higher confidence setups.

MA Deviationインジケーター名: MA乖離率インジケーター / MA Deviation Indicator
📖 説明(日本語)
このインジケーターは、3本の移動平均線(MA)の乖離率を視覚化し、相場の過熱感やトレンドの強さを判定するためのツールです。
✅ 主な機能
複数の移動平均タイプに対応:SMA, EMA, WMA, RMA, VWMA, HMAから選択可能。
最大3本の移動平均を自由に設定可能。
それぞれのMA間の乖離率(%)をチャートにプロット。
指定した閾値を超えた時に背景色を表示(緑=乖離が正方向に大きい、赤=負方向に大きい)。
データウィンドウ上で「背景表示フラグ」も確認可能(サインが出ているかどうかが数値で確認できます)。
⚠️ 注意事項
乖離率は過去の価格と比較したものであり、将来の価格を保証するものではありません。
短期トレードよりも、トレンドの強弱や過熱感の把握に適しています。
複数のMAを使用しない場合でも、背景色は他の設定されたMAペアで判定されることにご注意ください。
📖 Description (English)
This indicator visualizes the percentage deviation between up to 3 configurable moving averages (MA), helping traders assess trend momentum and potential overextension.
✅ Key Features
Supports multiple MA types: Choose from SMA, EMA, WMA, RMA, VWMA, and HMA.
Set up to 3 custom MAs with different periods.
Plots the deviation (%) between each pair of selected MAs.
Background color highlights extreme deviations (green = strong positive deviation, red = strong negative deviation).
Data Window flag (1 or 0) shows whether background highlight is active.
⚠️ Notes
Deviation percentages are not predictive, but useful for identifying trend strength or market overheating.
Especially useful for trend analysis, not for exact entry signals.
Even if not all lines are shown, the background color may still appear based on the enabled MA comparisons.

BTCs RSI Dip & EMA Crossover AlertThis indicator helps you catch potential reversal opportunities after a stock or crypto asset becomes oversold.
🛠 How it works:
Watches RSI (Relative Strength Index)
First, it waits for RSI to dip below a level you choose (default is 30), which often signals the asset is oversold and due for a bounce.
Waits for Price Confirmation
After the RSI dip, the indicator watches for the first time price closes above both the 55 EMA and 200 EMA — a strong sign that momentum may be shifting upward.
Sends a “Buy” Signal
When that happens, the script:
Plots a green “Buy” label on the chart
Triggers an alert (labeled "Buy Indicator") so you’re notified immediately
⚙️ Customizable Inputs:
RSI threshold (e.g. 30 or 25)
RSI period (e.g. 14)
EMA lengths (default: 55 and 200)
✅ Designed to:
Avoid false signals by requiring both RSI weakness and price strength
Only trigger once per RSI dip, so you’re not spammed with repeat alerts
Use it to stay patient during downtrends and get alerted when the technicals show a possible turnaround. Great for swing traders and longer-term entries.

Previous Day High/Low with Labelsprevious day range, moving averages editable and with notes to add to the screen

ema/dema_cum_stdThis indicator measures distance between moving averages by first calculating the variance of a group of moving averages the converting to standard deviation by taking the square root of the variance and then normalized by dividing by price (close) and multiplying by 100 ( percent). Here are the groups
Group 1 :11,13, 18, 21
Group 2: 11, 13, 18, 21, 29, 34
Group 3: 11, 13, 18, 21, 29, 34, 47, 55
Group 4: 11, 13, 18, 21, 29, 34, 47, 55, 76, 89
Group 5: 11, 13, 18, 21, 29, 34, 47, 55, 76, 89, 123, 144
Group 6: 11, 13, 18, 21, 29, 34, 47, 55, 76, 89, 123, 144, 199, 233
Group 7: 11, 13, 18, 21, 29, 34, 47, 55, 76, 89, 123, 144, 199, 233, 322, 377
Group 8: 11, 13, 18, 21, 29, 34, 47, 55, 76, 89, 123, 144, 199, 233, 322, 377, 521, 610
Great for showing compression and expansion levels and showing divergences. I try to only use Groups 1-4 or Groups 1-5
Shows when moving average groups squeeze below the set level you set using plot shape function. Shape colors are color coordinated to match moving average dispersion plots
Uses DEMA and EMA


Rolling Log Returns [BackQuant]Rolling Log Returns
The Rolling Log Returns indicator is a versatile tool designed to help traders, quants, and data-driven analysts evaluate the dynamics of price changes using logarithmic return analysis. Widely adopted in quantitative finance, log returns offer several mathematical and statistical advantages over simple returns, making them ideal for backtesting, portfolio optimization, volatility modeling, and risk management.
What Are Log Returns?
In quantitative finance, logarithmic returns are defined as:
ln(Pₜ / Pₜ₋₁)
or for rolling periods:
ln(Pₜ / Pₜ₋ₙ)
where P represents price and n is the rolling lookback window.
Log returns are preferred because:
They are time additive : returns over multiple periods can be summed.
They allow for easier statistical modeling , especially when assuming normally distributed returns.
They behave symmetrically for gains and losses, unlike arithmetic returns.
They normalize percentage changes, making cross-asset or cross-timeframe comparisons more consistent.
Indicator Overview
The Rolling Log Returns indicator computes log returns either on a standard (1-period) basis or using a rolling lookback period , allowing users to adapt it to short-term trading or long-term trend analysis.
It also supports a comparison series , enabling traders to compare the return structure of the main charted asset to another instrument (e.g., SPY, BTC, etc.).
Core Features
✅ Return Modes :
Normal Log Returns : Measures ln(price / price ), ideal for day-to-day return analysis.
Rolling Log Returns : Measures ln(price / price ), highlighting price drift over longer horizons.
✅ Comparison Support :
Compare log returns of the primary instrument to another symbol (like an index or ETF).
Useful for relative performance and market regime analysis .
✅ Moving Averages of Returns :
Smooth noisy return series with customizable MA types: SMA, EMA, WMA, RMA, and Linear Regression.
Applicable to both primary and comparison series.
✅ Conditional Coloring :
Returns > 0 are colored green ; returns < 0 are red .
Comparison series gets its own unique color scheme.
✅ Extreme Return Detection :
Highlight unusually large price moves using upper/lower thresholds.
Visually flags abnormal volatility events such as earnings surprises or macroeconomic shocks.
Quantitative Use Cases
🔍 Return Distribution Analysis :
Gain insight into the statistical properties of asset returns (e.g., skewness, kurtosis, tail behavior).
📉 Risk Management :
Use historical return outliers to define drawdown expectations, stress tests, or VaR simulations.
🔁 Strategy Backtesting :
Apply rolling log returns to momentum or mean-reversion models where compounding and consistent scaling matter.
📊 Market Regime Detection :
Identify periods of consistent overperformance/underperformance relative to a benchmark asset.
📈 Signal Engineering :
Incorporate return deltas, moving average crossover of returns, or threshold-based triggers into machine learning pipelines or rule-based systems.
Recommended Settings
Use Normal mode for high-frequency trading signals.
Use Rolling mode for swing or trend-following strategies.
Compare vs. a broad market index (e.g., SPY or QQQ ) to extract relative strength insights.
Set upper and lower thresholds around ±5% for spotting major volatility days.
Conclusion
The Rolling Log Returns indicator transforms raw price action into a statistically sound return series—equipping traders with a professional-grade lens into market behavior. Whether you're conducting exploratory data analysis, building factor models, or visually scanning for outliers, this indicator integrates seamlessly into a modern quant's toolbox.
EMA 20 – Yellow DotsA simple EMA 20 designed for high visibility to easily stand out amongst other indicators.

Adjustable EMA Crossover with Signals3 Adjustable Ema's with crossover. These are used for identifying a trend and help with entry and exit signals.

Gabriel's MPT Moving Average RibbonGabriel's MPT Moving Average Ribbon is a cutting-edge, risk-adjusted technical analysis tool that fuses Modern Portfolio Theory (MPT) with adaptive moving average logic to dynamically guide market participants through bullish and bearish conditions.
This ribbon is not a simple MA crossover — it leverages Sharpe Ratio, Sortino Ratio, Omega Ratio, and Value at Risk (VaR) to scale and smooth each moving average using real-time probabilistic efficiency metrics. Combined, these elements create a volatility-weighted, risk-optimized visualization of market structure.
🔍 Core Features:
Multi-Ratio Adaptive Scaling: Moving averages are dynamically weighted by Omega Ratio, Sortino Stdev, Sharpe Winrate, and VaR conditions for smarter price tracking.
Volatility Engine: Supports multiple return models:
Close-to-Close
Parkinson
Garman-Klass
Rogers–Satchell
Yang–Zhang (default for highest accuracy)
Smart Ribbon Construction:
Blends 3 different MA types per ribbon (e.g., SMA, EMA, WMA) for each of the 4 ribbons
Supports WMA-style dynamic weighting using MPT-derived ratios
Sharpe Winrate Estimation: Uses CDF logic to project the probability of success given current Sharpe ratio.
Dynamic Risk Phase Detection (VaR):
Identifies Risk On, Risk Off, or Neutral states using a triple-model composite VaR framework.
🛎️ Alerts Included:
📈 Bullish Crossover Alert: MA #1 crossing above MA #2 with all ribbons aligned upward.
📉 Bearish Crossunder Alert: MA #1 crossing below MA #2 with all ribbons aligned downward.
📊 Omega Ratio Alert: Triggered when Omega exceeds 1 (profitable risk-adjusted reward).
⚠️ Omega Caution Alert: Triggered when Omega drops below 1.
🟢 Risk On Alert: Market enters a favorable, low-risk zone. Deep Value Zone for Long-Term Investing.
🔴 Risk Off Alert: Market enters a cautionary, high-risk phase.
🎯 Use Cases:
Trend Identification: MA ribbon alignment indicates momentum phases.
Risk-Tuned Entries/Exits: Combine ribbon crossovers with VaR/Ratio signals for confirmation.
Institutional Strategy Overlay: Ideal for portfolio managers integrating risk-adjusted technical overlays.
🧠 Pro Tips:
Use "Complete" mode for the most robust risk signal, as it blends Historical, EWMA, and Variance-Covariance ratios.
Customize each MA’s type and length to match your trading horizon (e.g., intraday, swing).
Toggle Ratios Weighted MA for adaptive weighting when market risk fluctuates.
It's set to the settings I use to trade, from MA settings to MPT table. It goes in order: Sharpe Est. Winrate, Deviation of Sortino, Omega Ratio (1 Year), and the Ideal position size according to VaR.

Adjustable EMA Crossover with Signals2 adjustable ema's with a crossover signal. This is to be used for trend identification along with entry and exit signals.
