RSI For LoopTitle: RSI For Loop
SurgeQuant’s RSI with Threshold Colors and Bar Coloring indicator is a sophisticated tool designed to identify overbought and oversold conditions using a customizable Relative Strength Index (RSI). By averaging RSI over a user-defined lookback period, this indicator provides clear visual signals for bullish and bearish market conditions. The RSI line and price bars are dynamically colored to highlight momentum, making it easier for traders to spot potential trading opportunities.
How It Works
RSI Calculation:
Computes RSI based on a user-selected price source (Close, High, Low, or Open) with a configurable length (default: 5). Optional moving average smoothing refines the RSI signal for smoother analysis.
Lookback Averaging:
Averages the RSI over a user-defined lookback period (default: 5) to generate a stable momentum indicator, reducing noise and enhancing signal reliability.
Threshold-Based Signals:
Long Signal: Triggered when the averaged RSI exceeds the upper threshold (default: 52), indicating overbought conditions.
Short Signal: Triggered when the averaged RSI falls below the lower threshold (default: 48), indicating oversold conditions.
Visual Representation
The indicator provides a clear and customizable visual interface: Green RSI Line and Bars: Indicate overbought conditions when the averaged RSI surpasses the upper threshold, signaling potential long opportunities.
Red RSI Line and Bars: Indicate oversold conditions when the averaged RSI drops below the lower threshold, signaling potential short opportunities.
Neutral Gray RSI Line: Represents RSI values between thresholds for neutral market conditions.
Threshold Lines: Dashed gray lines mark the upper and lower thresholds on the RSI panel for easy reference.
Customization & Parameters
The RSI with Threshold Colors and Bar Coloring indicator offers flexible parameters to suit
various trading styles: Source: Select the input price (default: Close; options: Close, High, Low, Open).
RSI Length: Adjust the RSI calculation period (default: 5).
Smoothing: Enable/disable moving average smoothing (default: enabled) and set the smoothing length (default: 10).
Moving Average Type: Choose from multiple types (SMA, EMA, DEMA, TEMA, WMA, VWMA, SMMA, HMA, LSMA, ALMA; default: ALMA).
ALMA Sigma: Configure the ALMA smoothing parameter (default: 5).
Lookback Period: Set the period for averaging RSI (default: 5).
Thresholds: Customize the upper (default: 52) and lower (default: 48) thresholds for signal generation.
Color Settings: Transparent green and red colors (70% transparency) for bullish and bearish signals, with gray for neutral states.
Trading Applications
This indicator is versatile and can be applied across various markets and strategies: Momentum Trading: Highlights strong overbought or oversold conditions for potential entry or exit points.
Trend Confirmation: Use bar coloring to confirm RSI-based signals with price action on the main chart.
Reversal Detection: Identify potential reversals when RSI crosses the customizable thresholds.
Scalping and Swing Trading: Adjust parameters (e.g., RSI length, lookback) to suit short-term or longer-term strategies.
Final Note
SurgeQuant’s RSI with Threshold Colors and Bar Coloring indicator is a powerful tool for traders seeking to leverage RSI for momentum and reversal opportunities. Its combination of lookback-averaged RSI, dynamic threshold signals, and synchronized RSI and bar coloring offers a robust framework for informed trading decisions. As with all indicators, backtest thoroughly and integrate into a comprehensive trading strategy for optimal results.
Indicators and strategies

AMOGH SMC 1Smart Money Concept (SMC) Indicator market structure ke powerful elements jaise Break of Structure (BOS), Change of Character (CHoCH), liquidity zones, aur Fair Value Gaps (FVG) ko identify karta hai. Is indicator ka purpose hai institutional price movements ko track karna—jahaan large players apna entry ya exit plan karte hain. Traditional indicators ke mukable SMC ek zyada refined aur logic-driven approach deta hai jisme market ka intent samajhna asaan hota hai. Ye tool traders ko trending aur consolidating market conditions me structure-based signals provide karta hai, jisse trade execution aur risk management aur effective ho jata hai. FVGs un zones ko highlight karte hain jahan price imbalance hota hai, aur CHoCH/BOS se market ka directional bias confirm hota hai. Jo traders price action aur institutional footprint pe kaam karte hain, unke liye ye indicator ek must-have resource hai. Iska design clean, customizable aur real-time plotting ke saath optimized hai.


Liquidity Sweeps [SB1]Liquidity Sweeps
This indicator detects liquidity sweep events where price briefly breaks above or below recent swing points before reversing. These sweeps often occur during stop hunts, fakeouts, or liquidity grabs, and are commonly used by smart money traders to trap breakout participants before reversing direction.
🔍 What It Does
Identifies key swing highs and lows based on user-defined pivot strength.
Detects:
Bearish Sweeps: Price breaks a recent high but fails to close above it.
Bullish Sweeps: Price breaks a recent low but fails to close below it.
Tracks whether these sweeps are simply wicks, full breakouts and retests, or a combination of both.
Highlights these zones with boxes and labels to signal high-probability reversal or reaction zones.
🧠 Why Use It
Liquidity sweeps are often used by institutions and large players to trigger stops and create movement. Detecting these events helps traders:
Avoid chasing false breakouts
Time entries around exhaustion or reversal points
Align trades with Smart Money Concepts (SMC), ICT principles, or Order Block Theory
Avoid chasing false breakouts
Time entries around exhaustion or reversal points
Align trades with Smart Money Concepts (SMC), ICT principles, or Order Block Theory
⚙️ Settings & Customization
Swings: Adjusts the sensitivity of swing high/low detection.
Detection Type:
Only Wicks: Detects when a wick pierces a level but closes back inside.
Only Outbreaks & Retests: Detects when a candle breaks out and later retests.
Wicks + Outbreaks & Retests: Shows both types for full coverage.
Extend Zones: Draws boxes across future bars until invalidation.
Colors: Fully customizable for bullish and bearish sweeps.
🧬 Original Enhancements
This script is based on open-source work by LuxAlgo and has been significantly enhanced with:
Multiple detection modes
Real-time alert support📣 📣
Efficient pivot memory cleanup📣 📣
Sweep zone auto-extension until broken
Improved visual clarity with dotted/dashed lines, and color-coded boxes
✅ Note: The original version had no alerts. This version adds real-time detection alerts for practical trading use. Credit: Original swing detection logic inspired by LuxAlgo’s open-source Liquidity Sweep framework. This version is extended and modified under the terms of the CC BY-NC-SA 4.0 license.
📣 📣 Alerts Included📣📣
🔼 Bullish Wick Sweep📣
🔽 Bearish Wick Sweep📣
These alerts allow traders to be notified the moment a liquidity sweep occurs, providing immediate edge for reactive or anticipatory trading.
📈 How to Use It
Add to your chart.
Choose the detection type based on your trading style:
Wicks for reversals and stop hunts
Outbreaks for failed breakouts or retests
Wait for sweep zones to form and monitor price behavior around them.
Use in conjunction with:
Fair Value Gaps (FVG)
Order Blocks
VWAP Anchors
Market Structure Breaks/ Breaks of structures

Multi-Time Period Charts with Wicks - ENEXSLWe wanted to see the candle wicks on the official Multi-Time Period Charts indicator.
This version has wick calculations added. Please see www.tradingview.com for the original indicator breakdown.
In short, this indicator will reference larger time periods and draw a candle with the wick around a smaller timeframe chart..

Price x Vol StochasticAn enhanced Fast Stochastic (FSTO) indicator that integrates volume as a conviction amplifier.
This script modifies the price stochastic to range from −1 to +1, allowing it to express directional momentum. Volume stochastic remains in the range of 0 to +1, serving as a direction-neutral amplifier.
The result is a bi-directional composite stochastic that:
>> Emphasizes congruent signals (e.g., strong price direction with strong volume).
>> Minimizes misleading or incongruent signals from high volume paired with neutral or conflicting price movement.
Ideal for identifying high-conviction breakouts and momentum divergences with volume support.

Range Bar Gaps DetectorRange Bar Gaps Detector
Overview
The Range Bar Gaps Detector identifies price gaps across multiple range bar sizes (12, 24, 60, and 120) on any trading instrument, helping traders spot potential support/resistance zones or breakout opportunities. Designed for Pine Script v6, this indicator detects gaps on range bars and exports data for use in companion scripts like Range Bar Gaps Overlap, making it ideal for multi-timeframe gap analysis.
Key Features
Multi-Range Gap Detection: Identifies gaps on 12, 24, 60, and 120-range bars, capturing both bullish (gap up) and bearish (gap down) price movements.
Customizable Sensitivity: Includes a user-defined minimum deviation (default: 10% of 14-period SMA) for 12-range gaps to filter out noise.
7-Day Lookback: Automatically prunes gaps older than 7 days to focus on recent, relevant price levels.
Data Export: Serializes up to 10 gaps per range (tops, bottoms, start bars, highest/lowest prices, and age) for seamless integration with overlap analysis scripts.
Debugging Support: Plots gap counts and aggregation data in the Data Window for easy verification of detected gaps.
How It Works
The indicator aggregates price movements to simulate higher range bars (24, 60, 120) from a base range bar chart. It detects gaps when the price jumps significantly between bars, ensuring gaps meet the minimum deviation threshold for 12-range bars. Gaps are stored in arrays, serialized for external use, and pruned after 7 days to maintain efficiency.
Usage
Add to your range bar chart (e.g., 12-range) to detect gaps across multiple ranges.
Use alongside the Range Bar Gaps Overlap indicator to visualize gaps and their overlaps as boxes on the chart.
Check the Data Window to confirm gap counts and sizes for each range (12, 24, 60, 120).
Adjust the "Minimal Deviation (%) for 12-Range" input to control gap detection sensitivity.
Settings
Minimal Deviation (%) for 12-Range: Set the minimum gap size for 12-range bars (default: 10% of 14-period SMA).
Range Sizes: Fixed at 24, 60, and 120 for higher range bar aggregation.
Notes
Ensure the script is published under your TradingView username (e.g., GreenArrow2005) for use with companion scripts.
Best used on range bar charts to maintain consistent gap detection.
For advanced overlap analysis, pair with the Range Bar Gaps Overlap indicator to highlight zones where gaps from different ranges align.
Ideal For
Traders seeking to identify key price levels for support/resistance or breakout strategies.
Multi-timeframe analysts combining gap data across various range bar sizes.
Developers building custom indicators that leverage gap data for advanced charting.

Position Trading Strategy - EMA + FVG (Conservative)claude.ai
# 📊 Conservative Position Trading Strategy - EMA + FVG
## 🎯 **Strategy Overview**
This indicator combines **Exponential Moving Averages (EMA)** with **Fair Value Gap (FVG)** analysis to identify high-probability trading opportunities. Designed specifically for **funded account traders** who need consistent, conservative performance with strict risk management.
---
## 🔧 **Key Features**
### ✅ **Smart Entry Scoring System (1-10 Scale)**
- **EMA Alignment**: 3 points maximum
- **Price Position**: 2 points maximum
- **Momentum Confirmation**: 2 points maximum
- **Volume Validation**: 1 point maximum
- **FVG Proximity**: 2 points maximum
### ✅ **Advanced Signal Filtering**
- **Confluence Filter**: Ensures strong trend alignment
- **Volatility Filter**: Avoids choppy market conditions
- **Time Separation**: Prevents overtrading
- **Enhanced Exit Logic**: Color-coded position tracking
### ✅ **Risk Management Features**
- **Pyramiding Control**: Configurable position scaling
- **Conservative Position Sizing**: Based on account risk
- **Smart Exit Conditions**: Protects profits and limits losses
---
## ⚙️ **Settings Configuration**
### 🎯 **Entry Signal Strength**
| Setting | Conservative | Moderate | Aggressive |
|---------|-------------|----------|------------|
| **Minimum Entry Score** | 8-9 | 7-8 | 6-7 |
| **FVG Threshold** | 0.20% | 0.15% | 0.10% |
| **Use Confluence Filter** | ✅ ON | ✅ ON | ❌ OFF |
| **Volatility Filter** | ✅ ON | ✅ ON | ❌ OFF |
**📝 Recommendation**: Start with **Conservative** settings for funded accounts, then adjust based on performance.
### 🏗️ **Pyramiding Configuration**
| Account Type | Pyramid Levels | Risk Per Trade | Max Drawdown Target |
|-------------|----------------|----------------|---------------------|
| **Funded Account** | 1-2 | 0.25-0.5% | <3% |
| **Personal Account** | 2-3 | 0.5-1.0% | <5% |
| **High Risk** | 3-4 | 1.0-2.0% | <10% |
### 🔧 **Recommended Settings by Trading Style**
#### 🛡️ **Ultra Conservative (Funded Accounts)**
```
Minimum Entry Score: 8
Pyramid Levels: 1
Risk Per Trade: 0.25%
FVG Threshold: 0.20%
Confluence Filter: ON
Volatility Filter: ON
Min Candle Separation: 8
```
#### ⚖️ **Balanced Approach**
```
Minimum Entry Score: 7
Pyramid Levels: 2
Risk Per Trade: 0.5%
FVG Threshold: 0.15%
Confluence Filter: ON
Volatility Filter: ON
Min Candle Separation: 5
```
#### 🎯 **Moderate Aggressive**
```
Minimum Entry Score: 6
Pyramid Levels: 3
Risk Per Trade: 1.0%
FVG Threshold: 0.10%
Confluence Filter: OFF
Volatility Filter: OFF
Min Candle Separation: 3
```
---
## 📈 **How to Use**
### 1️⃣ **Setup Process**
1. Add the indicator to your chart
2. Configure settings based on your account type
3. Set up alerts for entry/exit signals
4. Monitor the info table for real-time metrics
### 2️⃣ **Signal Interpretation**
- **Green Labels (L + Score)**: Long entry signals
- **Red Labels (S + Score)**: Short entry signals
- **Green EXIT L**: Long position exits
- **Magenta EXIT S**: Short position exits
### 3️⃣ **Info Table Monitoring**
- **Long/Short Score**: Current entry strength
- **Trend**: Overall market direction
- **Position**: Current position status
- **Pyramids**: Active scaling levels
- **Volatility**: Market condition assessment
---
## 🎨 **Visual Elements**
### 📊 **Chart Display**
- **Blue Line**: EMA 21 (Short-term trend)
- **Orange Line**: EMA 55 (Medium-term trend)
- **Red Line**: EMA 233 (Long-term trend)
- **Background Colors**: Subtle trend indication
- **Entry/Exit Labels**: Clear signal identification
### 📋 **Information Table**
Real-time dashboard showing:
- Current signal strength
- Position status
- Risk metrics
- Market conditions
---
## ⚠️ **Important Notes**
### 🔴 **Risk Disclaimers**
- **Past performance does not guarantee future results**
- **Always use proper risk management**
- **Test thoroughly on demo accounts first**
- **Funded account rules vary by provider**
### 💡 **Best Practices**
- **Backtest extensively** before live trading
- **Start with conservative settings**
- **Monitor maximum drawdown closely**
- **Keep detailed trading records**
- **Follow your funded account rules**
### 📅 **Recommended Timeframes**
- **Primary Analysis**: 4H, 1D
- **Entry Timing**: 1H, 15M
- **Avoid**: <15M timeframes
---
## 🎓 **Strategy Logic**
### 📈 **Entry Conditions**
1. **EMA Alignment**: Trend direction confirmation
2. **Price Position**: Above/below key EMAs
3. **Momentum**: RSI and price change validation
4. **Volume**: Above-average trading activity
5. **FVG Proximity**: Near unfilled gaps
### 📉 **Exit Conditions**
- EMA crossovers (trend change)
- Price breaks key support/resistance
- Momentum reversal signals
- Position management rules
---
## 🏆 **Performance Optimization**
### 📊 **For Better Results**
- **Combine with market structure analysis**
- **Use multiple timeframe confirmation**
- **Respect overall market trends**
- **Avoid trading during major news events**
### 🔧 **Customization Tips**
- **Adjust EMA periods** for different markets
- **Modify FVG threshold** based on volatility
- **Experiment with scoring weights**
- **Fine-tune risk parameters**
---
## 💬 **Community & Support**
### 📝 **Feedback Welcome**
- Share your settings and results
- Report any bugs or issues
- Suggest improvements
- Post your backtesting results
### 🤝 **Collaboration**
This strategy is designed to evolve with community input. Your feedback helps make it better for everyone!
---
## 🎯 **Final Recommendations**
### ✅ **Do:**
- Start conservative and adjust gradually
- Backtest thoroughly across different market conditions
- Keep detailed performance records
- Follow strict risk management rules
### ❌ **Don't:**
- Use maximum aggressive settings immediately
- Ignore drawdown limits
- Trade without proper backtesting
- Violate your funded account rules
---
**📞 Remember**: This indicator is a tool to assist your trading decisions. Always combine it with proper risk management, market analysis, and your own trading plan. Success in trading comes from discipline, patience, and continuous learning.
**🎯 Good luck and trade safely!**

EVaR Indicator and Position SizingThe Problem:
Financial markets consistently show "fat-tailed" distributions where extreme events occur with higher frequency than predicted by normal distributions (Gaussian or even log-normal). These fat tails manifest in sudden price crashes, volatility spikes, and black swan events that traditional risk measures like volatility can underestimate. Standard deviation and conventional VaR calculations assume normally distributed returns, leaving traders vulnerable to severe drawdowns during market stress.
Cryptocurrencies and volatile instruments display particularly pronounced fat-tailed behavior, with extreme moves occurring 5-10 times more frequently than normal distribution models would predict. This reality demands a more sophisticated approach to risk measurement and position sizing.
The Solution: Entropic Value at Risk (EVAR)
EVaR addresses these limitations by incorporating principles from statistical mechanics and information theory through Tsallis entropy. This advanced approach captures the non-linear dependencies and power-law distributions characteristic of real financial markets.
Entropy is more adaptive than standard deviations and volatility measures.
I was inspired to create this indicator after reading the paper " The End of Mean-Variance? Tsallis Entropy Revolutionises Portfolio Optimisation in Cryptocurrencies " by by Sana Gaied Chortane and Kamel Naoui.
Key advantages of EVAR over traditional risk measures:
Superior tail risk capture: More accurately quantifies the probability of extreme market moves
Adaptability to market regimes: Self-calibrates to changing volatility environments
Non-parametric flexibility: Makes less assumptions about the underlying return distribution
Forward-looking risk assessment: Better anticipates potential market changes (just look at the charts :)
Mathematically, EVAR is defined as:
EVAR_α(X) = inf_{z>0} {z * log(1/α * M_X(1/z))}
Where the moment-generating function is calculated using q-exponentials rather than conventional exponentials, allowing precise modeling of fat-tailed behavior.
Technical Implementation
This indicator implements EVAR through a q-exponential approach from Tsallis statistics:
Returns Calculation: Price returns are calculated over the lookback period
Moment Generating Function: Approximated using q-exponentials to account for fat tails
EVAR Computation: Derived from the MGF and confidence parameter
Normalization: Scaled to for intuitive visualization
Position Sizing: Inversely modulated based on normalized EVAR
The q-parameter controls tail sensitivity—higher values (1.5-2.0) increase the weighting of extreme events in the calculation, making the model more conservative during potentially turbulent conditions.
Indicator Components
1. EVAR Risk Visualization
Dynamic EVAR Plot: Color-coded from red to green normalized risk measurement (0-1)
Risk Thresholds: Reference lines at 0.3, 0.5, and 0.7 delineating risk zones
2. Position Sizing Matrix
Risk Assessment: Current risk level and raw EVAR value
Position Recommendations: Percentage allocation, dollar value, and quantity
Stop Parameters: Mathematically derived stop price with percentage distance
Drawdown Projection: Maximum theoretical loss if stop is triggered
Interpretation and Application
The normalized EVAR reading provides a probabilistic risk assessment:
< 0.3: Low risk environment with minimal tail concerns
0.3-0.5: Moderate risk with standard tail behavior
0.5-0.7: Elevated risk with increased probability of significant moves
> 0.7: High risk environment with substantial tail risk present
Position sizing is automatically calculated using an inverse relationship to EVAR, contracting during high-risk periods and expanding during low-risk conditions. This is a counter-cyclical approach that ensures consistent risk exposure across varying market regimes, especially when the market is hyped or overheated.
Parameter Optimization
For optimal risk assessment across market conditions:
Lookback Period: Determines the historical window for risk calculation
Q Parameter: Controls tail sensitivity (higher values increase conservatism)
Confidence Level: Sets the statistical threshold for risk assessment
For cryptocurrencies and highly volatile instruments, a q-parameter between 1.5-2.0 typically provides the most accurate risk assessment because it helps capturing the fat-tailed behavior characteristic of these markets. You can also increase the q-parameter for more conservative approaches.
Practical Applications
Adaptive Risk Management: Quantify and respond to changing tail risk conditions
Volatility-Normalized Positioning: Maintain consistent exposure across market regimes
Black Swan Detection: Early identification of potential extreme market conditions
Portfolio Construction: Apply consistent risk-based sizing across diverse instruments
This indicator is my own approach to entropy-based risk measures as an alterative to volatility and standard deviations and it helps with fat-tailed markets.
Enjoy!

WT-FLOW: MTF WaveTrend Trend-Follower📘 Strategy Introduction: WT-FLOW (WaveTrend Trend-Follower)
WT-FLOW is a multi-timeframe trend-following strategy specifically **optimized for the 15-minute timeframe** on the BTC/USDT trading pair. It is designed to help professional users follow buy/sell trends with high precision.
The strategy utilizes a three-tiered time alignment:
- **240min WaveTrend**: Macro trend filter (determines high-timeframe direction)
- **30min WaveTrend**: Momentum confirmation (validates trend continuation)
- **15min WaveTrend**: Signal generation (entries and exits are executed here)
It features an advanced **Trailing Stop** mechanism that includes maximum gain-based tracking logic and percentage-based fallback tolerance. Entry and exit points are marked on the chart with colored labels (🟢🔴❅❄), including bar index information.
⚙️ Technical Features:
- Compatible with Pine Script v5
- Backtestable via the `strategy()` block
- Supports both Long and Short position tracking
- Trailing Stop and Marginal Stop systems work in tandem
⚠️ Disclaimer:
This strategy is based on historical data. It should not be used in live markets without manual confirmation and appropriate risk management. Use is at your own risk.

MA5 — 四點高低 + H1/L1 水平線 + 突破/回買 + 月季線交叉//@version=5
indicator("MA5 — 四點高低 + H1/L1 水平線 + 突破/回買 + 月季線交叉", overlay=true)
// 1. 均線設定
ma5 = ta.sma(close, 5)
ma10 = ta.sma(close, 10)
ma20 = ta.sma(close, 20)
ma60 = ta.sma(close, 60) // ← 加上這一行
// 畫出均線
plot(ma5, title="MA5", color=color.red)
plot(ma10, title="MA10", color=color.orange)
plot(ma20, title="MA20", color=color.yellow)
plot(ma60, title="MA60", color=color.green)
// 2. 全域變數:方向、區段極值
var int direction = na
var float segHigh = na
var int segHighBar = na
var float segLow = na
var int segLowBar = na
// 3. 全域變數:儲存兩組高低
var float high1 = na
var int high1Bar = na
var float high2 = na
var int high2Bar = na
var float low1 = na
var int low1Bar = na
var float low2 = na
var int low2Bar = na
// 4. 全域變數:標籤與線段句柄
var label highLbl1 = na
var label highLbl2 = na
var label lowLbl1 = na
var label lowLbl2 = na
var line highLine = na
var line lowLine = na
var line h1Line = na
var line l1Line = na
// 5. 全域變數:回買訊號控制
var bool buyBackShown = false
// 6. 判斷當前段方向
currDir = close > ma5 ? 1 : close < ma5 ? -1 : direction
// 7. 首次初始化
if na(direction)
direction := currDir
segHigh := high
segHighBar := bar_index
segLow := low
segLowBar := bar_index
// 8. 同段內更新極值
if currDir == 1 and high > segHigh
segHigh := high
segHighBar := bar_index
if currDir == -1 and low < segLow
segLow := low
segLowBar := bar_index
// 9. 段落切換:推舊值→更新 H1/L1→刪舊標籤/線→畫新標籤/線→重置 seg*
if currDir != direction
high2 := high1
high2Bar := high1Bar
low2 := low1
low2Bar := low1Bar
if direction == 1
high1 := segHigh
high1Bar := segHighBar
else
low1 := segLow
low1Bar := segLowBar
buyBackShown := false
if not na(highLbl1)
label.delete(highLbl1)
if not na(highLbl2)
label.delete(highLbl2)
if not na(lowLbl1)
label.delete(lowLbl1)
if not na(lowLbl2)
label.delete(lowLbl2)
if not na(high2)
highLbl2 := label.new(high2Bar, high2, "H2", style=label.style_label_down, color=color.blue, textcolor=color.white)
if not na(high1)
highLbl1 := label.new(high1Bar, high1, "H1", style=label.style_label_down, color=color.blue, textcolor=color.white)
if not na(low2)
lowLbl2 := label.new(low2Bar, low2, "L2", style=label.style_label_up, color=color.purple, textcolor=color.white)
if not na(low1)
lowLbl1 := label.new(low1Bar, low1, "L1", style=label.style_label_up, color=color.purple, textcolor=color.white)
if not na(highLine)
line.delete(highLine)
if not na(high1) and not na(high2)
highLine := line.new(high2Bar, high2, high1Bar, high1, color=color.blue, width=2)
if not na(lowLine)
line.delete(lowLine)
if not na(low1) and not na(low2)
lowLine := line.new(low2Bar, low2, low1Bar, low1, color=color.purple, width=2)
if not na(h1Line)
line.delete(h1Line)
if not na(high1)
h1Line := line.new(high1Bar, high1, bar_index, high1, xloc=xloc.bar_index, extend=extend.right, color=color.green, style=line.style_dashed)
if not na(l1Line)
line.delete(l1Line)
if not na(low1)
l1Line := line.new(low1Bar, low1, bar_index, low1, xloc=xloc.bar_index, extend=extend.right, color=color.red, style=line.style_dashed)
segHigh := high
segHighBar := bar_index
segLow := low
segLowBar := bar_index
// 10. 更新方向
direction := currDir
// 11. 突破訊號:收盤首次突破 H1 且 ma5>ma10>ma20
buySignal = not na(high1) and ta.crossover(close, high1) and ma5 > ma10 and ma10 > ma20
if buySignal
label.new(bar_index, low, "突破", style=label.style_label_up, color=color.green, textcolor=color.white)
// 12. 回買訊號:L1 之後任一 K 棒,首次收盤突破 MA5,且高於 L1、漲幅>2%、ma5>ma10>ma20、且收盤>ma20
buyBackSignal = not na(low1) and bar_index > low1Bar and ta.crossover(close, ma5) and high > low1 and (close - open) / open > 0.02 and ma5 > ma10 and ma10 > ma20 and close > ma20 and not buyBackShown
if buyBackSignal
label.new(bar_index, low, "回買", style=label.style_label_up, color=color.green, textcolor=color.white)
buyBackShown := true
// 13. 月季線交叉且四線多頭排列時,在 K 棒正下方標示放大三角形
if ta.cross(ma20, ma60) and ma5 > ma10 and ma10 > ma20 and ma20 > ma60
label.new(bar_index, low, "▲", xloc=xloc.bar_index, yloc=yloc.belowbar, style=label.style_label_center, color=color.new(color.white, 100), textcolor=color.white, size=size.large)

Hybrid: RSI + Breakout + Dashboard95% of traders lose, then i developped a bot that can go over those rules.

Painel de Velas 1H e 2H + Grade DiáriaIndicator Description "1H and 2H Candlestick Panel + Daily Grid"
Overview
This advanced indicator for TradingView combines a candlestick information panel on multiple timeframes with a daily grid of supports and resistances, providing a complete market overview for intraday and swing trading.
Main Features
1. Automatic Daily Grid
Previous Close Line: Highlighted red line marking the previous day's close.
Support/Resistance Grid:
4 lines above (blue) and 4 lines below (gold) the previous close, spaced according to a configurable distance.
Automatic update at the beginning of each new day.
Customizable distance between lines in the inputs.
2. Multi-Timeframe Candlestick Panel
Information table in the upper right corner with data from:
Included timeframes: Current, 30M, 1H, 2H, 3H, 4H, 6H, 12H and Daily (1D).
Displayed information:
Open and Close
Price difference (value and color according to direction)
Candle type (Positive/Negative)
Time remaining until candlestick close (HH:MM:SS format)
3. Confluence Signals
Buy Alert: When all candlesticks (from current to daily) are positive.
Sell Alert: When all candlesticks (from current to daily) are negative.
Visual signals: Buy/sell arrows on the chart and configurable alerts.
Customizable Settings
Grid Distance (Dots): Adjust the distance between daily support/resistance lines.
How to Use
Daily Grid:
Use the blue lines (above) as potential resistance and the gold ones (below) as support.
The red line (previous close) is a key level for analysis.
Candlestick Panel:
Monitor the direction of candlesticks on different timeframes to identify trends.
Use the remaining time to plan entries before the close of important candlesticks.
Confluence Signals:
Trade in the direction of confluence when all timeframes are aligned (buy or sell).
Benefits
✔ Efficient multi-timeframe analysis
✔ Visual identification of support/resistance zones
✔ Automatic alerts for strong setups
✔ Easy grid customization
Ideal for traders who trade based on price action and timeframe confluence!

Divergence IndicatorLook for green circles (bullish divergences) below bars and red circles (bearish divergences) above bars.
Set up alerts as needed using the "Bullish Divergence" or "Bearish Divergence" conditions.

Holy GrailThis is a long-only educational strategy that simulates what happens if you keep adding to a position during pullbacks and only exit when the asset hits a new All-Time High (ATH). It is intended for learning purposes only — not for live trading.
🧠 How it works:
The strategy identifies pullbacks using a simple moving average (MA).
When price dips below the MA, it begins monitoring for the first green candle (close > open).
That green candle signals a potential bottom, so it adds to the position.
If price goes lower, it waits for the next green candle and adds again.
The exit happens after ATH — it sells on each red candle (close < open) once a new ATH is reached.
You can adjust:
MA length (defines what’s considered a pullback)
Initial buy % (how much to pre-fill before signals start)
Buy % per signal (after pullback green candle)
Exit % per red candle after ATH
📊 Intended assets & timeframes:
This strategy is designed for broad market indices and long-term appreciating assets, such as:
SPY, NASDAQ, DAX, FTSE
Use it only on 1D or higher timeframes — it’s not meant for scalping or short-term trading.
⚠️ Important Limitations:
Long-only: The script does not short. It assumes the asset will eventually recover to a new ATH.
Not for all assets: It won't work on assets that may never recover (e.g., single stocks or speculative tokens).
Slow capital deployment: Entries happen gradually and may take a long time to close.
Not optimized for returns: Buy & hold can outperform this strategy.
No slippage, fees, or funding costs included.
This is not a performance strategy. It’s a teaching tool to show that:
High win rate ≠ high profitability
Patience can be deceiving
Many signals = long capital lock-in
🎓 Why it exists:
The purpose of this strategy is to demonstrate market psychology and risk overconfidence. Traders often chase strategies with high win rates without considering holding time, drawdowns, or opportunity cost.
This script helps visualize that phenomenon.

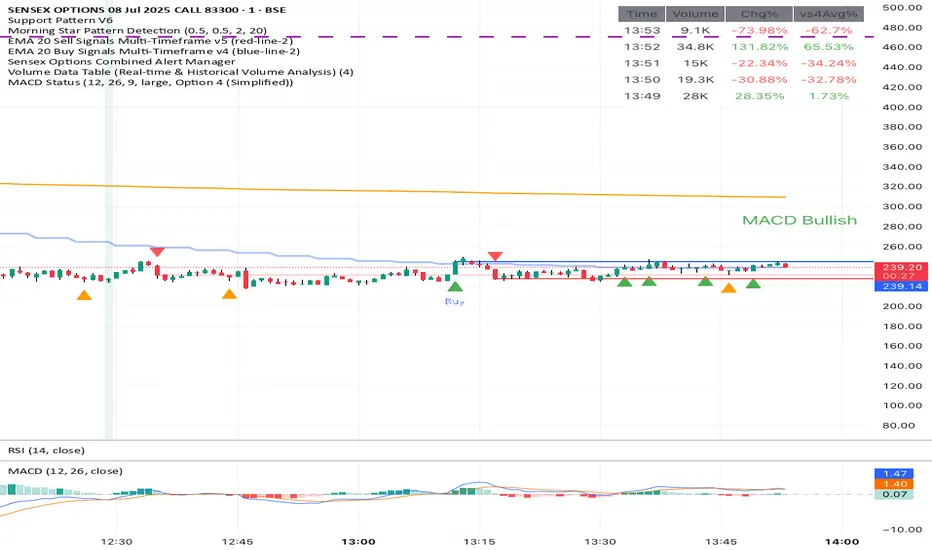
Volume Data Table (Real-time & Historical Volume Analysis)Volume Data Table (Real-time & Historical Volume Analysis)
Overview:
The Volume Data Table indicator is a powerful tool designed to provide concise, real-time, and historical volume insights directly on your chart. It aggregates critical volume metrics into an organized, customizable table, making it incredibly easy to identify unusual volume activity, sudden surges, or sustained interest in a particular asset.
This indicator is perfect for traders who rely on volume analysis to confirm price movements, spot potential reversals, or gauge market conviction.
Key Features & How It Works:
Real-time Volume Metrics:
The table prominently displays the volume data for the current (last) candle, including:
Time: The precise time of the current candle's close, formatted in IST (Indian Standard Time - UTC+5:30) for your convenience.
Volume: The total volume for the current candle, smartly formatted in K (Thousands) or M (Millions) for readability.
Change % (Chg%): The percentage change in volume compared to the immediately preceding candle. This helps you quickly spot sudden increases or decreases in trading activity.
Vs 4-Avg % (vs4Avg%): The percentage change in volume compared to the average volume of the last 4 preceding candles. This is crucial for identifying volume surges or drops relative to recent historical activity, which can signal significant market events.
Configurable Historical Data:
Beyond the current candle, you can customize how many previous candles' volume data you wish to display. A simple input setting allows you to choose from 1 to 20 historical rows, giving you flexibility to review recent volume trends. Each historical row also provides its own "Change %" and "Vs 4-Avg %" for detailed analysis of past candle activity.
Intuitive Color-Coding:
Percentage change values are intuitively color-coded for instant visual cues:
Green: Indicates a positive (increase) in volume percentage.
Red: Indicates a negative (decrease) in volume percentage.
Clean & Organized Table Display:
The indicator presents all this data in a neat, easy-to-read table positioned at the top-right of your chart. The table automatically adjusts its height based on the number of historical rows you choose, ensuring a compact and efficient use of screen space.
Ideal Use Cases:
Volume Confirmation: Quickly confirm the conviction behind price movements. A strong price move on high "Vs 4-Avg %" volume often indicates higher reliability.
Spotting Abnormal Volume: Identify candles with unusually high or low volume compared to their recent average, which can precede or accompany significant price action.
Momentum Analysis: Understand if buying/selling pressure is increasing or decreasing over recent periods.
Scalping & Day Trading: The real-time updates and concise format make it highly effective for fast-paced short-term decision-making.
Complements Other Indicators: Use it alongside price action, candlestick patterns, or other technical indicators for a more robust analysis.
Customization Options:
Number of Historical Rows: Adjust Number of Historical Rows from 1 to 20 to tailor the depth of your historical volume review.
Important Disclaimer:
This indicator is a technical analysis tool and should be used as part of a comprehensive trading strategy. It is not financial advice. Trading in financial markets involves substantial risk, and you could lose money. Always perform your own research and risk management.
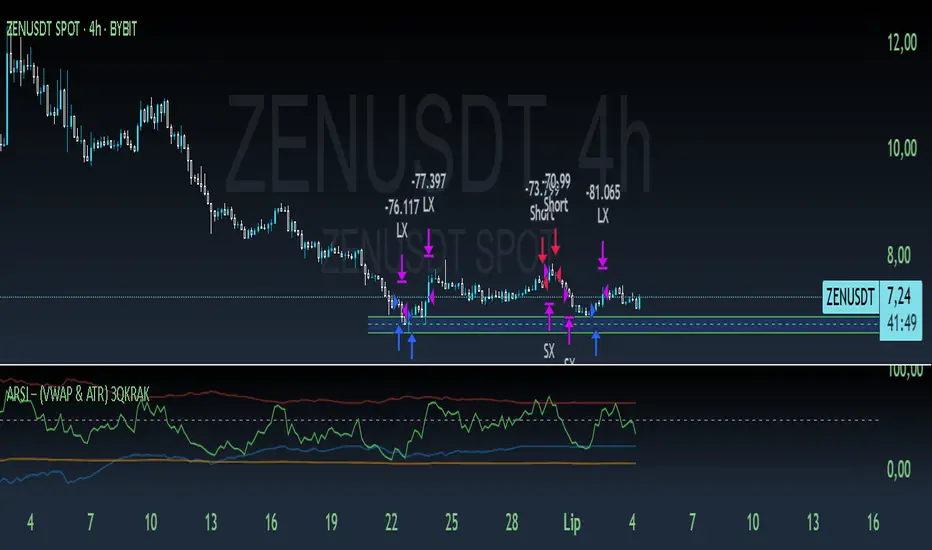
ARSI – (VWAP & ATR) 3QKRAKThe ARSI Long & Short – Dynamic Risk Sizing (VWAP & ATR) indicator combines three core components—an adjusted RSI oscillator (ARSI), Volume‐Weighted Average Price (VWAP), and Average True Range (ATR)—so that entry/exit signals and position sizing are always tailored to current market conditions. ARSI, plotted from 0 to 100 with clearly marked overbought and oversold zones, is the primary signal driver: when ARSI falls below the lower threshold it indicates an excessive sell‐off and flags a long opportunity, whereas a break above the upper threshold signals overextended gains and foreshadows a short. A midpoint line at 50 can serve as an early exit or reduction signal when crossed against your position.
VWAP, showing the volume‐weighted average price over the chosen period, acts as a trend filter—long trades are only taken when price sits above VWAP, and shorts only when it’s below—ensuring each trade aligns with the prevailing market momentum. ATR measures current volatility and is used both to set safe stop‐loss levels and to dynamically size each position. In practice, this means positions automatically shrink in high‐volatility environments and grow in quieter markets, all while risking a fixed percentage of your capital.
Everything appears on a single chart: the ARSI pane below the price window with its reference levels; VWAP overlaid on the price; and the ATR‐based stop‐loss distances graphically displayed. Traders thus get a comprehensive, at-a-glance view of entries, exits, trend confirmation, and exactly how large a position they can safely take. The indicator runs in real time, removing the need for manual parameter calculations and letting you focus on strategic decision-making.
My Script v6SMA Calculation: Computes a Simple Moving Average of the selected input source (default is the closing price) over a user-defined period (Length, default 14).
Buy Signal: Displays a green "BUY" label below the bar when the price crosses above the SMA (bullish crossover).
Sell Signal: Displays a red "SELL" label above the bar when the price crosses below the SMA (bearish crossunder).
Overlay Enabled: The indicator is drawn directly on the price chart (overlay=true).

Micropulse Crypto Reversal – 1 Minute📛 Micropulse Crypto Reversal – 1 Minute
📘 Strategy Description:
Micropulse Reversal is a specialized scalping strategy designed for 1-minute cryptocurrency charts such as BTC/USDT and ETH/USDT. It captures fast reversal opportunities with a scientifically guided combination of price action, volume dynamics, and volatility filtering.
🎯 Core Features:
Hybrid use of RSI, Bollinger Bands, Hull Moving Average, and OBV
Scoring system ensures only strong, high-confidence signals trigger trades
ATR filter blocks signals in low-volatility (choppy) conditions
Supports both long and short entries, with automatic position reversal logic
Optimized parameters are fixed and not user-editable (fully locked)
⚙️ Hardcoded Parameters:
RSI Length: 9, Oversold: 40, Overbought: 60
Bollinger Bands: 20 / 2.0
Hull MA: 13, OBV short/long: 3 / 8
ATR Filter: > 0.1% of price
Take Profit: +0.8%, Stop Loss: -0.6%
Minimum Signal Score to Enter: 4 / 5
📈 Ideal Use:
BTC, ETH, and other major crypto pairs with high volume
Timeframe: 1-minute
Fast-entry, fast-exit trades
Works well for bot integration, signal alerts, or manual scalping
⚠️ Risk Disclaimer:
This strategy is optimized for past data and short-term momentum conditions. Past performance does not guarantee future results.
Always validate on forward data and use proper risk management before live deployment.

200 EMA Power Bounce Screenerthis indicator work on bullish reversal strategy. when stock is abov 200 ema and touch 200 ema for reversal. it will confirm that there is a revesal candle, stron support on 200 ema, primary trend is strong than secondary trand, have a strong volume, rsi cross 50 in upperside.


Wyckoff Smart Signals (Long + Short)- Wycoff Smart signals made by Melik
Using Wycoff fundamentals and volume confirmation to form a bias

XAUUSD BOS + Retest Looser Bot//@version=5
indicator("SMC Map — BOS/CHoCH + PD + Liquidity + Killzones", overlay=true)
// === CONFIG ===
pd_tf = input.timeframe("240", "HTF for PD array")
show_killzone = input.bool(true, "Show Killzones")
// === HTF SWINGS ===
htf_high = request.security(syminfo.tickerid, pd_tf, high)
htf_low = request.security(syminfo.tickerid, pd_tf, low)
pd_mid = (htf_high + htf_low) / 2
// Plot PD midline
plot(pd_mid, title="PD 50%", color=color.gray, linewidth=2)
// === SWING STRUCTURE ===
var float swing_high = na
var float swing_low = na
is_swing_high = ta.highest(high, 3) == high and close < high
is_swing_low = ta.lowest(low, 3) == low and close > low
if (is_swing_high)
swing_high := high
if (is_swing_low)
swing_low := low
// === BOS / CHoCH ===
bos_up = not na(swing_high) and close > swing_high
bos_down = not na(swing_low) and close < swing_low
var int structure_dir = 0 // 0=neutral, 1=up, -1=down
choch_up = false
choch_down = false
if (bos_up)
choch_up := structure_dir == -1
structure_dir := 1
if (bos_down)
choch_down := structure_dir == 1
structure_dir := -1
// === PLOTS ===
plotshape(bos_up, title="BOS UP", style=shape.triangleup, location=location.belowbar, color=color.green, size=size.small)
plotshape(bos_down, title="BOS DOWN", style=shape.triangledown, location=location.abovebar, color=color.red, size=size.small)
plotshape(choch_up, title="CHOCH UP", style=shape.labelup, location=location.belowbar, color=color.lime, size=size.tiny, text="CHOCH")
plotshape(choch_down, title="CHOCH DOWN", style=shape.labeldown, location=location.abovebar, color=color.maroon, size=size.tiny, text="CHOCH")
plot(swing_high, title="Swing High Liquidity", color=color.new(color.green, 50), style=plot.style_cross, linewidth=1)
plot(swing_low, title="Swing Low Liquidity", color=color.new(color.red, 50), style=plot.style_cross, linewidth=1)
// === KILLZONE ===
in_london = (hour >= 6 and hour < 11)
in_ny = (hour >= 12 and hour < 18)
bgcolor(show_killzone and in_london ? color.new(color.green, 90) : na)
bgcolor(show_killzone and in_ny ? color.new(color.blue, 90) : na)
