AUDUSD Breakout ascending channel and consolidation breakout 1D 📊 AUD/USD Technical Breakdown – 1D Time Frame
The Aussie has officially broken out of both the ascending channel and the consolidation phase, signaling strong momentum ahead. 🚀
📍 Entry Level: 0.65800
🔁 Possible Retest Zone (Support): 0.64000
🎯 Technical Targets:
✅ 1st Target: 0.66900 (Key Supply Zone)
✅ 2nd Target: 0.69000 (Major Resistance Level)
Market structure and price action suggest bullish continuation if the breakout holds. Always manage risk accordingly. 📈
---
💬 Drop your thoughts below
❤️ Like, 🔄 Follow, and 👥 Join us for more real-time updates and smart setups!
— Livia, keeping it sharp 😜
AUDUSD_ZERO trade ideas

Its time to retest the support and then continue the trend It recently broke the trend line currently may retest and again continue the rally

AUDUSD BULLISHTechnically:
AUDUSD is in bullish trend it took resistance at 0.65463 but now finally it break and trade above on now we have to wait for retest the same resistance which will become support.

AUDUSD TRADING INSIGHT (RECAP)In this video, I invite you to join me as I delve into my thought process behind this trade and the strategies I used to manage it. I’m confident you’ll uncover valuable insights that can enhance your trading journey. If you’ve taken the same trade, I’d love to hear your experiences and thoughts in the comments section below! Your perspective could spark an engaging discussion!

AUDUSDAUD/USD Exchange Rate
Current Level: 0.6530–0.6550
Slightly bearish near-term bias amid RBA rate cut expectations
Australia 10-Year Government Bond Yield
Current Yield: 4.15% (as of June 30, 2025)
Rose 0.01 percentage points from the previous session.
Reflects market reaction to RBA policy and global trade uncertainty.
Reserve Bank of Australia (RBA) Rate
Current Cash Rate: 3.85% (lowest in two years)
Cut by 25 bps in May 2025 to combat slowing growth and align with 2–3% inflation targets.
Markets price a 90% probability of another 25 bps cut in July 2025.
US Federal Reserve (Fed) Rate
Current Federal Funds Rate: 4.25–4.50%
Unchanged since December 2024; held steady at the June 18, 2025, meeting.
Fed signaled potential for two 25 bps cuts in late 2025 (September/December), contingent on inflation cooling.
Key Implications
Rate Differential:
RBA-Fed spread: –0.40% to –0.65% (AUD negative), pressuring AUD/USD.
Australia’s 10Y yield premium over US 10Y (~4.26%) is –0.11%, reducing AUD carry appeal.
AUD/USD Drivers:
RBA Easing: Expected July cut may weaken AUD further.
Fed Patience: Delayed cuts sustain USD strength.
Yield Sensitivity: Narrowing yield spreads limit AUD upside.
In summary:
AUD/USD trades near 0.6530–0.6550, pressured by RBA-Fed policy divergence and narrowing yield spreads. The RBA’s dovish path (3.85% rate, July cut expected) contrasts with the Fed’s hold at 4.25–4.50%, sustaining USD strength. Australia’s 10Y yield at 4.15% offers minimal premium over US Treasuries, limiting AUD support.
#AUDUSD

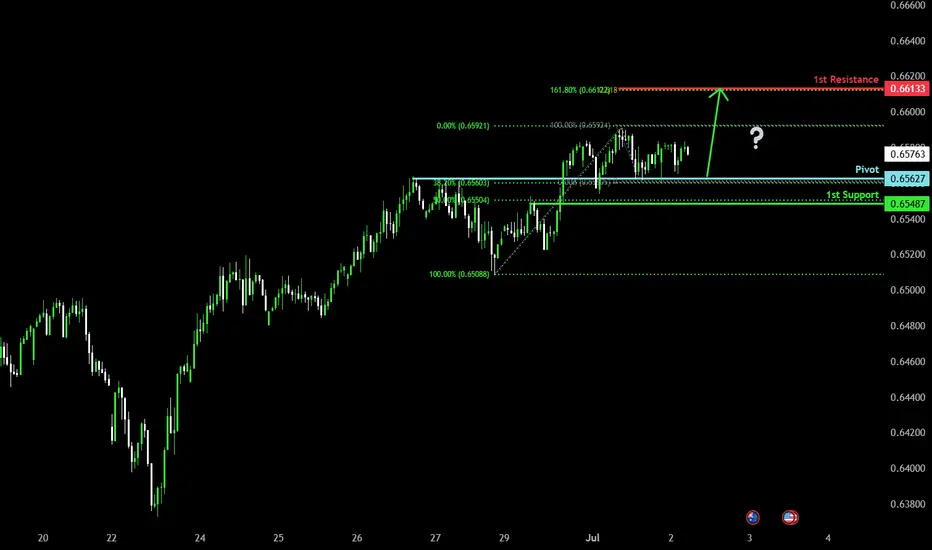
Bullish bounce?The Aussie (AUD/USD) is falling towards the pivot and could bounce to the 1st resistance that aligns with the 161.8% Fibonacci extension and the 61.8% Fibonacci projection.
Pivot: 0.6562
1st Support: 0.6548
1st Resistance: 0.6613
Risk Warning:
Trading Forex and CFDs carries a high level of risk to your capital and you should only trade with money you can afford to lose. Trading Forex and CFDs may not be suitable for all investors, so please ensure that you fully understand the risks involved and seek independent advice if necessary.
Disclaimer:
The above opinions given constitute general market commentary, and do not constitute the opinion or advice of IC Markets or any form of personal or investment advice.
Any opinions, news, research, analyses, prices, other information, or links to third-party sites contained on this website are provided on an "as-is" basis, are intended only to be informative, is not an advice nor a recommendation, nor research, or a record of our trading prices, or an offer of, or solicitation for a transaction in any financial instrument and thus should not be treated as such. The information provided does not involve any specific investment objectives, financial situation and needs of any specific person who may receive it. Please be aware, that past performance is not a reliable indicator of future performance and/or results. Past Performance or Forward-looking scenarios based upon the reasonable beliefs of the third-party provider are not a guarantee of future performance. Actual results may differ materially from those anticipated in forward-looking or past performance statements. IC Markets makes no representation or warranty and assumes no liability as to the accuracy or completeness of the information provided, nor any loss arising from any investment based on a recommendation, forecast or any information supplied by any third-party.
PRZ at 0.6600? | Watching for Reversal from Channel Top👆🚀Boost it if you like it... (Thank you) 🚀👆
Pair: AUD/USD Timeframe: 4H Bias: Short-term bearish Custom Term: PRZ (Possible Reversal Zone) = 0.65696
📈 Technical Structure:
AUD/USD is trading within a well-respected ascending channel, with price currently hovering near 0.6570. The upper boundary of the channel aligns closely with the PRP zone at 0.6600, which also coincides with:
A prior supply zone (visible on higher timeframes).
Confluence of the 15 EMA (0.65692) and 60 EMA (0.65534) flattening out.
Psychological round number resistance.
Entry: 0.65700
Stop: Above 0.66064 (channel breakout invalidation)
Target 1: 0.6540
Target 2: 0.6500
Risk/Reward: ~1.8
(Warning: This is an early entry )
🧠 Psychology Insight:
The PRP concept helps frame trades around areas of emotional overextension—where traders may overcommit to a breakout. By identifying these zones in advance, you stay objective and avoid reactive decisions.
PRZ: Possible Reversal Zone
#AUDUSD #PRZ #Forex #TechnicalAnalysis #ChannelTrading #ReversalZone #PriceAction #MJFX #TradingPsychology #ToughButSuccessful


AUSSIE BANK ROBBERY: AUD/USD Bullish Breakout Confirmed!🔥 AUD/USD BANK HEIST: The Ultimate Bullish Robbery Plan (Thief Trading Style) 🔥
🌟 ATTENTION, MONEY MAKERS & MARKET ROBBERS! 🌟
💸 MISSION BRIEF:
Based on Thief Trading Style (technical + fundamental analysis), we’re executing a bullish heist on AUD/USD ("The Aussie")—time to steal those pips like a pro!
📈 ENTRY STRATEGY (The Heist Begins!)
Long Entry Trigger: Wait for Dynamic Resistance MA crossover + candle close above 0.65300 (bullish confirmation).
Pro Tip: Use Buy Stop orders above MA or Buy Limit orders on pullbacks (15m/30m timeframe).
🔔 SET AN ALERT! Don’t miss the breakout—alert up, gloves on!
🛑 STOP LOSS (Protect Your Loot!)
"Yo, rookie! 🗣️ If you’re entering on breakout, DO NOT set SL before confirmation!
📍 Thief SL Placement: Nearest 4H swing low (0.64800)—adjust based on your risk, lot size, & trade multiples.
⚠️ Warning: Deviate at your own peril—your risk, your rules!
🎯 TARGET (Cash Out & Run!)
Take Profit Zone: 0.65800
Scalpers: Long-only plays! Use trailing SL to lock profits.
Swing Traders: Ride the wave—big money moves require patience!
📰 FUNDAMENTAL BACKUP (Know Why We Robbin’!)
Bullish momentum fueled by macro trends, COT data, sentiment shifts.
🚨 Breaking News Alert: Avoid high-impact news spikes—trail SL or stay out!
💥 BOOST THE HEIST!
Hit 👍 LIKE, 🔄 SHARE & 🚀 BOOST—strengthen the robbery squad! More heists = more profits!
🤑 NEXT HEIST COMING SOON… STAY TUNED! 🐱👤

AUD/USD Parallel Channel Setup – Breakout or Pullback in PlayThe AUD/USD pair is trading within a clearly defined ascending parallel channel, with consistent rejections from both the upper resistance zone near 0.6550–0.6560 and repeated bounces from the rising support area near 0.6390–0.6400. This structured price movement indicates strong channel discipline, which traders can use for high-probability breakouts or reversal plays.
The current price action is approaching the upper boundary of the resistance, and a decisive breakout here could lead to a bullish rally toward the projected target.
📈 Bullish Breakout Scenario
If the price breaks and closes above the resistance zone (above 0.6560), it will confirm a bullish breakout from the channel. Based on the height of the channel, the projected breakout target is 0.67365, which is derived by measuring the vertical distance between support and resistance and projecting it upward from the breakout point. This could signal a major trend continuation in favor of the bulls.
📉 Bearish Rejection Scenario
If the price once again gets rejected at the resistance zone, a corrective move is expected toward the support area around 0.6400. The structure suggests that unless a breakout occurs, price may continue to oscillate within the rising channel. The next bearish leg could form a lower high and test the trendline support again.
🧭 Trading Strategy Outlook
Buy Breakout Strategy:
Entry: Above 0.6560
SL: Below breakout candle
TP: 0.67365 (projected target)
Sell Rejection Strategy:
Entry: Near 0.6550 resistance
SL: Above 0.6570
TP: 0.6400 support zone
This is a neutral-to-bullish setup, with a potential for continuation if the resistance breaks with strength. Traders should wait for confirmation before entering.
=================================================================
Disclosure: I am part of Trade Nation's Influencer program and receive a monthly fee for using their TradingView charts in my analysis.
=================================================================

AUDUSD SHORT DAILY FORECAST Q3 D2 W27 Y25AUDUSD SHORT DAILY FORECAST Q3 D2 W27 Y25
Professional Risk Managers👋
Welcome back to another FRGNT chart update📈
Diving into some Forex setups using predominantly higher time frame order blocks alongside confirmation breaks of structure.
Let’s see what price action is telling us today! 👀
💡Here are some trade confluences📝
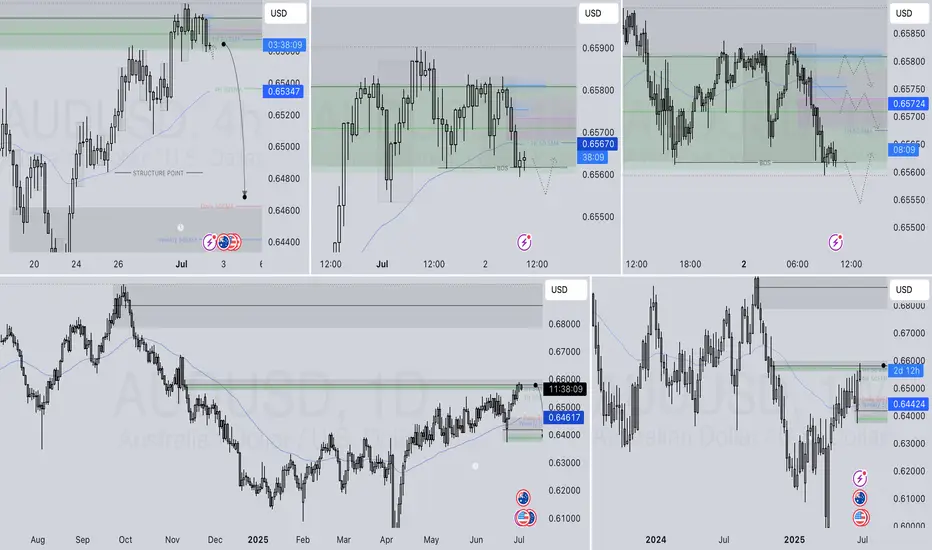
✅Daily Order block identified
✅4H Order Block identified
✅1H Order Block identified
🔑 Remember, to participate in trading comes always with a degree of risk, therefore as professional risk managers it remains vital that we stick to our risk management plan as well as our trading strategies.
📈The rest, we leave to the balance of probabilities.
💡Fail to plan. Plan to fail.
🏆It has always been that simple.
❤️Good luck with your trading journey, I shall see you at the very top.
🎯Trade consistent, FRGNT X
AUD/USD BEARISH BIAS RIGHT NOW| SHORT
AUD/USD SIGNAL
Trade Direction: short
Entry Level: 0.653
Target Level: 0.647
Stop Loss: 0.657
RISK PROFILE
Risk level: medium
Suggested risk: 1%
Timeframe: 9h
Disclosure: I am part of Trade Nation's Influencer program and receive a monthly fee for using their TradingView charts in my analysis.
✅LIKE AND COMMENT MY IDEAS✅

AUDUSD Potential UpsidesHey Traders, in today's trading session we are monitoring AUDUSD for a buying opportunity around 0.63800 zone, AUDUSD is trading in an uptrend and currently is in a correction phase in which it is approaching the trend at 0.63800 support and resistance area.
Trade safe, Joe.

AUDUSD – Bearish Breakdown Below EMA Support🚀👆 Boost it if you like it...👆🚀
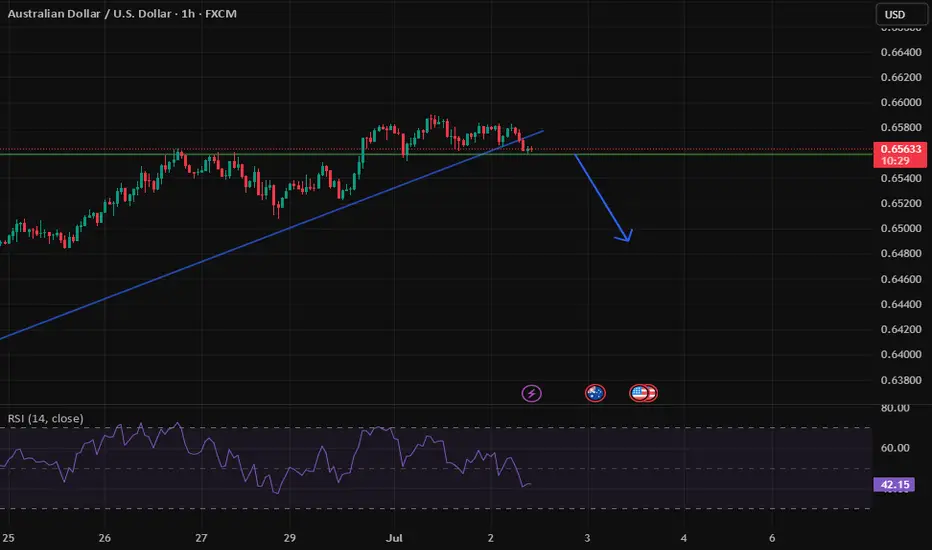
Price has broken decisively below the EMA cluster after consolidating in a tight range. The strong bearish candle suggests momentum toward lower support levels.
Trade Plan:
✅ Entry:
Current price ~0.65545
✅ Stop Loss:
Above 0.657722 (last minor swing high)
✅ Target:
0.65340 – 0.6500 area (previous demand and round number support)
Context:
• EMA confluence failure
• Clear bearish momentum candle
• Clean risk-to-reward setup
Risk Management:
Risk per trade: 1%
Hashtags:
#AUDUSD #ForexSignals #PriceAction #Breakdown #MJTrading #TradingIdea #Forex

Retest of New Highs and Pullback Zone✨ By MJTrading:
Chart Overview:
AUDUSD reached a 2025 new high around 0.65600 before pulling back sharply. Price broke out of a consolidation wedge and is now retesting the prior breakout and dynamic support area.
🔹 Key Points:
Structure: Clear impulse move to new highs, followed by corrective pullback.
Support Zone: Blue box ~0.6480–0.6500 could act as a demand area if price extends lower.
EMAs: Price testing the 60 EMA (~0.6523) after losing short-term momentum.
Trade Setup:
Entry: 0.65250
SL: 0.65510
TP1: 0.65000
(Please Manage your Risk)( Ideal: 1% Per Trade)
Possible Scenarios:
Bullish reaction from current EMA support or the blue demand zone.
Deeper retracement if price fails to hold above 0.6500.
💡 Note:
This chart highlights how prior consolidation and breakout zones can offer potential retest entries in trending markets.
Thanks for your time an attention...
Follow for more setups.
#MJTrading
#AUDUSD #Forex #TechnicalAnalysis #PriceAction #BreakoutTrading #SupportResistance #TradingView #FX

AUDUSD BEARISH REVERSAL Price entered sideways consolidation around June 24-25, After peaking around 0.6565–0.6580, the price started to create lower highs, suggesting a trend reversal or deeper correction.

AUD/USD 4H – Bearish Supply Zone Rejection & Mid-Term Short BiasAUD/USD 4H – Bearish Supply Zone Rejection & Mid-Term Short Bias
The Aussie has climbed into a major supply zone near the 0.67380 – 0.67540 area, which overlaps with a historical resistance range from late 2024. Price is currently testing the upper edge of this zone, showing signs of exhaustion.
🔍 Key Observations:
Supply Zone Reaction: The confluence of past resistance (clearly marked as 'R') and current bearish candle formations suggests a potential reversal setup.
Liquidity Grab & Rejection: The current push may be a liquidity sweep above recent highs, potentially trapping breakout buyers before a reversal.
Downside Targets:
First support area around 0.65311 – 0.65000, previously respected demand zone.
If momentum continues, extended targets lie at 0.62729, 0.60874, and 0.59206 – all aligned with previous price reactions and liquidity pockets.
📊 Trading Plan:
Bias: Short (mid-term swing)
Entry Zone: 0.67350 – 0.67540 (sell limit / wait for confirmation)
Stop Loss: Above 0.67650 (above last swing high)
Targets:
TP1: 0.65300
TP2: 0.62730
TP3: 0.60870
🧠 Risk Note:
Price has entered a high-probability reversal zone, but confirmation via bearish engulfing or lower-timeframe structure break is ideal before entering aggressively.

AUDUSD SHORT DAILY FORECAST Q3 D30 W27 Y25AUDUSD SHORT DAILY FORECAST Q3 D30 W27 Y25
Professional Risk Managers👋
Welcome back to another FRGNT chart update📈
Diving into some Forex setups using predominantly higher time frame order blocks alongside confirmation breaks of structure.
Let’s see what price action is telling us today! 👀
💡Here are some trade confluences📝
✅Daily Order block identified
✅4H Order Block identified
✅1H Order Block identified
🔑 Remember, to participate in trading comes always with a degree of risk, therefore as professional risk managers it remains vital that we stick to our risk management plan as well as our trading strategies.
📈The rest, we leave to the balance of probabilities.
💡Fail to plan. Plan to fail.
🏆It has always been that simple.
❤️Good luck with your trading journey, I shall see you at the very top.
🎯Trade consistent, FRGNT X

AUDUSD WEEKLY HIGHER TIME FRAME FORECAST Q3 W27 Y25AUDUSD WEEKLY HIGHER TIME FRAME FORECAST Q3 W27 Y25
Professional Risk Managers👋
Welcome back to another FRGNT chart update📈
Diving into some Forex setups using predominantly higher time frame order blocks alongside confirmation breaks of structure.
Let’s see what price action is telling us today! 👀
💡Here are some trade confluences📝
✅Weekly 50EMA Rejection
✅Daily Order block identified
✅4H Order Block identified
🔑 Remember, to participate in trading comes always with a degree of risk, therefore as professional risk managers it remains vital that we stick to our risk management plan as well as our trading strategies.
📈The rest, we leave to the balance of probabilities.
💡Fail to plan. Plan to fail.
🏆It has always been that simple.
❤️Good luck with your trading journey, I shall see you at the very top.
🎯Trade consistent, FRGNT X

AUDUSD AUD/USD Exchange Rate
Current Level: 0.6530–0.6550
Slightly bearish near-term bias amid RBA rate cut expectations
Australia 10-Year Government Bond Yield
Current Yield: 4.15% (as of June 30, 2025)
Rose 0.01 percentage points from the previous session.
Reflects market reaction to RBA policy and global trade uncertainty.
Reserve Bank of Australia (RBA) Rate
Current Cash Rate: 3.85% (lowest in two years)
Cut by 25 bps in May 2025 to combat slowing growth and align with 2–3% inflation targets.
Markets price a 90% probability of another 25 bps cut in July 2025.
US Federal Reserve (Fed) Rate
Current Federal Funds Rate: 4.25–4.50%
Unchanged since December 2024; held steady at the June 18, 2025, meeting.
Fed signaled potential for two 25 bps cuts in late 2025 (September/December), contingent on inflation cooling.
Key Implications
Rate Differential:
RBA-Fed spread: –0.40% to –0.65% (AUD negative), pressuring AUD/USD.
Australia’s 10Y yield premium over US 10Y (~4.26%) is –0.11%, reducing AUD carry appeal.
AUD/USD Drivers:
RBA Easing: Expected July cut may weaken AUD further.
Fed Patience: Delayed cuts sustain USD strength.
Yield Sensitivity: Narrowing yield spreads limit AUD upside.
In summary:
AUD/USD trades near 0.6530–0.6550, pressured by RBA-Fed policy divergence and narrowing yield spreads. The RBA’s dovish path (3.85% rate, July cut expected) contrasts with the Fed’s hold at 4.25–4.50%, sustaining USD strength. Australia’s 10Y yield at 4.15% offers minimal premium over US Treasuries, limiting AUD support.

AUDUSD Ranging BullishHi there,
AUDUSD broke above (A) and formed a higher high (C). From this point, it gets interesting.
(BC) represents a full bullish range, and (n) is blocking the drop of (D). If the price falls below 0.64786, the bullish bias will be invalidated.
We have two price targets for a bias of 0.65397.
Happy trading,
K.
Not trading advice

AUD/USD ANALYSISAUD/USD ANALYSIS; we wait for price to raid either on the buyside or sell liquidity then a change in the state of price delivery depending on which side price will raid
