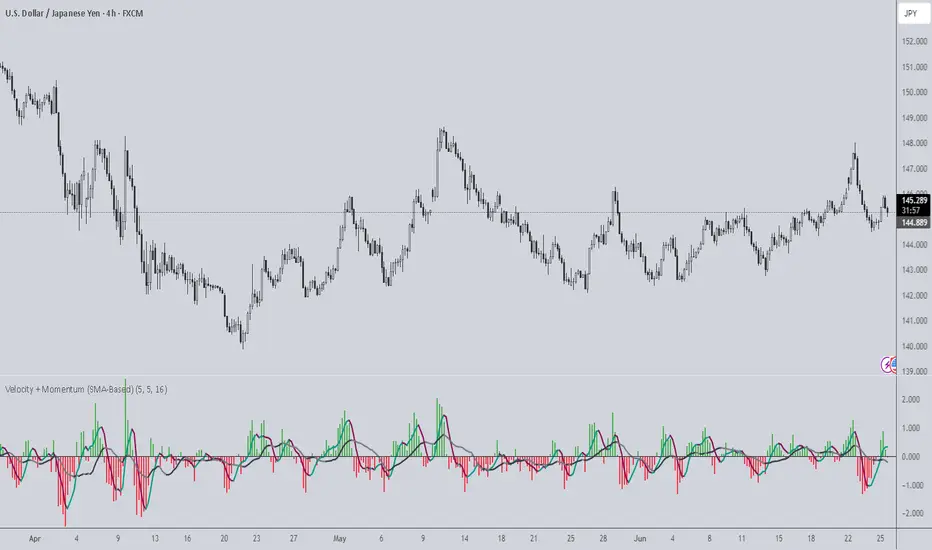
Velocity + Momentum (SMA-Based)Velocity + Momentum (SMA-Based) is a clean, powerful oscillator that measures price acceleration using SMA-derived velocity and dual momentum signals. This tool is ideal for identifying directional shifts, exhaustion points, and early entries across any market or timeframe.
How It Works:
This indicator calculates velocity as the distance between the current close and a simple moving average of the open price. Then, it applies two smoothed moving averages to this velocity line:
• Internal Momentum (shorter-term smoothing)
• External Momentum (longer-term context, hidden by default)
The result is a layered view of how fast price is moving and whether that move is gaining or losing strength.
How to Use:
• The green/red histogram shows current velocity (positive = bullish, negative = bearish)
• The teal/maroon line tracks internal momentum and provides short-term signal turns
• The black/gray (hidden) line reflects external momentum and supports broader trend alignment
• Watch for crosses above/below the zero line for confirmation of directional strength
• Use the built-in alerts to catch real-time shifts in all three layers of movement: velocity, internal, and external
Why It's Useful:
• Detects subtle transitions before price structure changes
• Helps filter out noise by comparing short-term vs long-term motion
• Ideal for scalpers, swing traders, and trend-followers alike
• Pairs well with structure-based tools or price action zones
• Works on any asset and timeframe
This indicator simplifies momentum analysis by giving you actionable, multi-layered feedback on how price is accelerating — and when that’s likely to reverse.
Moving Averages
VWAP + EMA StrategyUses Vwap and Ema for buy and sell signal. Just looking through and exploring what code can do. Not a financial advice

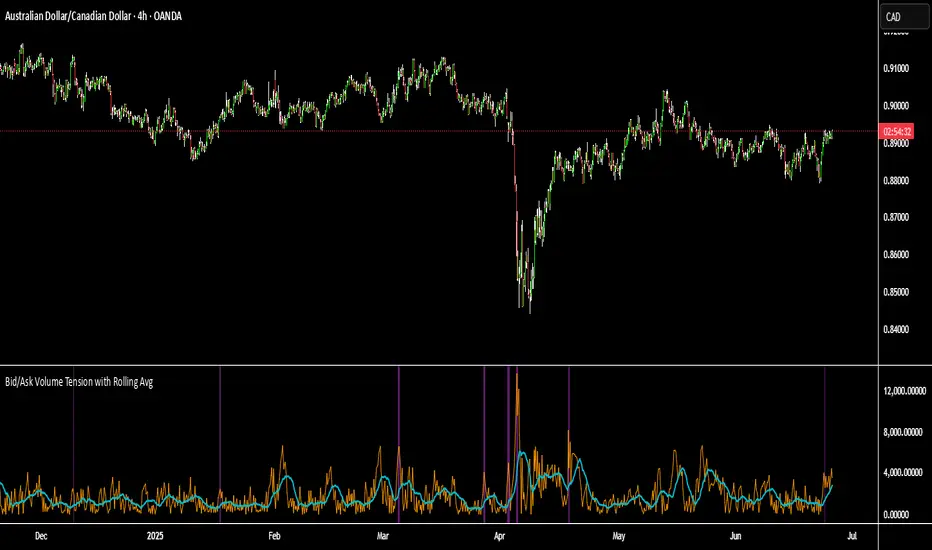
Bid/Ask Volume Tension with Rolling Avg📊 Bid/Ask Volume Tension with Rolling Average
This indicator is designed to help traders identify pivotal moments of buildup, exhaustion, or imbalance in the market by calculating the tension between buy and sell volume.
🔍 How It Works:
Buy volume is approximated when the candle closes higher than or equal to its open.
Sell volume is approximated when the candle closes below its open.
Both are smoothed using an EMA (Exponential Moving Average) for noise reduction.
Tension is calculated as the absolute difference between smoothed buy and sell volume.
A rolling average of tension shows the baseline for normal behavior.
When instant tension rises significantly above the rolling average, it often signals:
A build-up before a large move
Aggressive order flow imbalances
Potential reversals or breakouts
🧠 How to Use:
Watch the orange line (instant tension) for spikes above the aqua line (rolling average).
Purple background highlights show when tension exceeds a customizable multiple of the average — a potential setup zone.
Use this indicator alongside:
Price action (candlestick structure)
Support/resistance
Liquidity zones or order blocks
⚙️ Settings:
Smoothing Length: Controls the responsiveness of buy/sell volume smoothing.
Rolling Avg Window: Defines the lookback period for the baseline tension.
Buildup Threshold: Triggers highlight zones when tension exceeds this multiple of the average.
🧪 Best For:
Spotting pre-breakout tension
Detecting volume-based divergences
Confirming order flow imbalances
STMDUpdated Setup Rules
Buy condition:
SMA 8 > SMA 13 > SMA 20 (aligned and pointing up).
All 3 averages are rising (positive slope).
Entry candle is a power candle (bullish elephant bar).
SELL condition:
SMA 8 < SMA 13 < SMA 20 (aligned and pointing down).
All 3 averages are falling (negative slope).
Entry candle is a power candle (bearish elephant bar).

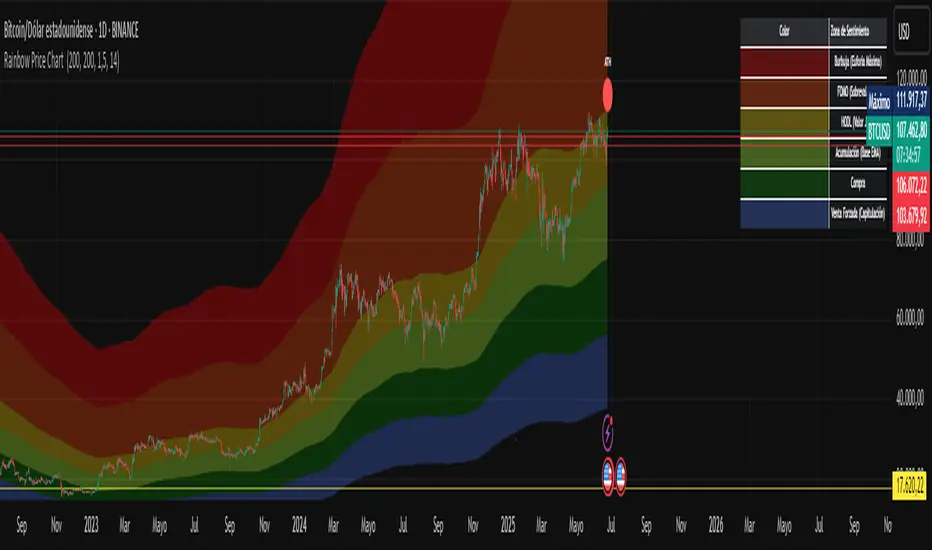
Rainbow Price Chart This indicator is a technical and on-chain analysis tool for Bitcoin, designed to help investors better understand the different phases of the market cycle and underlying sentiment. It directly overlays on the price chart (overlay=true).
Indicator Name: "Rainbow Price Chart & V/T Ratio Signals"
General Purpose:
It combines two popular methodologies for visualizing Bitcoin's value and sentiment: the classic "Rainbow Price Chart" and signals derived from the "Value per Transaction Ratio" (V/T Ratio) based on blockchain data. It is ideal for long-term investors looking for strategic entry/exit points.
Main Components:
Rainbow Price Chart:
Concept: Divides Bitcoin's price range into different market "sentiment zones" (e.g., "Bubble Zone," "FOMO Zone," "HODL Zone," "Accumulation Zone," "Buy Zone," "Fire Sale Zone") using colored bands. These bands are calculated as ascending and descending multiples of a base Exponential Moving Average (EMA), configurable by default to 200 periods.
Visualization: The zones are represented with transparent color fills on the price chart. A detailed legend in the top right corner of the chart explains the meaning of each color and sentiment zone.
Important Note: This type of chart is designed to be viewed and analyzed correctly on a logarithmic price scale. The indicator includes a visual reminder to activate this scale.
Value per Transaction (V/T) Ratio Signals:
Concept: Measures the average value per transaction on the Bitcoin blockchain by dividing the total transacted volume in USD by the number of transactions. This ratio is smoothed with an Exponential Moving Average (by default, 7 periods) and is framed within a dynamic Linear Regression Channel (LRC) based on standard deviation.
Signal Generation: Based on the position of the smoothed V/T Ratio within this LRC channel, the indicator generates signals directly on the price chart, such as:
"BOTTOM": Low price, V/T Ratio in the lower band of the LRC.
"SEMI-LOW" / "SEMI-HIGH": Intermediate phases within the channel.
"ATH" (All-Time High): Potentially overvalued price, V/T Ratio in the upper band of the LRC.
On-Chain Data: The indicator requests external daily on-chain data for total transacted volume (TVTVR) and number of transactions (NTRAN) from the Bitcoin blockchain.
Diagnostic Panes: Includes plots of the raw on-chain data (volume and number of transactions) in a separate pane, which are useful for debugging or verifying the data source. The lines for the V/T Ratio itself and its LRC channel are not plotted by default but can be activated in the code for deeper analysis.
Ideal for:
Bitcoin investors and "hodlers" who desire a visual tool that combines price-based market cycle context with fundamental signals derived from on-chain activity, to help identify key moments for accumulation or potential distribution.
Considerations:
Relies on the availability of external on-chain data (QUANDL:BCHAIN) within TradingView.
Functions best on a daily timeframe.
21 & 200 EMA with Star at Crossovers21-day EMA: Plotted in green
200-day EMA: Plotted in red
Crossover Markers:
A yellow star (★) appears on the chart at the 21 EMA price level when:
21 EMA crosses above the 200 EMA (bullish crossover)
21 EMA crosses below the 200 EMA (bearish crossover)
Stars have a black background to ensure high visibility


Medias Móviles - Swing Trading - by addryy58....sdasdsjdhsaidhsauoixhashxuoashxuosahuoxhasohxsaxsaxsa

SMA 5/10/20/50/100/150/200/250//@version=6
indicator (title="SMA8", shorttitle="SMA8", overlay=true)
len1 = input.int(5, minval=1, title="SMA 1")
src1 = input(close, title="Source One")
out1 = ta.sma(src1, len1)
plot(out1, title="SMA 1", color=color.rgb(233, 11, 11), linewidth=1)
len2 = input.int(10, minval=1, title="SMA 2")
src2 = input(close, title="Source Two")
out2 = ta.sma(src2, len2)
plot(out2, title="SMA 2", color=color.orange, linewidth=1)
len3 = input.int(20, minval=1, title="SMA 3")
src3 = input(close, title="Source Three")
out3 = ta.sma(src3, len3)
plot(out3, title="SMA 3", color=color.rgb(250, 226, 12), linewidth=1)
len4 = input.int(50, minval=1, title="SMA 4")
src4 = input(close, title="Source Four")
out4 = ta.sma(src4, len4)
plot(out4, title="SMA 4", color=color.rgb(51, 255, 0), linewidth=1)
len5 = input.int(100, minval=1, title="SMA 5")
src5 = input(close, title="Source Five")
out5 = ta.sma(src5, len5)
plot(out5, title="SMA 5", color=color.rgb(0, 249, 249), linewidth=1)
len6 = input.int(150, minval=1, title="SMA 6")
src6 = input(close, title="Source Six")
out6 = ta.sma(src6, len6)
plot(out6, title="SMA 6", color=#014ff9, linewidth=1)
len7 = input.int(200, minval=1, title="SMA 7")
src7 = input(close, title="Source Seven")
out7 = ta.sma(src7, len7)
plot(out7, title="SMA 7",color=#6c01f9, linewidth=1)
len8 = input.int(250, minval=1, title="SMA 8")
src8 = input(close, title="Source Eight")
out8 = ta.sma(src8, len8)
plot(out8, title="SMA 8",color=color.white, linewidth=1)

Jeromey Dual MAs with SmoothingThis is a powerful 2-in-1 indicator that lets you plot two completely independent moving average systems on your chart at the same time.
Each of the two systems works in two layers:
The Primary MA: This is a standard Exponential Moving Average (EMA) calculated from the price. You choose its length and color (e.g., a blue 20-period EMA).
The Optional Smoothing MA: This is a second moving average that uses the value of the Primary MA as its input. This creates a "moving average of a moving average," resulting in an even smoother line. You can choose its type (like SMA or WMA) and even turn it into Bollinger Bands that wrap around the Primary MA.
In short, it lets you combine two complete trend-following systems (like a fast MA and a slow MA), each with its own optional smoothing, all within a single indicator to keep your chart clean.

Ergin Swing V2"Wealth doesn’t come in a hurry. Be patient with yellow, take a break with purple."
Ergin Swing V2 is a minimalistic yet highly effective visual strategy built on a single indicator: EMA14.
✅ Yellow candle → First close above EMA14 = Buy signal
🟣 Purple candle → First close below EMA14 = Sell signal
🔇 No noisy signals in between. Only the first cross is marked.
Ideal for:
Swing traders who prefer clean charts
Trend-followers who avoid indicator overload
Anyone who wants to "see the signal" clearly without alerts popping every bar
➕ Can be extended with RSI, TP/SL logic, or trend filters
Created by Ergin • Powered by Patience • Verified by Candles

Jeromey Dual MAs with SmoothingThis is a powerful 2-in-1 indicator that lets you plot two completely independent moving average systems on your chart at the same time.
Each of the two systems works in two layers:
The Primary MA: This is a standard Exponential Moving Average (EMA) calculated from the price. You choose its length and color (e.g., a blue 20-period EMA).
The Optional Smoothing MA: This is a second moving average that uses the value of the Primary MA as its input. This creates a "moving average of a moving average," resulting in an even smoother line. You can choose its type (like SMA or WMA) and even turn it into Bollinger Bands that wrap around the Primary MA.
In short, it lets you combine two complete trend-following systems (like a fast MA and a slow MA), each with its own optional smoothing, all within a single indicator to keep your chart clean.


NEIROCTO Impulse Watcher (Alert Ready)//@version=5
indicator("NEIROCTO Trap Watcher (Downside Alert)", overlay=true)
// === Условия ===
rsi = ta.rsi(close, 14)
rsi_down = rsi < ta.sma(rsi, 5)
volatility = math.abs(close - close ) / close * 100
volatility_trigger = volatility > 3
volume_sma = ta.sma(volume, 20)
volume_up = volume > volume_sma
// === Сигнал ===
condition = rsi < 40 and rsi_down and volatility_trigger and volume_up
// === Графика ===
bgcolor(condition ? color.new(color.red, 85) : na)
plotshape(condition, title="DROP Signal", location=location.abovebar, color=color.red, style=shape.labeldown, text="⚠️")
// === Алерт ===
alertcondition(condition, title="⚠️ NEIROCTO: Возможен откат!", message="⚠️ NEIROCTO: RSI ↓, Волатильность >3%, объёмы растут. Возможен откат!")

NEIROCTO Impulse Watcher (Alert Ready)//@version=5
indicator("NEIROCTO Combo Watcher (Pump vs Dump)", overlay=true)
// === RSI и его производные ===
rsi = ta.rsi(close, 14)
rsi_sma = ta.sma(rsi, 5)
rsi_up = rsi > rsi_sma
rsi_down = rsi < rsi_sma
// === Волатильность ===
volatility = math.abs(close - close ) / close * 100
volatility_trigger = volatility > 3
// === Объёмы ===
volume_sma = ta.sma(volume, 20)
volume_up = volume > volume_sma
// === Условие пампа ===
pump_condition = rsi > 45 and rsi_up and volatility_trigger and volume_up
// === Условие отката ===
dump_condition = rsi < 40 and rsi_down and volatility_trigger and volume_up
// === Фон ===
bgcolor(pump_condition ? color.new(color.green, 85) : na)
bgcolor(dump_condition ? color.new(color.red, 85) : na)
// === Метки ===
plotshape(pump_condition, title="🚀 PUMP Signal", location=location.belowbar, color=color.green, style=shape.labelup, text="🚀")
plotshape(dump_condition, title="⚠️ DUMP Signal", location=location.abovebar, color=color.red, style=shape.labeldown, text="⚠️")
// === Алерты ===
alertcondition(pump_condition, title="🚀 NEIROCTO: Возможен памп!", message="🚀 RSI ↑, Волатильность >3%, Объёмы высокие — возможен памп!")
alertcondition(dump_condition, title="⚠️ NEIROCTO: Возможен откат!", message="⚠️ RSI ↓, Волатильность >3%, объёмы растут — возможен откат!")

2025 Stratejik Sinyal İndikatörüThe strategy indicator, which generates buy-sell signals on the chart and can set alarms for indicators such as Supertrend, RSI, Stochastic RSI, Squeeze Momentum, MACD, 10 Moving Average and Price indicator PPO, will guide you while trading.

MT Daily ZonesMT Daily Zones
A precision market structure tool from Mindfluential Trading, combining daily CPR, PDH/PDL zones, EMAs/SMAs - all optimized for intraday traders.
🔹 Core Features
🔵 CPR (Central Pivot Range)
Plots Pivot, TC, and BC from the previous day
Helps define the market's fair value zone and compression/breakout areas
Royal blue color ensures clarity on both light and dark themes
🟠 PDH / PDL Zones
Accurately plots Previous Day’s High and Low
Useful for breakout scalps, reversal traps, and trend continuation setups
🟢 Smart Trend Filters
Toggle EMAs (8, 20, 50) and SMAs (50, 100, 200)
Smooth color-coded display for dynamic trend alignment
✅ Clean Visuals. Real Structure. No Clutter.
⚠️ Disclaimer
This indicator is for educational purposes only. Do your own research before making trading decisions.
May 27
Release Notes
MT Daily Zones
A precision market structure tool from Mindfluential Trading, combining daily CPR, PDH/PDL zones, EMAs/SMAs - all optimized for intraday traders.
🔹 Core Features
🔵 CPR (Central Pivot Range)
Plots Pivot, TC, and BC from the previous day
Helps define the market's fair value zone and compression/breakout areas
Royal blue color ensures clarity on both light and dark themes
🟠 PDH / PDL Zones
Accurately plots Previous Day’s High and Low
Useful for breakout scalps, reversal traps, and trend continuation setups
🟢 Smart Trend Filters
Toggle EMAs (8, 20, 50) and SMAs (50, 100, 200)
Smooth color-coded display for dynamic trend alignment
✅ Clean Visuals. Real Structure. No Clutter.
⚠️ Disclaimer
This indicator is for educational purposes only. Do your own research before making trading decisions.

Asset Statistics Analysis 📊📊 Asset Drawdown Statistics — Full Analysis & Recommendation Tool
This indicator provides an in-depth statistical analysis of an asset’s drawdown behavior over a custom period and offers dynamic trade recommendations based on price action and moving average alignment.
🔍 Main Features:
✅ Drawdown Classification: Real-time classification of the current drawdown into 4 levels:
🟢 Low
🟡 Moderate
🟠 High
🔴 Critical
(Levels are calculated dynamically based on the asset's max drawdown in the selected period.)
⏱️ Average & Max Durations: Tracks how long the asset stays in each drawdown level on average and records the longest streaks (in bars).
📈 Dynamic Price Thresholds: Visual lines on the chart show key drawdown levels derived from peak equity.
📋 Statistical Dashboard: A floating table shows:
Current drawdown and classification
Time spent in each drawdown level (percentage)
Average and max duration per level
Live recommendation based on drawdown context and MA trend
📌 Trade Recommendations:
Based on the current drawdown + position relative to 3 moving averages (SMA):
🟢 Strong Buy / Buy
🟡 Accumulate / Hold
🟠 Reduce
🔴 Sell / Strong Sell
⚙️ Inputs:
Drawdown Period: Defines the number of bars used for peak drawdown calculation
3 customizable moving averages: Short / Medium / Long
✅ How to Use:
Use the drawdown classification to assess long-term risk phases.
Check the "Recommendation" box for guidance on timing entries/exits.
Combine with your own strategy or trend-following approach.
⚠️ Disclaimer
This script is provided for educational and informational purposes only and does not constitute financial, investment, or trading advice.
Always do your own research and consult with a qualified financial advisor before making any trading decisions.
The author assumes no responsibility for any losses or damages resulting from the use of this indicator.

Deep Z pi SP MA + 2 CC + OB + CPR + last 5 Minmy script with proper strike price, if strike price crosses R1, take put ex + hedge, if crosses s1 take call ex. bottom bc call normal and top bc put normal.

PINO EMA Rhythm Pack📌 PINO EMA Rhythm Pack
This indicator provides a multi-layered visual framework for analyzing the **rhythm and structure** of price movements using a customizable combination of EMAs and SMA. It is designed to simplify the interpretation of momentum shifts, pullbacks, and structural alignment across different time frames.
---
🔹 **Purpose & Use**
Use this tool to interpret short-term market rhythm (EMA 10/20/50), detect transitions through mid-term anchors (EMA 21), and align with long-term directional flow (EMA 200, SMA 200), all within one clean overlay.
---
🔹 **Key Features**
- Default view focuses on short-term rhythm:
• EMA 10 / EMA 20 / EMA 50
- Optional anchors and long-term guides:
• EMA 21 / EMA 200 / SMA 200
- Clean line colors and varied thickness for quick visual parsing
- Fully toggleable components to suit your trading framework
- No alerts, no signals — just visual context
---
🔹 **Note**
This open-source script was built for educational purposes and practical chart use. It brings together widely-used moving average concepts into one flexible overlay, aiming to support **structured discretionary analysis** and improve visual clarity.
This open-source script was built for educational purposes and practical chart use.


multi_tf_trendHere is a powerful trend indicator that uses data from 3 different time frames to analyze trend direction and direction switches. You can change the timeframes with the drop down menu. The index adds up all the bull signals and subtracts bear signals. The index can help gauge a trend's longevity and strength. For example, Index of +2 is strongly bullish while an Index of -2 is strongly bearish.
