Smart RSI Divergence PRO | Auto Lines + Alerts
Smart RSI Divergence PRO
This indicator automatically finds RSI divergences on price charts:
🔹 Detects both regular & hidden divergences
🔹 Draws auto trendlines connecting swing highs & lows
🔹 Clear triangle labels directly on the chart
🔹 Ready-to-use alerts for your strategy
Use it to spot potential trend reversals and hidden continuation signals.
How it works
Regular Divergence: Price makes a higher high (or lower low) while RSI does not — this can signal a possible trend reversal.
Hidden Divergence: Price makes a lower high (or higher low) while RSI makes a higher high (or lower low) — this can signal a possible trend continuation in the same direction.
Auto Lines & Labels
The script automatically detects local swing highs and lows and draws connecting trendlines on price.
Labels appear on the chart as colored triangles, so signals are easy to see at a glance:
🔻 Red triangle — Regular Bearish Divergence (potential short)
🟠 Orange triangle — Hidden Bearish Divergence (possible trend continuation down)
🟢 Green triangle — Regular Bullish Divergence (potential long)
🔵 Blue triangle — Hidden Bullish Divergence (possible trend continuation up)
Customization
You can adjust:
RSI length
Show/hide regular or hidden divergences
Show/hide auto lines and labels
Customize line width and transparency
Works on any market and any timeframe — crypto, forex, indices, stocks.
⚠️ Disclaimer: This script is for educational purposes only and does not constitute financial advice. Always test any strategy thoroughly and trade at your own risk.
Pivot points and levels

Smart Deviation Trend Bands PRO + MTF Filter
Smart Deviation Trend Bands PRO + MTF Filter
This advanced version of Smart Deviation Bands gives you everything you need to catch cleaner trend bounces and avoid fake signals.
🔹 Classic deviation bands with 1, 2 and 3 standard deviations
🔹 Dynamic SMA line with clear trend coloring
🔹 Built-in multi-timeframe trend filter (MTF)
🔹 Signals only appear when they align with the higher timeframe trend
🔹 Ready-to-use alerts for bullish and bearish bounces
How it works
The script plots classic standard deviation bands around a dynamic Simple Moving Average (SMA). The three bands (1, 2 and 3 standard deviations) help you spot different levels of pullbacks or extensions relative to the trend.
A built-in multi-timeframe filter checks the trend on a higher timeframe (HTF). A signal appears only when a bounce aligns with the bigger trend:
Bullish bounce: Price crosses up from the lower deviation band while the HTF trend is up.
Bearish bounce: Price crosses down from the upper deviation band while the HTF trend is down.
Signal markers
🟢 Green circle: Bullish bounce — price crossing up from lower band with HTF uptrend
🔴 Red circle: Bearish bounce — price crossing down from upper band with HTF downtrend
How to use
Works on any market (crypto, stocks, forex).
Works on any timeframe — the filter can use any higher timeframe you choose (for example, H4, 1D, 1W).
Fully adjustable settings: SMA length, standard deviation multipliers, and filter timeframe.
Combine this with your strategy to filter out fake breakouts and trade in line with the bigger trend.
⚠️ Disclaimer: This script is for educational purposes only and does not constitute financial advice. Always test any strategy thoroughly and trade at your own risk.

Smart Price Divergence (MACD Filter) + EMA
Smart MACD Price Divergence + EMA
This indicator automatically spots price divergences filtered by MACD momentum and trend direction with an adjustable EMA:
🔹 Detects regular bullish & bearish divergences
🔹 Filters signals using a simple EMA trend filter
🔹 Clear triangle labels on the chart
🔹 Ready-to-use alerts for your strategy
Use it to catch potential reversal points when the trend may be losing strength.
How it works
Bearish Divergence: Price makes a higher high above the EMA while MACD makes a lower high → possible reversal down.
Bullish Divergence: Price makes a lower low below the EMA while MACD makes a higher low → possible reversal up.
EMA filter: Helps identify when the market is overextended relative to its trend.
The indicator uses standard MACD settings (fast, slow, and signal lengths) which can be adjusted to fit your asset and timeframe. The EMA length is also fully customizable.
Signal colors
🔻 Red triangle — Bearish Price Divergence (potential short)
🔺 Green triangle — Bullish Price Divergence (potential long)
This script works on any timeframe and market — crypto, forex, indices, or stocks. Signals do not repaint once confirmed.
⚠️ Disclaimer: This script is for educational purposes only and does not constitute financial advice. Always test any strategy thoroughly and trade at your own risk.

Buy Sell Magic Rework
A version of the legendary Forex indicator Buy Sell Magic for TradingView, with optional additional filtering in the settings.
A simple yet very effective trend-following tool — I personally used it for trading gold 14 years ago, and it still works great today!
How it works:
This script combines the classic Parabolic SAR trend indicator with an optional ZigZag filter for additional signal confirmation.
Parabolic SAR:
The indicator plots the Parabolic SAR on the chart to help identify trend direction and potential reversals. A buy signal is generated when the SAR flips from above the price to below it, signaling a possible uptrend. A sell signal appears when the SAR moves from below to above the price, indicating a potential downtrend.
ZigZag Filter (optional):
The ZigZag filter uses pivot highs and lows to reduce market noise and confirm significant swings. When enabled, a signal is shown only after a clear pivot forms in the chosen period.
Inputs:
ZigZag Period: Controls pivot sensitivity.
SAR Start, Increment, Max: Adjust how responsive the SAR is.
Use ZigZag Filter: Enable or disable additional filtering.
Plots:
Gray crosses = Parabolic SAR points
Green arrows = Buy signals
Red arrows = Sell signals
Best Use:
This tool works well on various markets: Forex, crypto, stocks. It is best suited for trend-following or swing trading strategies. Adjust the settings for your preferred asset and timeframe, and always backtest before live trading.
⚠️ Disclaimer: This script is for educational purposes only and does not constitute financial advice. Always test any strategy thoroughly and trade at your own risk.

SuperTrend Touch SignalsAlwin's Magic
"Bro I’ve cooked up a trading magic using Supertrend 😎
It literally tells me when to buy and when to sell — like green means go, red means run! Been testing it and damn, it's 🔥🔥🔥
Need to make it automatic next!"

3% Price RangeThe simplest way to track a 3% range is to calculate it directly:
Upper Limit: Current Spot Price * 1.03
Lower Limit: Current Spot Price * 0.97

FibPivot FluidTradesThis comprehensive indicator provides a complete trading framework combining institutional concepts (SMC), Fibonacci-based levels, and a systematic trading approach with clear risk management.
Key Features of This Combined Indicator:
Smart Money Concepts (SMC) Components:
Supply/Demand zones with configurable width and history
Break of Structure (BOS) detection
Point of Interest (POI) labels
Swing high/low detection with HH/HL/LH/LL labeling
Fibonacci Pivot Points:
Daily pivot points with configurable Fib levels
Support/Resistance levels (S1-S5, R1-R5)
Customizable visual appearance
Trading System:
ATR-based trailing stop signals
EMA trend confirmation (13, 33, 200)
Visual buy/sell signals
Risk management with SL/TP levels
Trade information table
Enhanced Visuals:
Themed colors (dark/light mode)
Clean, organized layout
Configurable display options for all components
Alerts:
Buy/Sell signal alerts
Can be extended for BOS alerts

MojoPivots Breakout Signals [DonnieMojo]The MojoPivots Breakout Indicator is a precision-engineered tool designed for traders seeking high-probability breakout opportunities using dynamic pivot structures and real-time volume imbalances.
Built on DonnieMojo’s breakout framework, this indicator analyzes market structure via custom MR (Major Resistance) and MS (Major Support) levels, dynamically derived from intraday volume profiles and statistical price expansion. It intelligently tracks and visualizes potential breakout zones, key "line-in-the-sand" levels, and take-profit targets (TP1, TP2, TP3) based on volatility-adjusted zones.
🔑 Core Features:
Breakout Signal Detection
Identifies potential bullish and bearish breakouts when price breaches predefined resistance (MR1) or support (MS1) levels with confirmation from volume dynamics.
Smart Take-Profit System
Targets are automatically mapped to MR2–MR4 and MS2–MS4, offering structured TP zones based on standard deviation thresholds.
Delta Zone Visuals
Color-coded fills display real-time buyer/seller dominance in each zone using an imbalance-weighted volume model.
VPOC "Sand Line"
The Volume Point of Control is plotted to show the session's key battle line for trend continuation or rejection.
Statistical Performance Panel
Live breakout stats with hit-rate bars (TP1/TP2/TP3) help you evaluate performance and adjust trade management.
🧪 Usage Tips:
Timeframe Sync: The default detection logic is based on 15-minute candles, but pivot zones are calculated from higher timeframes (2H by default). Adjust these in the settings to suit your strategy.
Entry Trigger: Wait for price to close below MS1 or above MR1 and breach it on the next bar to confirm a breakout signal.
TP Scaling: Use TP1 for conservative exits or scale out progressively at TP2 and TP3 for extended moves.
Volume Confirmation: Delta zone fills (green/red) help validate whether breakout levels are supported by buyer/seller strength — fade low-delta signals with caution.
Combine with Trend Filters: Enhance results by using MojoPivots alongside trend indicators like EMAs, ADX, or macro S/R.

DTL Daily Trading Levels
A comprehensive trading levels indicator that displays all critical price levels for intraday and swing traders in real-time. This professional-grade tool automatically tracks and plots key support and resistance levels that institutional traders monitor.

Pivot Tops & BottomsHow it works
strategy() call replaces indicator() and enables backtesting.
Longs are opened at each confirmed swing-low and closed at the next swing-high.
Shorts can be turned on via the Enable Short Side toggle.
Position sizing uses 10% of equity per trade by default—adjust in the default_qty_value input.
Turn on Show Pivot Shapes to see where tops/bottoms land on your chart (shifted back by pivotLen).
Use the built-in Strategy Tester tab to review performance, drawdowns, win rate, etc.

Fadi ffa **Fadi Dynamic Trend Indicator**
The **Fadi Dynamic Trend Indicator** is a comprehensive technical analysis tool designed to assist traders in identifying trends, key price levels, and potential reversal points across various markets and timeframes. By combining dynamic trend detection, statistical price channel analysis, and advanced reversal point identification, this indicator provides actionable insights for trend-following, breakout, and reversal trading strategies.
**How It Works**:
This indicator integrates three complementary components to deliver clear trading signals and a deeper understanding of market dynamics:
1. **Dynamic Trend Detection**: Utilizes a proprietary algorithm based on the Average True Range (ATR) to calculate dynamic support and resistance levels. It generates Buy and Sell signals when the price crosses these levels, indicating potential trend changes. Traders can customize the trend strength and sensitivity to suit their trading style.
2. **Price Channel Analysis**: Plots a statistical channel based on price regression, highlighting the trend's direction and range. The channel dynamically extends to the right, helping traders identify breakout zones and trend continuation patterns.
3. **Reversal Point Detection**: Identifies significant high and low points in the market, marking them with triangle symbols (▼ for highs, ▲ for lows). Additionally, it highlights "missed" reversal levels (also marked with ▼ and ▲) to indicate potential price zones that have not yet been tested, offering unique insights into untapped market opportunities.
**How to Use**:
- **Timeframes**: The indicator performs well on various timeframes, with optimal results on 15-minute to 1-hour charts for scalping or swing trading.
- **Signals**: Look for Buy (green "BUY" label below the bar) and Sell (red "SELL" label above the bar) signals to enter trades, ideally confirmed by price action within the price channel or near reversal points.
- **Reversal Points**: Monitor the ▼ (highs) and ▲ (lows) labels to identify key reversal zones. The "missed" levels (also shown as ▼ and ▲) indicate potential areas where the price may react in the future.
- **Customization**:
- **Trend Signal Strength** (default: 1): Adjusts the ATR period to control the frequency of trend signals.
- **Trend Sensitivity** (default: 0.8): Fine-tunes the responsiveness of the trend lines.
- **Reversal Signal Sensitivity** (default: 7): Defines the lookback period for detecting reversal points.
- **Price Channel Length** (default: 100): Sets the period for calculating the price channel.
- Use the indicator on standard candlestick charts for accurate results.
**Unique Features**:
- **Integrated Analysis**: Combines trend detection, price channel analysis, and reversal point identification into a single, cohesive tool.
- **Missed Reversal Levels**: Highlights untested price levels with ▼ and ▲ symbols, helping traders anticipate potential price reactions before they occur.
- **Dynamic Customization**: Offers adjustable settings to adapt the indicator to different markets (stocks, forex, crypto) and trading strategies (scalping, day trading, or swing trading).
- **Efficient Design**: Optimized to minimize resource usage, ensuring smooth performance on TradingView charts.
**Settings**:
- **Trend Signal Strength**: Controls the ATR period for trend calculations (default: 1).
- **Trend Sensitivity**: Adjusts the sensitivity of trend signals (default: 0.8).
- **Reversal Signal Sensitivity**: Defines the lookback period for reversal point detection (default: 7).
- **Price Channel Length**: Sets the period for the statistical price channel (default: 100).
**Trading Tips**:
- For scalping, use shorter timeframes (5-15 minutes) and increase the Trend Sensitivity for more frequent signals.
- For swing trading, use higher timeframes (1-hour or 4-hour) and adjust the Reversal Signal Sensitivity to focus on significant reversal points.
- Combine Buy/Sell signals with price channel breakouts or interactions with reversal levels for higher-probability trades.
- Monitor the correlation coefficient (displayed below the chart) to gauge the strength of the trend within the price channel.
**Why Use This Indicator?**
The Fadi Dynamic Trend Indicator is ideal for traders seeking a versatile tool that simplifies complex market analysis. Its unique combination of trend signals, price channel visualization, and missed reversal levels empowers traders to make informed decisions in trending or ranging markets. Whether you're a beginner or an experienced trader, this indicator provides clear, actionable insights to enhance your trading strategy.
**Note**: This indicator is designed for use on standard candlestick charts to ensure realistic and reliable results. Always backtest and validate the indicator on your preferred market and timeframe before using it in live trading.

Stan's Magic PotionStan's Magic Potion Indicator
Overview
"Stan's Magic Potion" is a robust Pine Script® v6 indicator designed for short-term trading on 3-minute and 5-minute time frames, optimized for major indices such as AMEX:SPY , SP:SPX , NASDAQ:QQQ , and $IWM. This indicator integrates Opening Range Breakout (ORB) logic, Dynamic Momentum Metrics (DMM), VWAP, and confluence-based entry signals to deliver clear, actionable trade setups for bullish and bearish opportunities.
Key Features
Opening Range Breakout (ORB): Captures the high and low of the 9:30 AM – 9:45 AM EST opening range, locking these levels at 9:45 AM to identify breakout zones. Breakouts above or below these levels are highlighted with background colors for easy visualization.
DMM Cross Signals: Utilizes fast and slow Dynamic Momentum Metrics (DMM) to generate "CALL" and "PUT" signals on crossovers, with dynamic fill colors between the DMM lines to indicate trend direction.
Confluence Entry at 10:00 AM: Generates high-probability "CALL" or "PUT" signals at 10:00 AM when price aligns with key levels (above/below EMA 200, VWAP, and locked ORB high/low) and DMM trend confirmation.
VWAP and EMA 200: Plots VWAP and a 200-period EMA as dynamic support/resistance levels to aid in trend analysis.
Visual Clarity: Includes clear labels for trade signals, ORB lock markers, and color-coded plots for intuitive chart reading.
How to Use
Time Frame: Best used on 3-minute or 5-minute charts for AMEX:SPY , SP:SPX , NASDAQ:QQQ , or $IWM.
Trade Setups:
* Look for "CALL" or "PUT" signals from DMM crossovers throughout the session.
* Prioritize 10:00 AM confluence signals for higher-probability entries when price aligns with EMA 200, VWAP, and ORB levels.
* Monitor ORB breakouts (highlighted by background colors) for momentum-driven trades.
Risk Management: Always use proper risk management and confirm signals with additional analysis, as market conditions may vary.
Settings
* The indicator is pre-configured with default parameters (DMM settings, ORB time window, VWAP). No user inputs are required, ensuring simplicity and ease of use.
* Maximum bars back is set to 500 for performance optimization.
Notes
* This indicator is subject to the terms of the Mozilla Public License 2.0.
* © StanTheTradingMan.
* Designed for educational and informational purposes. Always backtest and validate strategies before live trading.
Why Use Stan's Magic Potion?
This indicator combines multiple proven technical concepts (ORB, DMM, VWAP) into a single, cohesive tool tailored for short-term traders. Its focus on key intraday time windows (9:30–9:45 AM and 10:00 AM) and clear visual cues make it an excellent choice for those seeking precision in fast-moving markets.
License
This Pine Script® code is licensed under the Mozilla Public License 2.0.

Price Ranged FVG📌 Price Ranged FVG
Is a clean and efficient tool designed to detect Fair Value Gaps (FVGs) with adjustable filters and structural context. It’s especially useful for traders looking to filter out insignificant gaps and focus on high-probability areas, particularly around swing breaks or structural shifts.
🧠 What is a Fair Value Gap (FVG)?
A Fair Value Gap appears when there’s a price imbalance between candles — typically after a strong move — where the market skips over certain price levels without trading there. These zones can act as potential areas for price to return to (mean reversion), or serve as support/resistance depending on market structure.
🔍 FVG Detection Types
You can choose between three different detection modes under the "FVG Detection" input:
Same Type: Only detects FVGs where the last 3 candles are in the same direction (all bullish or all bearish).
All: Detects any FVG, regardless of candle direction.
Twin Close: Detects FVGs only when the last two candles are in the same direction and close accordingly — offering a stricter confirmation.
🎯 FVG % Filters
To filter out noise or insignificant gaps, this indicator includes:
Minimum FVG % Filter: Ignores FVGs smaller than your specified percentage of the current close.
Maximum FVG % Filter: Ignores overly large gaps that may be unreliable or caused by anomalies.
These filters help focus on relevant FVGs that are more likely to act as reaction zones.
🏛 Structural Context (Swing Highs and Lows)
The indicator plots swing highs and swing lows with dots to provide structure-based context:
Set Swing Strength to 3 for detecting internal structure (shorter-term moves).
Use a higher setting like 5 to focus on external structure (more significant highs/lows).
These levels can help you determine whether an FVG is forming within a consolidation, breakout, or key structural transition.
✅ Use Case (My Personal Workflow)
I personally use this indicator to:
Filter out weak or irrelevant FVGs using the % filters.
Watch for price interaction at swing breaks — especially when an FVG aligns with a break in internal or external structure.
Refine entry and exit planning in confluence with other tools or strategies.
⚠️ Disclaimer
This indicator is not financial advice. It is a technical analysis tool intended to support your own decision-making process. Always do your own research and risk management.

AG DayTradeThis is one of best support&resistant indicator. It gives best possible entry and exit points with long term and short term trends.

Jags Dynamic S/R with Breakout & Weakness SignalsThis script is designed to automatically identify and display significant support and resistance levels on your chart. It then goes a step further by actively monitoring for potential breakouts and signs of support weakness.
Core Functionality: Identifying Key Levels
At its heart, the script uses a pivot logic to find recent price highs and lows, which it then plots as horizontal lines representing potential resistance and support, respectively. You have full control over how these levels are identified:
Timeframe: You can choose to find these pivot points on the current chart's timeframe or a higher one (e.g., daily pivots on an hourly chart).
Lookback Period: You can define how many bars to the left and right of a pivot point the script should consider, allowing you to fine-tune the significance of the levels it identifies.
Line Management: To keep your chart clean, you can set the maximum number of support and resistance lines to display. The script also has a clever "merge" feature that combines new pivot levels with existing ones if they are very close together, preventing clutter.
Breakout Detection
A key feature of this indicator is its ability to signal when the price breaks through one of these identified support or resistance levels. You can enable or disable this feature and choose from several confirmation methods to suit your trading style:
Simple Price Action: A breakout is confirmed simply by the price closing above a resistance level or below a support level.
ATR (Average True Range): For a breakout to be valid, the price must close a certain distance (based on the ATR) beyond the level, filtering out minor fluctuations.
Volume: This option adds another layer of confirmation by requiring a significant increase in trading volume during the breakout, suggesting strong conviction behind the move.
Momentum: This method uses the RSI (Relative Strength Index) to confirm that the breakout is supported by strong underlying momentum.
Quantitative: A more advanced option that uses a combination of the Rate of Change (ROC) and a Volume-Weighted Moving Average (VWMA) to provide a robust, multi-faceted confirmation of the breakout.
When a confirmed breakout occurs, the script will:
Color the breakout bar green for a bullish breakout (upward) or red for a bearish breakout (downward).
Place an arrow below a bullish breakout or above a bearish breakout.
Trigger an alert to notify you of the event.
Support Weakness Detection
To provide an early warning of a potential breakdown, the script includes a unique "Support Weakness Detection" feature. When enabled, it looks for a specific confluence of bearish signals as the price approaches a support level:
The price is hovering just above a key support level.
The short-term trend has already turned bearish (based on a moving average).
Momentum is fading (indicated by a falling RSI).
If all these conditions are met, a blue down-arrow will appear above the price bar, signalling that the nearby support may not hold.

K1 - Quarterly Theory Primary Price LevelsThe K1 indicator is a specialized tool designed for traders practicing Quarterly Theory (QT) and related concepts of smart money. It focuses on calculating and displaying Primary Price Levels (PPLs) that form the backbone of many QT-based strategies.
Unlike generic indicators using standard levels like previous highs/lows or session opens, K1 offers three uniquely integrated capabilities not found together in any open-source indicators on TradingView:
✅ Unique Features
Customizable PPL Visibility per Chart Context
Each price level can be individually toggled on or off, enabling traders to fine-tune their charts for specific timeframes and trading setups. For example, some traders prefer only the PWH, PWL, and Q3 Daily Open on higher timeframes, while others prioritize PDH, PDL, London Open, and NY AM Open on intraday charts. This level of flexibility supports multi-timeframe analysis with minimal clutter.
Historical PPL Display for Backtestin g
K1 supports historical plotting of PPLs for backtesting trade setups across multiple days or weeks. Historical levels can also be toggled, giving traders granular control over how far back the data is displayed and which levels to analyze retrospectively.
Consequent Encroachment (C.E.) Calculations
The indicator includes dashed lines marking the 50% wick levels (C.E.) of both the daily and 12-hour candles. These C.E. levels often signal potential retracement or reversal points. This concept, rooted in ICT methodology, is not commonly included in standard indicators and offers traders an advanced reference for precise entries.
📘 Background & Theory
K1 was developed in response to specific feature requests from QT traders and incorporates ideas from Traderdaye, who was influenced by ICT (Inner Circle Trader) teachings. It is also compatible with extended QT concepts such as:
Sequential Smart Money Technique (SSMT)
Precision Swing Point (PSP)
Terminus Price Divergence (TPD), a concept by Jacob Speculates
These concepts work together with the PPLs to build confluence zones and refine high-probability entries.
📍 Included PPLs in K1
Prior Week High (PWH) / Low (PWL)
Prior Day High (PDH) / Low (PDL)
True Day Open (000)
London Open (130)
Q3 Daily Open (600)
New York AM (730) / PM Open (1300)
True Week Open (TWO)
Sunday True Open (STO)
Consequent Encroachment Daily Wick (C.E. D)
Consequent Encroachment 12H Wick (C.E. 12H)
K1 is closed-source due to the proprietary logic used for session-specific time logic, precision wick encroachment calculations, and a multi-context plotting engine explicitly designed for QT workflows.
This script is currently available by invitation only and is intended for traders familiar with QT methodologies who want to add higher precision and flexibility to their technical charting.

Golden Pocket Syndicate [GPS]Golden Pocket Syndicate is a multi-layered market analysis toolkit built for precision entries and sniper-style reversals in both trending and ranging conditions. The script fuses volume dynamics, golden pocket structures, market maker behavior, and liquidation cluster tracking into one high-confluence system.
Core Features:
• 📐 Golden Pocket Zones: Dynamic GP levels from daily, weekly, monthly, and yearly timeframes. These levels update in real-time and serve as confluence zones for entries and exits.
• 📊 WaveTrend Divergence Diamonds: Momentum shifts are detected using a custom filtered WaveTrend cross system to mark high-probability reversal conditions.
• 🧠 Market Maker Premium Divergence: Tracks price dislocation between CME and Binance to detect large player manipulation using a configurable premium threshold.
• 💎 MM Reversal Diamonds: Identifies potential market maker traps and large player pivots using historical candle behavior, EMA alignment, and price structure breaks.
• 📉 Stealth Liquidation Cluster Arrows: Volume-based liquidation pressure visualized as lightweight directional arrows based on calculated wick expansion and volume bursts. Highlights key zones where price is likely to bounce or reject.
• 🧭 Trend Validation: Uses volume-based trend conditions and short-term EMA positioning to further qualify signals and eliminate noise.
How to Use:
This indicator is designed to help traders visualize confluence between key institutional price levels, momentum shifts, and volume-based pressure points. Long/short opportunities can be explored at marked reversal diamonds or liquidation zones that align with key GP levels. Intended for use on higher timeframes (15m to 4H), though flexible across any pair or market.

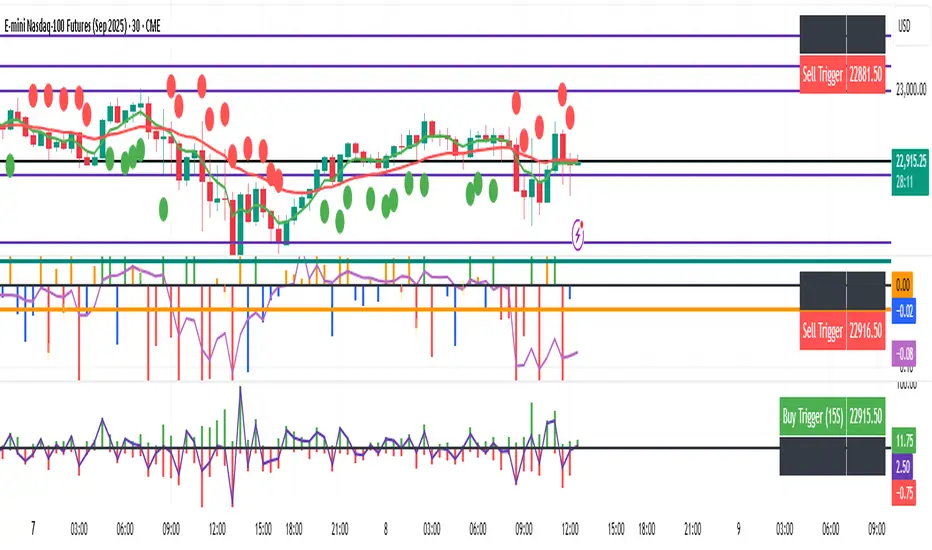
HL/OL Histogram + (Close-Open)🧠 Core Concept
This indicator is designed to detect meaningful directional intent in price action using a combination of:
Intrabar candle structure (high - open, open - low)
Net price momentum (close - open)
Timed trigger levels (frozen buy/sell prices based on selected timeframe closes)
The core idea is to visually separate bullish and bearish energy in the current bar, and to mark the price at which momentum flips from down to up or vice versa, based on a change in the close - open differential.
🔍 Components Breakdown
1. Histogram Bars
Green Bars (high - open): Represent bullish upper wicks, showing intrabar strength above the open.
Red Bars (open - low): Represent bearish lower wicks, showing pressure below the open.
Plotted as histograms above and below the zero line.
2. Close–Open Line (White)
Plots the difference between close and open for each bar.
Helps you visually track when momentum flips from negative to positive, or vice versa.
A bold black zero line provides clear reference for these flips.
3. Buy/Sell Signal Logic
A Buy Trigger is generated when close - open crosses above zero
A Sell Trigger occurs when close - open crosses below zero
These trigger events are one-shot, meaning they’re only registered once per signal direction. No retriggers occur until the opposite condition is met.
📈 Trigger Price Table (Static)
On a signal trigger, the close price from a lower timeframe (15S, 30S, 1, 2, 3, or 5 min) is captured.
This price is frozen and displayed in a table at the top-right of the pane.
The price remains fixed until the opposite trigger condition fires, at which point it is replaced.
Why close price?
Using the close from the lower timeframe gives a precise, decisive reference point — ideal for planning limit entries or confirming breakout commitment.
🛠️ Use Cases
Momentum traders can use the histogram and line to time entries after strong open rejection or close breakouts.
Scalpers can quickly gauge intrabar sentiment reversals and react to new momentum without waiting for candle closes.
Algo builders can use the frozen price logic as precise entry or confirmation points in automated strategies.
Multy Dynamic POCThis script displays up to 4 independent Point of Control (POC) levels based on volume profile logic.
📌 Each POC can be configured individually:
Period options: Daily (D), Weekly (W), Monthly (M), or BARS (rolling bar window).
Dynamic recalculation when the period changes (e.g., new day/week/month or custom bar count).
Price-anchored lines for each POC level that scale correctly with the chart.
Customizable line color and thickness.
🔍 How it works:
For each active POC line, the script builds a simple volume distribution based on the candle’s average price (hl2) and volume.
The price range is split into 100 buckets. The one with the highest accumulated volume is selected as the Point of Control (POC).
In BARS mode, POC is recalculated every N bars. In D/W/M modes, it resets exactly at the beginning of a new period (according to TradingView’s time() function).
✅ Useful for:
Traders applying volume profile analysis without needing the full built-in volume profile tool.
Spotting dynamic high-volume zones in trends or ranges.
Strategy development or confirmation around high-interest price levels.
_______________________________________________________________________________
Данный индикатор отображает до 4 независимых уровней Point of Control (POC), рассчитанных по объёмам.
📌 Каждый POC можно настраивать отдельно:
Периоды: День (D), Неделя (W), Месяц (M) или BARS (скользящее окно по количеству баров).
Автоматический пересчёт при смене периода (например, новый день, неделя или месяц).
Линии POC привязаны к цене и масштабируются вместе с графиком.
Настраиваемый цвет и толщина линий.
🔍 Как работает:
Для каждой активной линии POC создаётся объёмное распределение: берется средняя цена свечи (hl2) и объем.
Диапазон цен делится на 100 уровней. Тот, где накоплено больше всего объёма, и есть POC.
В режиме BARS уровень пересчитывается каждые N баров. В режимах D/W/M — строго в начале нового периода.
✅ Подходит для:
Трейдеров, использующих объёмный анализ, но не имеющих платной подписки на Volume Profile.
Поиска уровней интереса и подтверждения сигналов.
Разработки стратегий с опорой на объём.

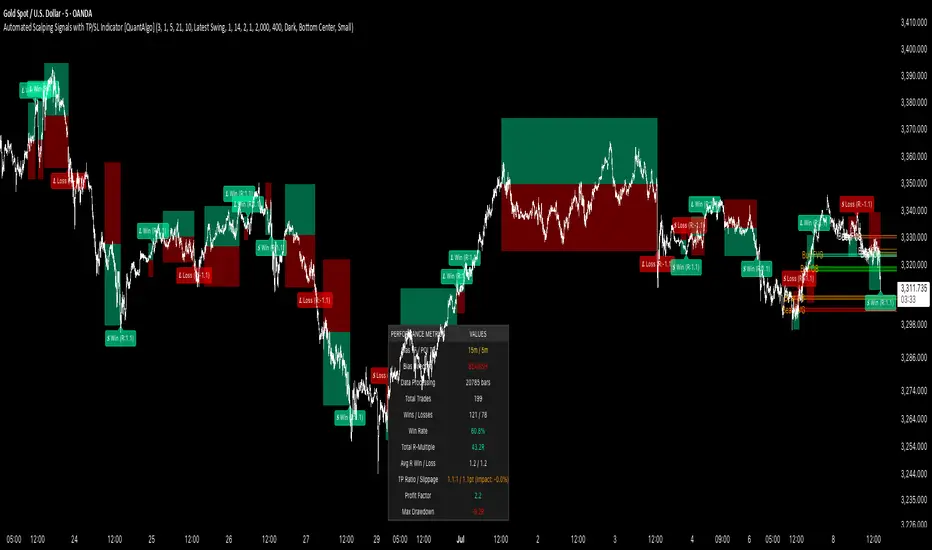
Automated Scalping Signals with TP/SL Indicator [QuantAlgo]🟢 Overview
The Automated Scalping Signals with Take Profit & Stop Loss Indicator is a multi-timeframe trading system that combines market structure analysis with directional bias filtering to identify potential scalping opportunities. It detects Points of Interest (POI) including Fair Value Gaps (FVG) and Order Blocks (OB) while cross-referencing entries with higher timeframe exponential moving average positioning to create systematic entry conditions.
The indicator features adaptive timeframe calculations that automatically scale analysis periods based on your chart timeframe, maintaining consistent analytical relationships across different trading sessions. It provides integrated trade management with stop loss calculation methods, configurable risk-reward ratios, and real-time performance tracking through dashboard displays showing trade statistics, bias direction, and active position status.
This advanced system is designed for low timeframe trading, typically performing optimally on 1 to 15-minute charts across popular instruments such as OANDA:XAUUSD , CME_MINI:MES1! , CME_MINI:ES1! , CME_MINI:MNQ1! , CBOT_MINI:YM1! , CBOT_MINI:MYM1! , BYBIT:BTCUSDT.P , BYBIT:ETHUSDT.P , or any asset and timeframe of your preference.
🟢 How It Works
The indicator operates using a dual-timeframe mathematical framework where higher timeframe exponential moving averages establish directional bias through cross-over analysis, while simultaneously scanning for specific market structure patterns on the POI timeframe. The timeframe calculation engine uses multiplication factors to determine analysis periods, ensuring the bias timeframe provides trend context while the POI timeframe captures structural formations.
The structural analysis begins with FVG detection, which systematically scans price action to identify imbalances where gaps exist between consecutive candle ranges with no overlapping wicks. When such gaps are detected, the algorithm measures their size against minimum thresholds to filter out insignificant formations. Concurrently, OB recognition analyzes three-candle sequences, examining specific open/close relationships that indicate potential institutional accumulation zones. Once these structural patterns are identified, the algorithm cross-references them against the higher timeframe bias direction, creating a validation filter that only permits entries aligned with the prevailing EMA cross-over state. When price subsequently intersects these validated POI zones, entry signals generate with the system calculating entry levels at zone midpoints, then applying the selected stop loss methodology combined with the configured risk-reward ratio to determine take profit placement.
To mirror realistic trading conditions, the indicator incorporates configurable slippage calculations that account for execution differences between intended and actual fill prices. When trades reach their take profit or stop loss levels, the algorithm applies slippage adjustments that worsen the exit prices in a conservative manner - reducing take profit fills and increasing stop loss impact. This approach ensures backtesting results reflect more realistic performance expectations by accounting for spread costs, market volatility during execution, and liquidity constraints that occur in live trading environments.
It also has a performance dashboard that continuously tracks and displays comprehensive trading metrics:
1/ Bias TF / POI TF: Displays the calculated timeframes used for bias analysis and POI detection, showing the actual periods (e.g., "15m / 5m") that result from the multiplier settings to confirm proper adaptive timeframe selection
2/ Bias Direction: Shows current market trend assessment (Bullish, Bearish, or Sideways) derived from EMA cross-over analysis to indicate which trade directions align with prevailing momentum
3/ Data Processing: Indicates how many price bars have been analyzed by the system, helping users verify if complete historical data has been processed for comprehensive strategy validation
4/ Total Trades: Displays the cumulative number of completed trades plus any active positions, providing volume assessment for statistical significance of other metrics
5/ Wins/Losses: Shows the raw count of profitable versus unprofitable trades, offering immediate insight into strategy effectiveness frequency
6/ Win Rate: Reveals the percentage of successful trades, where values above 50% generally indicate effective entry timing and values below suggest strategy refinement needs
7/ Total R-Multiple: Displays cumulative risk-reward performance across all trades, with positive values demonstrating profitable system operation and negative values indicating net losses requiring analysis
8/ Average R Win/Loss: Shows average risk-reward ratios for winning and losing trades separately, where winning averages approaching the configured take profit ratio indicate minimal slippage impact while losing averages near -1.0 suggest effective stop loss execution
9/ TP Ratio / Slippage: Displays the configured take profit ratio and slippage settings with calculated performance impact, showing how execution costs affect actual versus theoretical returns
10/ Profit Factor: Calculates the ratio of total winning amounts to total losing amounts, where values above 1.5 suggest robust profitability, values between 1.0-1.5 indicate modest success, and values below 1.0 show net losses
11/ Maximum Drawdown: Tracks the largest peak-to-trough decline in R-multiple terms, with smaller negative values indicating better capital preservation and risk control during losing streaks
🟢 How to Use
Start by applying the indicator to your chart and observe its performance across different market conditions to understand how it identifies bias direction and POI formations. Then navigate to the settings panel to configure the Bias Timeframe Multiplier for trend context sensitivity and POI Timeframe Multiplier for structural analysis frequency according to your trading preference and objectives.
Next, fine-tune the EMA periods in Bias Settings to control trend detection sensitivity and select your preferred POI types based on your analytical preference. Proceed to configure your Risk Management approach by selecting from the available stop loss calculation methods and setting the Take Profit ratio that aligns with your risk tolerance and profit objectives. Complete the setup by customizing Display Settings to control table visibility and trade visualization elements, adjusting UI positioning and colors for optimal chart readability, then activate Alert Conditions for automated notifications on trade entries, exits, and bias direction changes to support systematic trade management.
🟢 Examples
OANDA:XAUUSD
CME_MINI:MES1!
CME_MINI:ES1!
CME_MINI:MNQ1!
CBOT_MINI:YM1!
BYBIT:BTCUSDT.P
BINANCE:SOLUSD
*Disclaimer: Past performance is not indicative of future results. None of our statements, claims, or signals from our indicators are intended to be financial advice. All trading involves substantial risk of loss, not just upside potential. Users are highly recommended to carefully consider their financial situation and risk tolerance before trading.
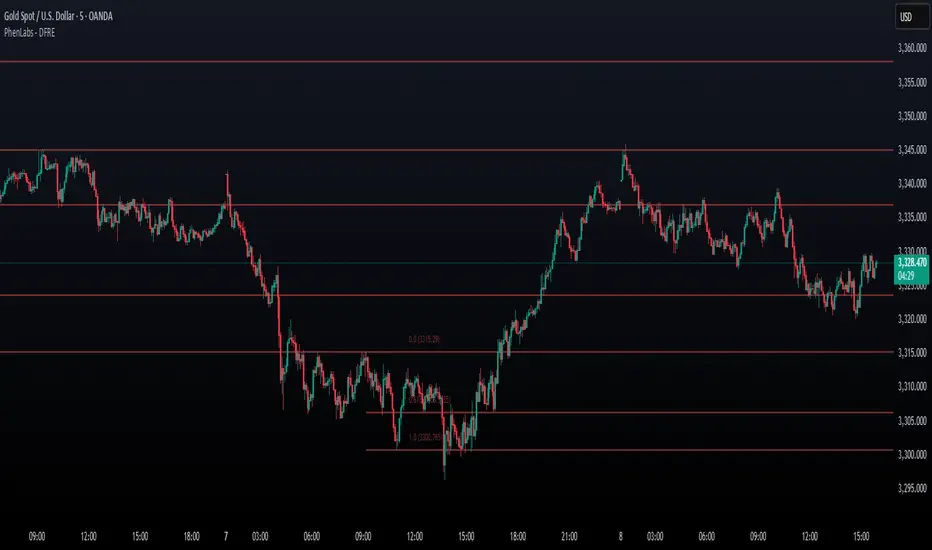
Fibonacci Retracement Engine (DFRE) [PhenLabs]📊 Fibonacci Retracement Engine (DFRE)
Version: PineScript™ v6
📌 Description
Dynamic Fibonacci Retracement Engine (DFRE) is a sophisticated technical analysis tool that automatically detects important swing points and draws precise Fibonacci retracement levels on various timeframes. The intelligent indicator eliminates the subjectivity of manual Fibonacci drawing using intelligent swing detection algorithms combined with multi timeframe confluence analysis.
Built for professional traders who demand accuracy and consistency, DFRE provides real time Fibonacci levels that adapt to modifications in market structure without sacrificing accuracy in changing market conditions. The indicator excels at identifying key support and resistance levels where price action is more likely to react, giving traders a potent edge in entry and exit timing.
🚀 Points of Innovation
Intelligent Swing Detection Algorithm : Advanced pivot detection with customizable confirmation bars and minimum swing percentage thresholds
Multi-Timeframe Confluence Engine : Simultaneous analysis across three timeframes to identify high-probability zones
Dynamic Level Management : Automatically updates and manages multiple Fibonacci sets while maintaining chart clarity
Adaptive Visualization System : Smart labeling that shows only the most relevant levels based on user preferences
Real-Time Confluence Detection : Identifies zones where multiple Fibonacci levels from different timeframes converge
Automated Alert System : Comprehensive notifications for level breakouts and confluence zone formations
🔧 Core Components
Swing Point Detection Engine : Uses pivot high/low calculations with strength confirmation to identify significant market turns
Fibonacci Calculator : Automatically computes standard retracement levels (0.236, 0.382, 0.5, 0.618, 0.786, 0.886) plus extensions (1.272, 1.618)
Multi-Timeframe Security Function : Safely retrieves Fibonacci data from higher timeframes without repainting
Confluence Analysis Module : Mathematically identifies zones where multiple levels cluster within specified thresholds
Dynamic Drawing Management : Efficiently handles line and label creation, updates, and deletion to maintain performance
🔥 Key Features
Customizable Swing Detection : Adjust swing length (3-50 bars) and strength confirmation (1-10 bars) to match your trading style
Selective Level Display : Choose which Fibonacci levels to show, from core levels to full extensions
Multi-Timeframe Analysis : Analyze up to 3 different timeframes simultaneously for confluence identification
Intelligent Labeling System : Options to show main levels only or all levels, with latest-set-only functionality
Visual Customization : Adjustable line width, colors, and extension options for optimal chart clarity
Performance Optimization : Limit maximum Fibonacci sets (1-5) to maintain smooth chart performance
Comprehensive Alerting : Get notified on level breakouts and confluence zone formations
🎨 Visualization
Dynamic Fibonacci Lines : Color-coded lines (green for uptrends, red for downtrends) with customizable width and extension
Smart Level Labels : Precise level identification with both ratio and price values displayed
Confluence Zone Highlighting : Visual emphasis on areas where multiple timeframe levels converge
Clean Chart Management : Automatic cleanup of old drawing objects to prevent chart clutter
Responsive Design : All visual elements adapt to different chart sizes and timeframes
📖 Usage Guidelines
Swing Detection Settings
Swing Detection Length - Default: 25 | Range: 3-50 | Controls the lookback period for identifying pivot points. Lower values detect more frequent swings but may include noise, while higher values focus on major market turns.
Swing Strength (Confirmation Bars) - Default: 2 | Range: 1-10 | Number of bars required to confirm a swing point. Higher values reduce false signals but increase lag.
Minimum Swing % Change - Default: 1.0% | Range: 0.1-10.0% | Minimum percentage change required to register a valid swing. Filters out insignificant price movements.
Fibonacci Level Settings
Individual Level Toggles : Enable/disable specific Fibonacci levels (0.236, 0.382, 0.5, 0.618, 0.786, 0.886)
Extensions : Show projection levels (1.272, 1.618) for target identification
Multi-Timeframe Settings
Timeframe Selection : Choose three higher timeframes for confluence analysis
Confluence Threshold : Percentage tolerance for level clustering (0.5-5.0%)
✅ Best Use Cases
Swing Trading : Identify optimal entry and exit points at key retracement levels
Confluence Trading : Focus on high-probability zones where multiple timeframe levels align
Support/Resistance Trading : Use dynamic levels that adapt to changing market structure
Breakout Trading : Monitor level breaks for momentum continuation signals
Target Setting : Utilize extension levels for profit target placement
⚠️ Limitations
Lagging Nature : Requires confirmed swing points, which means levels appear after significant moves
Market Condition Dependency : Works best in trending markets; less effective in extremely choppy conditions
Multiple Signal Complexity : Multiple timeframe analysis may produce conflicting signals requiring experience to interpret
Performance Considerations : Multiple Fibonacci sets and MTF analysis may impact indicator loading time on slower devices
💡 What Makes This Unique
Automated Precision : Eliminates manual drawing errors and subjective level placement
Multi-Timeframe Intelligence : Combines analysis from multiple timeframes for superior confluence detection
Adaptive Management : Automatically updates and manages multiple Fibonacci sets as market structure evolves
Professional-Grade Alerts : Comprehensive notification system for all significant level interactions
🔬 How It Works
Step 1 - Swing Point Identification : Scans price action using pivot high/low calculations with specified lookback periods, applies confirmation logic to eliminate false signals, and calculates swing strength based on surrounding price action for quality assessment.
Step 2 - Fibonacci Level Calculation : Automatically computes retracement and extension levels between confirmed swing points, creates dynamic level sets that update as new swing points are identified, and maintains multiple active Fibonacci sets for comprehensive market analysis.
Step 3 - Multi-Timeframe Confluence : Retrieves Fibonacci data from higher timeframes using secure request functions, analyzes level clustering across different timeframes within specified thresholds, and identifies high-probability zones where multiple levels converge.
💡 Note: This indicator works best when combined with other technical analysis tools and proper risk management. The multi-timeframe confluence feature provides the highest probability setups, but always confirm signals with additional analysis before entering trades.
Initial BalanceInitial balance and extentions for levels 50%, 100%, 150% and 200%.
Alerts avilable for every level separatly or one for any level

EMA/MA Unified with Pivot S/RTitle: Moving Average Combined with Pivot Point Support and Resistance Strategy
Description: This indicator combines two powerful trading concepts: 1. Moving Average Crossover; 2. Pivot Point Support and Resistance. It provides traders with a versatile tool.
Features:
Moving Average Crossover: Use moving average groups to identify trend trends. Contains multiple EMAs and one SMA to highlight short-term, medium-term and long-term market trends.
Detection of Golden Cross and Dead Cross: to predict market trends.
Support and Resistance: Dynamically identify key support and resistance levels based on pivot points. Configurable lookback period for left and right pivot points to suit different trading styles and time frames. Fast right pivot point option captures recent market volatility and optimizes support and resistance areas.
Customization:
Traders can adjust the length of the moving average according to their trading strategy. The support and resistance display can be toggled to get a clearer chart as needed.
Trend Analysis:
When EMA240S crosses EMA1440, a weak golden cross (X symbol) is drawn, suggesting that the main trend may turn to a bullish trend; when EMA720 crosses EMA1440, a strong golden cross (upward triangle) is drawn, suggesting that the main trend is likely to turn to a bullish trend.
When EMA240S crosses EMA1440, a weak death cross (X symbol) is drawn, suggesting that the main trend may turn to a bearish trend; when EMA720 crosses EMA1440, a strong death cross (downward triangle) is drawn, suggesting that the main trend is likely to turn to a bearish trend.
Visualization:
Moving averages are displayed in different color to depict the strength and direction of the trend.
Support and resistance levels are drawn in different color, enhancing the visual appeal and readability of key price levels.
This comprehensive indicator is designed for traders who seek to combine the accuracy of support and resistance analysis with the trend-following ability of moving average crossovers, providing a powerful basis for making informed trading decisions.
——————————————————————————————————————————————————————————
标题:移动平均线结合轴枢点支阻位策略
描述: 该指标融合了两个强大的交易概念:1. 移动平均线交叉;2. 轴枢点支撑压力位。为交易者提供了一个多功能工具。
特点:
移动平均线交叉: 利用均线组识别趋势走势。包含多条EMA和一条SMA,以突出显示短期、中期和长期的市场趋势。
检测金叉和死叉:以预示市场趋势。
支撑位和阻力位: 基于枢轴点动态识别关键支撑位和阻力位。 可配置左右枢轴点的回溯期,以适应不同的交易风格和时间框架。 快速右轴点选项可捕捉近期市场波动并优化支撑位和阻力位区域。
自定义:
交易者可以根据自己的交易策略调整移动平均线的长度。 支撑位和阻力位显示可以切换,以便根据需要获得更清晰的图表。
趋势研判:
当EMA240S上穿EMA1440时,绘制弱金叉(X符号),暗示主趋势可能转为多头趋势;当EMA720上穿EMA1440时,绘制强金叉(向上三角),暗示主趋势大概率转为多头。
当EMA240S下穿EMA1440时,绘制弱死叉(X符号),暗示主趋势可能转为空头趋势;当EMA720下穿EMA1440时,绘制强死叉(向下三角),暗示主趋势大概率转为空头。
可视化:
移动平均线以不同的颜色显示,以描绘趋势的强度和方向。
支撑位和阻力位以不同的颜色绘制,增强了关键价格水平的视觉吸引力和可读性。
这款综合指标专为寻求将支撑位和阻力位分析的精准性与移动平均线交叉的趋势跟踪能力相结合的交易者而设计,为做出明智的交易决策提供了一个强大的判断依据。
