XAUUSD Smart AI Strategy v1.2spodfjkpsdogfjkpod
sdfpjdsoikgfjmp
d
sfopsdjgf
sodjihfosiudg
sdpofjiposdgj
sdokgfpiosdg
Indicators and strategies


Multi-Indicator Trading BotMACD stands for Moving Average Convergence Divergence. It is a momentum indicator that shows the relationship between two moving averages of a stock’s price:
MACD Line = 12 EMA – 26 EMA
Signal Line = 9 EMA of the MACD Line
Histogram = MACD Line – Signal Line
✅ MACD Crossover Strategy: The Basic

LA SOÑADA 7000 4h//@version=5
strategy(title='LA SOÑADA 7000 4h', calc_on_order_fills=true, calc_on_every_tick=false, initial_capital=10000, commission_type=strategy.commission.percent, commission_value=0.04, overlay=true, default_qty_type=strategy.cash, default_qty_value=60000)
buffer = input.float(title='buffer', defval=0.3, minval=0, step=0.1)
b1 = close * (1 + buffer / 100)
b2 = close * (1 - buffer / 100)
strategy.entry('Long', strategy.long, when=close > b1, comment='entry')
strategy.close('Long', when=close < b2, comment='exit')
//money management
stop_loss = input.int(15, 'Stop loss %', minval=1, step=1)
sl = strategy.position_avg_price * (1 - stop_loss / 100)
close_Stop = close < sl
strategy.close('Long', when=close_Stop, comment='Stop loss')
Target_profit = input.int(50, 'Target Profit %', minval=1, step=1)
tp = strategy.position_avg_price * (1 + Target_profit / 100)
close_Target = close > tp
strategy.close('Long', when=close_Target, comment='Target')

US30 Stealth StrategyOnly works on US30 (CAPITALCOM) 5 Minute chart
📈 Core Concept:
This is a trend-following strategy that captures strong market continuations by entering on:
The 3rd swing in the current trend,
Confirmed by a volume-verified engulfing candle,
With adaptive SL/TP and position sizing based on risk.
🧠 Entry Logic:
✅ Trend Filter
Uses a 50-period Simple Moving Average (SMA).
Buy only if price is above SMA → Uptrend
Sell only if price is below SMA → Downtrend
✅ Swing Count Logic
For buy: Wait for the 3rd higher low
For sell: Wait for the 3rd lower high
Uses a 5-bar lookback to detect highs/lows
This ensures you’re not buying early — but after trend is confirmed with structure.
✅ Engulfing Candle Confirmation
Bullish engulfing for buys
Bearish engulfing for sells
Candle must engulf previous bar completely (body logic)
✅ Volume Filter
Current candle volume must be greater than the 20-period volume average
Ensures trades only occur with institutional participation
✅ MA Slope Filter
Requires the slope of the 50 SMA over the last 3 candles to exceed 0.1
Avoids chop or flat trends
Adds momentum confirmation to the trade
✅ Session Filter (Time Filter)
Trades only executed between:
2:00 AM to 11:00 PM Oman Time (UTC+4)
Helps avoid overnight chop and illiquidity
📊 Position Sizing & Risk Management
✅ Smart SL (Adaptive Stop Loss)
SL is based on full size of the signal candle (including wick)
But if candle is larger than 25 points, SL is cut to half the size
This prevents oversized risk from long signals during volatile moves.

Mahnam BTC with breake outThis strategy is designed and coded specifically for trading Bitcoin in the 15-minute timeframe.
Of course, those who are skilled in coding can use it in other timeframes and currencies by changing its codes and personalizing it.
Of course, it is strongly recommended that people who want to use it first perform the necessary backtests or test this strategy on demo sites and then trade on the Tetri platform.
In this strategy, it only checks the entry and exit conditions and connects to the exchange using the API code and trades completely automatically.
This strategy determines the stop loss and take profit points on the exchange at the same time as entering the transaction and sets them.
///////////////////////// Code ////////////////////////////////
//@version=5
// Copyright (c) 2021-present, Alex Orekhov (everget)
//indicator('HalfTrend and TMA', overlay=true , max_lines_count = 500, max_labels_count = 500)
strategy(title='Mahnam BTC with breake out', overlay=true , max_bars_back=5000 , max_labels_count= 500 , max_boxes_count = 500,max_lines_count = 500, initial_capital=1000, currency = currency.USDT, default_qty_type=strategy.cash )
import PineCoders/Time/4
/////////////////////////////////////////////////////////////////////////////////////////////////////////////////
newyork = '0000-2400' // input.session(title='Session', defval='0000-2400')
time_newyork = time(timeframe.period, newyork)
///////////////////////////////////////////////////////////////////////////////////////////////////////////
// تعیین تاریخ شروع و پایان (بر حسب timestamp یونیکس)
// تنظیمات Input برای تاریخ شروع و پایان
startDate = input.time(timestamp('01 Jan 2025 00:00 UTC'), "📅 تاریخ شروع معاملات", inline="dateRange")
endDate = input.time(timestamp('31 Dec 2025 23:59 UTC'), "📅 تاریخ پایان معاملات", inline="dateRange")
// بررسی اینکه آیا زمان فعلی در بازه مجاز است یا خیر
isTradeEnabled = (time >= startDate) //and (time <= endDate)
///////////////////////////////////////////////////////////////////////////////////////////
// currentTime = time("15", "GMT+0")
// hourOfDay = hour(currentTime)
// notrade_hours1 = input.(12 , minval = 0 , maxval = 24 , title = "Hours Friday")
// notrade_hours2 = input.int(12 , minval = 0 , maxval = 24 , title = "Hours Monday")
////////////////////////////////////////////////////////////Holidays/////////////////////
// تعریف روزهای هفته
isSaturday = dayofweek == dayofweek.saturday //and hourOfDay > 12
isSunday = dayofweek == dayofweek.sunday
// isMonday = dayofweek == dayofweek.monday and hourOfDay < notrade_hours1
// isFriday = dayofweek == dayofweek.friday and hourOfDay > notrade_hours2
// رنگآمیزی پسزمینه برای شنبه (آبی کمرنگ) و یکشنبه (نارنجی کمرنگ)
bgcolor(isSaturday ? color.new(color.blue, 90) : isSunday ? color.new(color.orange, 90) : na)
//bgcolor(isMonday ? color.new(color.white, 90) : isFriday ? color.new(color.green, 90) : na)
//////////////////////////////////////////////////////////////////////////////////////////////////////////////////////////////
//تنظیمات پوزیشن
leverage = input.int(defval = 10 , title = "leverage" , minval = 1 , maxval = 20,step = 5 , group="Posistion Settings==========================================")
quantity = input.float(defval = 500 , title = "quantity" , minval = 1, group="Posistion Settings==========================================")
sl_manager = input.float(defval = 0.5 , step = 0.1 , title = "Risk Percent Of Capital", group="Posistion Settings==========================================")
persent_fee = input.float(defval = 0.05 , title = "Persent Fee Eexchange" , minval = 0 , maxval = 1,step = 0.01 , group="Posistion Settings==========================================")
position_type = input.string(defval = "Buy_And_Sell" , title = "Position_type" , options = , group="Posistion Settings==========================================" )
r_r_long = input.float(defval = 2 , step = 0.1 , title = "R - R =>", group="Posistion Settings==========================================")
r_r_short = r_r_long // input.float(defval = 1.8 , step = 0.1 , title = "r_r Short =>")
//////////////////////////////////////////////////////// END ROC /////////////////////////////////////
day_of_week = input.bool(false , title = "Trade in 7 days", group="Posistion Settings==========================================")
show_tp_sl_ent = true // input.bool(defval=true, title= "Show Tp Sl Ent Box", group="Posistion Settings==========================================")
show_qty = true // input.bool(defval = true , title = "Show Qty Label", group="Posistion Settings==========================================")
//////////////////////////////////////////////////////// Information Position ////////////////////////////////////////////////////
var short_is_open = false
var long_is_open = false
//variant for sell position
var sl1 = 0.0
var tp1 = 0.0
var ent1 = 0.0
var equity1 = 0.0
var qty1 = ""
//variant for buy position
var sl3 = 0.0
var qty2 = ""
var tp3 = 0.0
var ent2 = 0.0
var equity2 = 0.0
symbol = str.tostring(syminfo.basecurrency + "-" + syminfo.currency )
////////////////////////////////////////////////////////////////////////////////////////////////////////
var long_condition = false
var short_condition = false
persent_candel = 0.7 // input.float(defval = 0.7 , step = 0.1 , title = "درصد حرکت آخرین کندل", group="CANDEL Settings==========================================")
////////////////////////////////////////////////////////////////////////////////////////////////////////
amplitude = 2 // input.int(title='Amplitude', defval=2)
channelDeviation =2 //input.int(title='Channel Deviation', defval=2)
showChannels =true // input.bool(title='Show Channels', defval=true)
var int trend = 0
var int nextTrend = 0
var float maxLowPrice = nz(low , low)
var float minHighPrice = nz(high , high)
var float up = 0.0
var float down = 0.0
float atrHigh = 0.0
float atrLow = 0.0
float arrowUp = na
float arrowDown = na
len_atr = 130 // input.int(130 , title = "Len Half Trend")
atr2 = ta.atr(len_atr) / 2
dev = channelDeviation * atr2
highPrice = high
lowPrice = low
highma = ta.sma(high, amplitude)
lowma = ta.sma(low, amplitude)
if nextTrend == 1
maxLowPrice := math.max(lowPrice, maxLowPrice)
if highma < maxLowPrice and close < nz(low , low)
trend := 1
nextTrend := 0
minHighPrice := highPrice
minHighPrice
else
minHighPrice := math.min(highPrice, minHighPrice)
if lowma > minHighPrice and close > nz(high , high)
trend := 0
nextTrend := 1
maxLowPrice := lowPrice
maxLowPrice
if trend == 0
if not na(trend ) and trend != 0
up := na(down ) ? down : down
arrowUp := up - atr2
arrowUp
else
up := na(up ) ? maxLowPrice : math.max(maxLowPrice, up )
up
atrHigh := up + dev
atrLow := up - dev
atrLow
else
if not na(trend ) and trend != 1
down := na(up ) ? up : up
arrowDown := down + atr2
arrowDown
else
down := na(down ) ? minHighPrice : math.min(minHighPrice, down )
down
atrHigh := down + dev
atrLow := down - dev
atrLow
//////////////////////////////////////////////////////////////////////////////////////////////////////////
len_rsi = 14 // input.int(14, group = "RSI Setting=================================")
rsi = ta.rsi(close , len_rsi)
//////////////////////////////////////////////////////////////////////////////////
// محاسبات مربوط به تعیین خطوط حمایت و مقاومت و شکست آنها
show_ATR = input.bool(false)
lookback_15 = 4 // input.int(4, title = "====>Look Back 1H=====>", inline = "2", group = "Setting Pivot======================", tooltip = "Drawing support and resistance in time frame 15 min in selected look back")
pl60 = fixnan(ta.pivotlow( low , lookback_15 , lookback_15 ))
ph60 = fixnan(ta.pivothigh( high , lookback_15 , lookback_15 ))
plot(show_ATR ? pl60 : na , color = color.red)
plot(show_ATR ? ph60 : na , color = color.green)
//////////////////////////////////////////////////////////////////////////////////////////////////////////
/////////////////////////////////////////////////////////////
len_ema_fast_long = 2 // input.int(2)
sorce_tma_long = low // input.source(low)
ema_fast_long = ta.ema(sorce_tma_long , len_ema_fast_long)
len_ema_slow_long = 25 // input.int(25)
ema_slow_long = ta.ema(sorce_tma_long , len_ema_slow_long)
//**********************************
len_ema_fast_short = 2 // input.int(2)
sorce_tma_short = high // input.source(close)
ema_fast_short = ta.ema(sorce_tma_short , len_ema_fast_short)
len_ema_slow_short = 25 // input.int(25)
ema_slow_short = ta.ema(sorce_tma_short , len_ema_slow_short)
///////////////////////////////////////////////////////////////////////////////////////////////////////////
bars = 2 // input.int(9,title="Volume Previous bars to check")
//one_side = input.bool(false, title="Positive values only")
float volume_up = 0
float volume_down = 0
for i = 0 to bars
if (close >open )
volume_up:=volume_up+volume
else
volume_down:=volume_down+volume
total_up_down_vol= volume_up-volume_down
vol_bb = 8 // input.int(8)
vol_aa = 2 // input.int(2)
pivot_high_vol = fixnan(ta.pivothigh(total_up_down_vol , vol_bb , vol_aa ))
pivot_low_vol = fixnan(ta.pivotlow(total_up_down_vol , vol_bb , vol_aa ))
///////////////////////////////////////////////////////////////////////////////////////////////////////////
//////////////////////////////////////////////////////////////////////////////////
CLOSE = close
LOW = low
HIGH = high
//////////////////////////////////////////////////////////////////////////////////
//
//reg_trend_on = input(true, 'Activate Reg Trend Line')
length_bull_bear = 4 // input.int(defval= 4, title='🔹 Length Reg Trend line=', minval=1)
//
BullTrend_hist = 0.0
BearTrend_hist = 0.0
BullTrend = (CLOSE - ta.lowest(LOW, length_bull_bear)) / (ta.sma(ta.tr(true), length_bull_bear ))
BearTrend = (ta.highest(HIGH, length_bull_bear) - CLOSE) / (ta.sma(ta.tr(true), length_bull_bear ))
BearTrend2 = -1 * BearTrend
Trend = BullTrend - BearTrend
// plot columun
if BullTrend < 2
BullTrend_hist := BullTrend - 2
BullTrend_hist
if BearTrend2 > -2
BearTrend_hist := BearTrend2 + 2
BearTrend_hist
//alexgrover-Regression Line Formula
x = bar_index
y = Trend
x_ = ta.sma(x, length_bull_bear)
y_ = ta.sma(y, length_bull_bear)
mx = ta.stdev(x, length_bull_bear)
my = ta.stdev(y, length_bull_bear)
c = ta.correlation(x, y, length_bull_bear)
slope = c * (my / mx)
inter = y_ - slope * x_
reg_trend = x * slope + inter
/////////////////////////////////////////////////
long2 = true
short2 = true
close_H = request.security("" , "" , close )
open_H = request.security("" , "" , open )
if close_H > open_H and close_H > open_H
short2 := false
if close_H < open_H and close_H < open_H
long2 := false
nnn = 1.4 // input.float(1.4 , step = 0.1)
long_1 = BullTrend > nnn and ta.sma(reg_trend , 4 ) > ta.sma(reg_trend , 8 )
short_1 = BearTrend2 < -nnn and ta.sma(reg_trend , 4 ) < ta.sma(reg_trend , 8 )
///////////////////////////////////////////////////
lensig_mdi = 8 // input.int(8, title="ADX Smoothing", minval=1)
len_mdi = 2 // input.int(2, minval=1, title="DI Length")
up_mdi = ta.change(high)
down_mdi = -ta.change(low)
plusDM = na(up_mdi) ? na : (up_mdi > down_mdi and up_mdi > 0 ? up_mdi : 0)
minusDM = na(down_mdi) ? na : (down_mdi > up_mdi and down_mdi > 0 ? down_mdi : 0)
trur_mdi = ta.rma(ta.tr, len_mdi)
plus_mdi = fixnan(100 * ta.rma(plusDM, len_mdi) / trur_mdi)
minus_mdi = fixnan(100 * ta.rma(minusDM, len_mdi) / trur_mdi)
sum = plus_mdi + minus_mdi
adx = 100 * ta.rma(math.abs(plus_mdi - minus_mdi) / (sum == 0 ? 1 : sum), lensig_mdi)
/////////////////////////////////////////////////////////////////////////////////////////////////////////////
//////////////////////////////////////////////////////////////////////////////////////////////////////////////////////////
// تنظیمات SuperTrend
atrPeriod = 28 // input(28, title="ATR Period Super Trend")
factor = 3 // input(3.0, title="Multiplier")
= ta.supertrend(factor, atrPeriod)
// تعریف تایمفریمهای بالاتر
htf0 = "30" // input.timeframe("30", title="تایمفریم تأیید اول (1H)")
htf1 = "60" // input.timeframe("60", title=" ایمفریم تأیید دوم (1H)")
htf2 = "240" // input.timeframe("240", title="تایمفریم تأیید سوم (4H)")
// محاسبه SuperTrend در تایمفریمهای بالاتر
supertrend1 = request.security(syminfo.tickerid, htf0, supertrend)
direction1 = request.security(syminfo.tickerid, htf0, direction)
supertrend1H = request.security(syminfo.tickerid, htf1, supertrend )
direction1H = request.security(syminfo.tickerid, htf1, direction)
supertrend4H = request.security(syminfo.tickerid, htf2, supertrend )
direction4H = request.security(syminfo.tickerid, htf2, direction)
// شرایط ورود
Condition_supertrend_long = (direction1H > 0 or direction4H > 0 or direction1 > 0) and volume > fixnan(ta.pivotlow(volume , 16 , 2 ))
Condition_supertrend_short = (direction1H < 0 or direction4H < 0 or direction1 < 0) and volume > fixnan(ta.pivotlow(volume , 16 , 2 ))
//////////////////////////////////////////////////////////////////////////////////////////////////////////
open_4h = request.security("" , "240" , open )
close_4h = request.security("" , "240" , close )
//////////////////////////////////////////////////////////////////////////////////
//////////////////////////////////////////////////////////////////////////////////////////////////////////////
if day_of_week == false
if isTradeEnabled == true and time == time_newyork and not isSaturday and not isSunday //and not isFriday and not isMonday
long_condition := long_is_open == false and short_is_open == false and total_up_down_vol > pivot_low_vol and rsi > 51 and rsi < 80
and math.abs(close - open) < (persent_candel/100) * close and ema_fast_long > ema_slow_long and high > ph60 and open < ph60 and long_1 == true and long2 == true
and plus_mdi > minus_mdi and Condition_supertrend_long == true and high > close_4h and close > atrHigh
short_condition := long_is_open == false and short_is_open == false and total_up_down_vol > pivot_low_vol and rsi < 49 and rsi > 20
and math.abs(close - open) < (persent_candel/100) * close and ema_fast_short < ema_slow_short and low < pl60 and open > pl60 and short_1 == true and short2 == true
and plus_mdi < minus_mdi and Condition_supertrend_short == true and low < close_4h and close < atrLow
if day_of_week == true
if isTradeEnabled == true and time == time_newyork
long_condition := long_is_open == false and short_is_open == false and total_up_down_vol > pivot_low_vol and rsi > 51 and rsi < 80
and math.abs(close - open) < (persent_candel/100) * close and ema_fast_long > ema_slow_long and high > ph60 and open < ph60 and long_1 == true and long2 == true
and plus_mdi > minus_mdi and Condition_supertrend_long == true and high > close_4h and close > atrHigh
short_condition := long_is_open == false and short_is_open == false and total_up_down_vol > pivot_low_vol and rsi < 49 and rsi > 20
and math.abs(close - open) < (persent_candel/100) * close and ema_fast_short < ema_slow_short and low < pl60 and open > pl60 and short_1 == true and short2 == true
and plus_mdi < minus_mdi and Condition_supertrend_short == true and low < close_4h and close < atrLow
////////////////////////////////////////////////////////////////////////////////////////////////////////////////////////////////
//تنظیمات استاپ سل پوزیشن شورت و لانگ بر اساس ATR
length_atr = 2 // input.int(title='Length', defval=2, minval=1, group = "StopLoss Setting=================================")
m = 0.9 // input.float(0.9,step = 0.1,title = 'Multiplier', group = "StopLoss Setting=================================")
show_atr = false // input.bool(false, group = "StopLoss Setting=================================")
src1_atr = high //input(high , title = "Stoploss Short")
src2_atr = low //input(low ,title = "Stoploss Long")
collong_atr = color.rgb(0,255,0,0)
colshort_atr = color.rgb(255,0,0,0)
a1 = (ta.sma(ta.tr(true), length_atr) * m) / 2 + (ta.wma(ta.tr(true), length_atr) * m) / 2
stop_loss_short = src1_atr + a1
stop_loss_long = src2_atr - a1
p1_atr1 = plot(show_atr ? stop_loss_long : na, title='ATR Short Stop Loss', color=colshort_atr, style=plot.style_circles)
p2_atr1 = plot(show_atr ? stop_loss_short : na, title='ATR Long Stop Loss', color=collong_atr, style=plot.style_circles)
/////////////////////////////////////////////////////////////////Start Stop Loss///////////////////////////////////////////////
/////////////////////////////////////////////////////////////////END Stop Loss///////////////////////////////////////////////
var total_long_trade = 0
var loss_long = 0
var profit_long = 0
var sood_pos_long = 0.00
var zarar_pos_long = 0.00
var kol_sood_long = 0.00
var total_short_trade = 0
var loss_short = 0
var profit_short = 0
var sood_pos_short = 0.00
var zarar_pos_short = 0.00
var kol_sood_short = 0.00
/////////////////////////////////////////////////////////////////////////////////////////////////////////////////////////////////
// ━━━━━━━━━━━━━━━━━━ تنظیمات ورودی ━━━━━━━━━━━━━━━━━━
var int candlesToWait = 12 // input.int(1, "تعداد کندلهای انتظار پس از معامله", minval=1)
// ━━━━━━━━━━━━━━━━━━ شناسایی آخرین معامله ━━━━━━━━━━━━━━━━━━
var int lastTradeCloseBar = na
var bool isCoolDownOver = true
// اگر معاملهای بسته شد، شماره کندل آن را ذخیره کن
if strategy.closedtrades > 0 and (na(lastTradeCloseBar) or strategy.closedtrades != strategy.closedtrades )
lastTradeCloseBar := bar_index
isCoolDownOver := false
// بررسی آیا تعداد کندلهای موردنظر گذشته است؟
if not na(lastTradeCloseBar) and (bar_index - lastTradeCloseBar) >= candlesToWait
isCoolDownOver := true
bgcolor(isCoolDownOver ? na : color.new(color.red, 90), title="Cooldown Status")
/////////////////////////////////////////////////////////////////////////////////////////////////////////////////////////////////////
////////////////////////////////////////////////////////////////////////////////////////////////////////////////////////////////
// تنظیمات دستورات لازم برای ارسال به صرافی جهت پوزیشن لانگ
//ADD_quantity = 1.5 // input.float(2 , title = "در صورت واگرایی ماجین رو چند بابر کنم؟")
if position_type == "Buy" or position_type == "Buy_And_Sell"
if long_condition and isCoolDownOver
ent2 := close
sl3 :=stop_loss_long - (stop_loss_long * (0.5 / leverage) / 100 )
tp3 := ent2 + ((ent2 - sl3) * r_r_long)
number_coin = ((quantity * leverage * sl_manager) / ((ent2 - sl3) *100))
equity2 := math.round ((number_coin * close ) , 3)
if equity2 > quantity * leverage
equity2 := quantity * leverage
//////////////////////////////////////////////////////////////////////////////////
if show_qty
label.new(bar_index , low , str.tostring(equity2) + "$" , color = color.rgb(0, 255, 0,0) , size = size.normal , style = label.style_label_up)
strategy.entry(id="buy", direction = strategy.long , qty=(equity2/close) )
if close >= 10 and close < 500
qty2 := str.tostring(math.round(equity2/close , 2))
else
qty2 := str.tostring(math.round(equity2/close , 0))
if close > 500
qty2 := str.tostring(math.round(equity2/close , 3 ))
if symbol == "AAVEUSDT"
qty2 := str.tostring(math.round(equity2/close , 1))
// ================/ برای باز کردن پوزیشن از این مقدار استفاده میکند /======================
message1 = '{"symbol":"'+symbol+'","type":"MARKET", "side":"BUY", "positionSide": "LONG", "quantity":"'+qty2+'","leverage": "'+str.tostring(leverage)+'","marginMode": "Isolated","botmix-action":"open-market-order-v2"}'
// message1 = '{ "side":"Ask","symbol":"'+symbol+'","tradeType":"Market","entrustVolume":"'+qty1+'","action":"Open","marginMode":"Isolated","leverage":"'+str.tostring(leverage)+'", "takerProfitPrice":"'+str.tostring(tp1)+'","stopLossPrice":"'+str.tostring(sl1)+'","botmix-action":"open-market-order" }'
// message1 = '{ "batchOrders": ,"botmix-action":"open-multiple-order" }'
alert(message1 , alert.freq_once_per_bar)
message2 = '{"symbol":"'+symbol+'","type":"LIMIT","side":"SELL", "positionSide": "LONG","delay": 5 ,"quantity":"'+qty2+'","price": "'+str.tostring(tp3)+'", "botmix-action":"open-market-order-v2"}'
alert(message2 , alert.freq_once_per_bar)
message3 = '{"symbol":"'+symbol+'","type":"STOP_MARKET","side":"SELL","positionSide": "LONG","delay": 10 ,"quantity":"'+qty2+'","price": "'+str.tostring(sl3)+'", "stopPrice": "'+str.tostring(sl3)+'","botmix-action":"open-market-order-v2"}'
alert(message3 , alert.freq_once_per_bar)
long_is_open := true
if show_tp_sl_ent
line.new(bar_index, tp3, bar_index + 15, tp3, xloc= xloc.bar_index, color= color.rgb(0, 255, 0,0 ), width = 1)
box.new(bar_index , tp3 , bar_index + 15 , ent2 ,bgcolor = color.rgb(0, 255, 0 , 90) , border_color = color.rgb(0, 255, 0 , 80) )
line.new(bar_index, (tp3 - ((tp3 - ent2) /2)), bar_index + 15, (tp3 - ((tp3 - ent2) /2)), xloc= xloc.bar_index, color= color.rgb(0, 17, 255), width = 2 , style = line.style_dashed)
line.new(bar_index, sl3, bar_index + 15, sl3, xloc= xloc.bar_index, color= color.rgb(255, 0, 0,0), width = 1)
box.new(bar_index , sl3 , bar_index + 15 , ent2 ,bgcolor = color.rgb(255, 0, 0, 90) , border_color = color.rgb(255, 0, 0 , 80) )
line.new(bar_index , ent2 , bar_index + 15 , ent2 , color = color.rgb(255, 255, 0, 0))
/////////////////////////////////////////////////////////
total_long_trade := total_long_trade + 1
if low <= sl3 and long_is_open == true
loss_long := loss_long + 1
zarar_pos_long := zarar_pos_long + (((ent2 - sl3) / ent2) * equity2)
if high >= tp3 and long_is_open == true
profit_long := profit_long + 1
sood_pos_long := sood_pos_long +(((tp3 - ent2) / ent2) * equity2)
kol_sood_long := sood_pos_long - zarar_pos_long
/////////////////////////////////////////////////////////////
if (low <= sl3 or high >= tp3) and long_is_open == true
long_is_open := false
strategy.exit( id = "buy" , from_entry = "buy" , limit = tp3 , stop = sl3 , qty_percent = 100 , comment_profit = "tp" , comment_loss = "sl" )
color_kol_pos_long = kol_sood_long >0 ? color.rgb(0,255,0) : color.rgb(255,0,0)
// //////////////////////LONG___ENNNDD//////////////////////////////////////////////////////////
// تظیمات دستورات لازم برای ارسال به صرافی جهت پوزیشن شورت
if position_type == "Sell" or position_type == "Buy_And_Sell"
if short_condition and isCoolDownOver
ent1 := close
sl1 :=stop_loss_short + (stop_loss_short * (0.5 / leverage) / 100 )
tp1 := ent1 - ((sl1 - ent1 ) * r_r_short)
number_coin = ((quantity * leverage * sl_manager) / ((sl1 - ent1) *100))
equity1 := math.round ((number_coin * close ) , 3)
if equity1 > quantity * leverage
equity1 := quantity * leverage
/////////////////////////////////////////////////////////////////////////////////////////
if show_qty
label.new(bar_index , high , str.tostring(equity1) + "$" , color = color.rgb(255, 0, 0,0) , size = size.normal , style = label.style_label_down)
strategy.entry(id="sell", direction = strategy.short, qty=(equity1/close) )
if close >= 10 and close < 500
qty1 := str.tostring(math.round(equity1/close , 2))
else
qty1 := str.tostring(math.round(equity1/close , 0))
if close > 500
qty1 := str.tostring(math.round(equity1/close , 3))
if symbol == "AAVEUSDT"
qty1 := str.tostring(math.round(equity1/close , 1))
// ================/ برای باز کردن پوزیشن از این مقدار استفاده میکند /======================
message1 = '{"symbol":"'+symbol+'","type":"MARKET", "side":"SELL", "positionSide": "SHORT", "quantity":"'+qty1+'","leverage": "'+str.tostring(leverage)+'","marginMode": "Isolated","botmix-action":"open-market-order-v2"}'
// message1 = '{ "side":"Ask","symbol":"'+symbol+'","tradeType":"Market","entrustVolume":"'+qty1+'","action":"Open","marginMode":"Isolated","leverage":"'+str.tostring(leverage)+'", "takerProfitPrice":"'+str.tostring(tp1)+'","stopLossPrice":"'+str.tostring(sl1)+'","botmix-action":"open-market-order" }'
// message1 = '{ "batchOrders": ,"botmix-action":"open-multiple-order" }'
alert(message1 , alert.freq_once_per_bar)
message2 = '{"symbol":"'+symbol+'","type":"LIMIT","side":"BUY", "positionSide": "SHORT","delay": 5 ,"quantity":"'+qty1+'","price": "'+str.tostring(tp1)+'", "botmix-action":"open-market-order-v2"}'
alert(message2 , alert.freq_once_per_bar)
message3 = '{"symbol":"'+symbol+'","type":"STOP_MARKET","side":"BUY","positionSide": "SHORT","delay": 10 ,"quantity":"'+qty1+'","price": "'+str.tostring(sl1)+'", "stopPrice": "'+str.tostring(sl1)+'","botmix-action":"open-market-order-v2"}'
alert(message3 , alert.freq_once_per_bar)
short_is_open := true
if show_tp_sl_ent
line.new(bar_index, tp1, bar_index + 15, tp1, xloc= xloc.bar_index, color= color.rgb(0, 255, 0,0 ), width = 1)
box.new(bar_index , tp1 , bar_index + 15 , ent1 ,bgcolor = color.rgb(0, 255, 0 , 90) , border_color = color.rgb(0, 255, 0 , 80) )
line.new(bar_index, (tp1+((ent1 - tp1)/2)), bar_index + 15, (tp1+((ent1 - tp1)/2)), xloc= xloc.bar_index, color= color.rgb(4, 0, 255), width = 2 , style= line.style_dashed)
line.new(bar_index, sl1, bar_index + 15, sl1, xloc= xloc.bar_index, color= color.rgb(255, 0, 0,50), width = 1)
box.new(bar_index , sl1 , bar_index + 15 , ent1 ,bgcolor = color.rgb(255, 0, 0, 90) , border_color = color.rgb(255, 0, 0 , 80) )
line.new(bar_index , ent1 , bar_index + 15 , ent1 , color = color.rgb(255, 255, 0,0))
////////////////////////////////////////////////////////////////////////////////////
total_short_trade := total_short_trade + 1
if high >= sl1 and short_is_open == true
loss_short := loss_long + 1
zarar_pos_short := zarar_pos_short + (((sl1 - ent1) / ent1) * equity1)
if low <= tp1 and short_is_open == true
profit_short := profit_short + 1
sood_pos_short := sood_pos_short +(((ent1 - tp1) / ent1) * equity1)
kol_sood_short := sood_pos_short - zarar_pos_short
///////////////////////////////////////////////////////////////////////////////////
if (high >= sl1 or low <= tp1 ) and short_is_open == true
short_is_open := false
strategy.exit( id = "sellext1" , from_entry = "sell" , limit = tp1 , stop = sl1 , qty_percent = 100 , comment_profit = "tp" , comment_loss = "sl" )
color_kol_pos_short = kol_sood_short > 0 ? color.rgb(0,255,0) : color.rgb(255,0,0)
////////////////////////////////////////////////////////////////////////////////////////////
kol_trade = loss_short + loss_long + profit_long + profit_short
/////////////////////SHORT___ENNNDD//////////////////////////////////////////////////////
closed_trades = (loss_short + loss_long + profit_long + profit_short) // strategy.closedtrades
kolfee = (closed_trades * quantity * leverage * persent_fee) / 100
net_profit = math.round((kol_sood_short + kol_sood_long) , 2 ) - kolfee
net_percent = math.round((net_profit / quantity) * 100 , 2)
win_rate = math.round(((profit_long + profit_short) / kol_trade) * 100 , 2) //math.round((strategy.wintrades / strategy.closedtrades) * 100 , 2)
ending = math.round((quantity + net_profit) , 2)
profit_factor = math.round((sood_pos_long + sood_pos_short) / math.abs(zarar_pos_long + zarar_pos_short) , 2)
drow_down = math.round((strategy.max_drawdown / quantity) * 100, 2 )
show_reportTabel = input.bool(true)
if show_reportTabel
table_color = color.rgb(0, 0, 0)
var table result_table = table.new(position.top_right, 30, 40, bgcolor=color.rgb(255,255,255,0), frame_color=color.rgb(0, 0, 0,0), frame_width=1, border_width=2)
table.cell(result_table , column = 0 , row = 0 , text = "TEST BTC with breake out: " + str.tostring(kol_trade) , bgcolor = table_color , text_color = color.rgb(255,255,255,0))
table.cell(result_table , column = 1 , row = 0 , text = "starting: " + str.tostring(quantity) + "$" , bgcolor = table_color, text_color = color.rgb(255,255,255,0))
table.cell(result_table , column = 2 , row = 0 , text = "Net Profit: " + str.tostring(net_profit) + "$: " + " fee = " + str.tostring(kolfee) , bgcolor = table_color, text_color = net_profit > 0 ? color.rgb(0,255,0,0) : color.rgb(255,0,0,0))
table.cell(result_table , column = 0 , row = 1 , text = "Win Rate: " + str.tostring(win_rate) + "%" , bgcolor = table_color, text_color = color.rgb(255,255,255,0))
table.cell(result_table , column = 1 , row = 1 , text = "Ending: " + str.tostring(ending) + "$" , bgcolor = table_color, text_color = color.rgb(255,255,255,0))
table.cell(result_table , column = 2 , row = 1 , text = "Profit Factor: " + str.tostring(profit_factor) , bgcolor = table_color, text_color = color.rgb(255,255,255,0))
table.cell(result_table , column = 3 , row = 0 , text = "Net Percent: " + str.tostring(net_percent) + "%" , bgcolor = table_color, text_color = net_percent > 0 ? color.rgb(0,255,0,0) : color.rgb(255,0,0,0))
table.cell(result_table , column = 3 , row = 1 , text = "Draw Down: " + str.tostring(drow_down) + "%" , bgcolor = table_color, text_color = color.rgb(255,255,255,0))
table.cell(result_table , column = 4 , row = 0 , text = "Stop: " + "Short =" + str.tostring(loss_short)+ " " +"Long =" + str.tostring(loss_long) , bgcolor = table_color, text_color = color.rgb(255,0,0,0))
table.cell(result_table , column = 4 , row = 1 , text = "TP: " + "Short =" + str.tostring(profit_short)+ " " +"Long =" + str.tostring(profit_long) , bgcolor = table_color, text_color = color.rgb(0,255,0,0))
table.cell(result_table , column = 5 , row = 0 , text = "Short: " + "sood =" + str.tostring(math.round(sood_pos_short,2)) + " " + "Zarar =" + str.tostring(math.round(zarar_pos_short,2)) , bgcolor = table_color, text_color = color.rgb(0,255,0,0))
table.cell(result_table , column = 5 , row = 1 , text = "Long: " + "sood =" + str.tostring(math.round(sood_pos_long,2)) + " " + "Zarar =" + str.tostring(math.round(zarar_pos_long,2)) , bgcolor = table_color, text_color = color.rgb(0,255,0,0))
table.cell(result_table , column = 6 , row = 0 , text = "Kol Sood Short: " + "Short =" + str.tostring(math.round(kol_sood_short,2)) , bgcolor = table_color, text_color = color_kol_pos_short)
table.cell(result_table , column = 6 , row = 1 , text = "Kol Sood Long: " + "LONG =" + str.tostring(math.round(kol_sood_long,2)) , bgcolor = table_color, text_color = color_kol_pos_long)
///////////////////////////////////////////////////////////////////////////////////////////////////////////////////////////////////////
// //////////////////////////////////////////////////////////////////////////////////////////////////////
// // ********** تنظیمات **********
// show_monthly_Report = input.bool(false, "نمایش گزارش ماهیانه")
// exchange_fee_percent = 0.05 / 100 // input.float(0.05, "کارمزد صرافی (%)", step=0.01) / 100
// indicator_name = 'BTC with breake out' // input.string("تحلیلگر حرفه ای - گزارش ماهیانه", "عنوان اندیکاتور")
// show_total_row = true // input.bool(true, "نمایش سطر جمع کل")
// // ********** ایجاد جدول **********
// var table monthlyReport = table.new(position = position.top_right, columns = 6,rows = 21,bgcolor = color.rgb(33, 33, 33),
// border_width = 2,border_color = color.rgb(80, 80, 80),frame_width = 1,frame_color = color.rgb(50, 50, 50))
// // ********** متغیرهای ماهیانه **********
// var int currentMonth = na
// var int monthTrades = 0
// var int monthWinningTrades = 0
// var float totalFees = 0.0
// var float monthNetProfit = 0.0
// // ********** متغیرهای جمع کل **********
// var float totalAllTrades = 0.0
// var float totalAllFees = 0.0
// var float totalAllNetProfit = 0.0
// var int totalAllWinningTrades = 0
// var int totalAllMonths = 0
// // ********** تشخیص تغییر ماه **********
// isNewMonth = ta.change(month) or ta.change(year)
// // ********** محاسبات معاملات **********
// tradeClosed = strategy.closedtrades > strategy.closedtrades
// if tradeClosed
// lastTradeIndex = strategy.closedtrades - 1
// tradeSize = math.abs(strategy.closedtrades.size(lastTradeIndex) * strategy.closedtrades.exit_price(lastTradeIndex))
// tradeFee = tradeSize * exchange_fee_percent
// totalFees := totalFees + tradeFee
// tradeProfit = strategy.closedtrades.profit(lastTradeIndex)
// monthNetProfit := monthNetProfit + tradeProfit
// monthTrades := monthTrades + 1
// if tradeProfit > 0
// monthWinningTrades := monthWinningTrades + 1
// // ********** مدیریت گزارش ماهیانه **********
// if isNewMonth and show_monthly_Report and not na(currentMonth)
// // محاسبات ماهانه
// grossProfit = monthNetProfit
// netProfit = grossProfit - totalFees
// winRate = monthTrades > 0 ? (monthWinningTrades/monthTrades)*100 : 0
// // به روزرسانی جمع کل
// totalAllTrades := totalAllTrades + monthTrades
// totalAllFees := totalAllFees + totalFees
// totalAllNetProfit := totalAllNetProfit + netProfit
// totalAllWinningTrades := totalAllWinningTrades + monthWinningTrades
// totalAllMonths := totalAllMonths + 1
// // نمایش در جدول
// row = (month % 12 == 0 ? 12 : month % 12) + 2 // +2 برای جا دادن سطرهای عنوان
// monthName = str.tostring(year ) + "-" + str.tostring(month , "00")
// table.cell(monthlyReport, 0, row, monthName, text_color=color.white)
// table.cell(monthlyReport, 1, row, str.tostring(monthTrades), text_color=color.white)
// table.cell(monthlyReport, 2, row, str.tostring(grossProfit, "0.00") + " $")
// table.cell(monthlyReport, 3, row, str.tostring(totalFees, "0.00") + " $")
// table.cell(monthlyReport, 4, row, str.tostring(netProfit, "0.00") + " $")
// table.cell(monthlyReport, 5, row, str.tostring(winRate, "1.0") + "%")
// // رنگ آمیزی سود/زیان
// textColor = netProfit >= 0 ? color.rgb(0, 200, 0) : color.rgb(200, 0, 0)
// for i = 2 to 5
// table.cell_set_text_color(monthlyReport, i, row, textColor)
// // ********** سطر جمع کل **********
// if show_monthly_Report and show_total_row and totalAllMonths > 0
// totalWinRate = totalAllTrades > 0 ? (totalAllWinningTrades/totalAllTrades)*100 : 0
// table.cell(monthlyReport, 0, 15, "جمع کل (" + str.tostring(totalAllMonths) + " ماه)",
// text_color=color.yellow,
// bgcolor=color.rgb(50, 50, 50),
// width=6)
// table.cell(monthlyReport, 1, 15, str.tostring(totalAllTrades),
// text_color=color.yellow,
// bgcolor=color.rgb(50, 50, 50))
// table.cell(monthlyReport, 2, 15, str.tostring(totalAllNetProfit + totalAllFees, "0.00") + " $",
// text_color=color.yellow,
// bgcolor=color.rgb(50, 50, 50))
// table.cell(monthlyReport, 3, 15, str.tostring(totalAllFees, "0.00") + " $",
// text_color=color.yellow,
// bgcolor=color.rgb(50, 50, 50))
// table.cell(monthlyReport, 4, 15, str.tostring(totalAllNetProfit, "0.00") + " $",
// text_color = totalAllNetProfit >= 0 ? color.green : color.red,
// bgcolor=color.rgb(50, 50, 50))
// table.cell(monthlyReport, 5, 15, str.tostring(totalWinRate, "1.0") + "%",
// text_color=color.yellow,
// bgcolor=color.rgb(50, 50, 50))
// // ********** ریست ماهیانه **********
// if isNewMonth
// currentMonth := month
// monthTrades := 0
// monthWinningTrades := 0
// totalFees := 0.0
// monthNetProfit := 0.0
// // ********** عنوانهای جدول **********
// if barstate.isfirst and show_monthly_Report
// // عنوان اصلی (یکپارچه در سطر اول)
// table.cell(
// monthlyReport,
// column = 4, // ستون شروع (0 = اولین ستون)
// row = 0, // ردیف 0 (اولین ردیف)
// text = indicator_name,
// bgcolor = color.rgb(0, 0, 0),
// text_size = size.small,
// text_color = color.rgb(255,255,0),
// width = 12, // گسترش روی تمام 6 ستون
// height = 4 // ارتفاع بیشتر برای وضوح بهتر
// )
// // عنوان ستونها (در ردیف دوم)
// headers = array.from("ماه", "تعداد", "سود ناخالص", "کارمزد", "سود خالص", "نرخ برد")
// for i = 0 to 5
// table.cell(
// monthlyReport,
// column = i,
// row = 1, // ردیف بعد از عنوان اصلی
// text = array.get(headers, i),
// text_color = color.white,
// bgcolor = color.rgb(60, 60, 60),
// width = 1 // عرض معمولی برای هر ستون
// )

JOEL-ATR Trend Color StrategyThis ATR tend based strategy with indicator gives exact buy and sell signal based on the trend. early detection of trend is very important to book good profits. This strategy proved that best for all indices, stocks, crypto etc,, 5 mints - day time from works really well .. add it enjoy the trade

Bitcoin Momentum Strategy RSI(5) > 70This script implements a momentum-based Bitcoin strategy using a single indicator: RSI (Relative Strength Index). The logic is simple yet powerful: it enters a long trade when RSI crosses above a certain threshold, signaling strength, and exits when momentum weakens.
🔍 How It Works
Buy Entry: RSI crosses above the Overbought Level (default: 70) and no position is open.
Exit: RSI drops back below the Overbought Level.
This strategy is designed to ride short-term bullish momentum on the 1D timeframe for BTCUSD.
All logic is handled using Pine Script v5 with fully adjustable input parameters.
🛠 Customizable Inputs
RSI Period: default 5
Overbought Level: default 70 (entry/exit trigger)
Oversold Level: default 30 (used for visual cues)
📊 Visual Enhancements
RSI line is green above Overbought (bullish), red below Oversold (bearish), and yellow in between.
Overbought/Oversold zones are marked with dotted lines and subtle background fill for easy chart reading.
⚠️ This strategy only takes long trades. It does not use any stop-loss or profit target logic and should be combined with sound risk management.

Quantum Reversal# 🧠 Quantum Reversal
## **Quantitative Mean Reversion Framework**
This algorithmic trading system employs **statistical mean reversion theory** combined with **adaptive volatility modeling** to capitalize on Bitcoin's inherent price oscillations around its statistical mean. The strategy integrates multiple technical indicators through a **multi-layered signal processing architecture**.
---
## ⚡ **Core Technical Architecture**
### 📊 **Statistical Foundation**
- **Bollinger Band Mean Reversion Model**: Utilizes 20-period moving average with 2.2 standard deviation bands for volatility-adjusted entry signals
- **Adaptive Volatility Threshold**: Dynamic standard deviation multiplier accounts for Bitcoin's heteroscedastic volatility patterns
- **Price Action Confluence**: Entry triggered when price breaches lower volatility band, indicating statistical oversold conditions
### 🔬 **Momentum Analysis Layer**
- **RSI Oscillator Integration**: 14-period Relative Strength Index with modified oversold threshold at 45
- **Signal Smoothing Algorithm**: 5-period simple moving average applied to RSI reduces noise and false signals
- **Momentum Divergence Detection**: Captures mean reversion opportunities when momentum indicators show oversold readings
### ⚙️ **Entry Logic Architecture**
```
Entry Condition = (Price ≤ Lower_BB) OR (Smoothed_RSI < 45)
```
- **Dual-Condition Framework**: Either statistical price deviation OR momentum oversold condition triggers entry
- **Boolean Logic Gate**: OR-based entry system increases signal frequency while maintaining statistical validity
- **Position Sizing**: Fixed 10% equity allocation per trade for consistent risk exposure
### 🎯 **Exit Strategy Optimization**
- **Profit-Lock Mechanism**: Positions only closed when showing positive unrealized P&L
- **Trend Continuation Logic**: Allows winning trades to run until momentum exhaustion
- **Dynamic Exit Timing**: No fixed profit targets - exits based on profitability state rather than arbitrary levels
---
## 📈 **Statistical Properties**
### **Risk Management Framework**
- **Long-Only Exposure**: Eliminates short-squeeze risk inherent in cryptocurrency markets
- **Mean Reversion Bias**: Exploits Bitcoin's tendency to revert to statistical mean after extreme moves
- **Position Management**: Single position limit prevents over-leveraging
### **Signal Processing Characteristics**
- **Noise Reduction**: SMA smoothing on RSI eliminates high-frequency oscillations
- **Volatility Adaptation**: Bollinger Bands automatically adjust to changing market volatility
- **Multi-Timeframe Coherence**: Indicators operate on consistent timeframe for signal alignment
---
## 🔧 **Parameter Configuration**
| Technical Parameter | Value | Statistical Significance |
|-------------------|-------|-------------------------|
| Bollinger Period | 20 | Standard statistical lookback for volatility calculation |
| Std Dev Multiplier | 2.2 | Optimized for Bitcoin's volatility distribution (95.4% confidence interval) |
| RSI Period | 14 | Traditional momentum oscillator period |
| RSI Threshold | 45 | Modified oversold level accounting for Bitcoin's momentum characteristics |
| Smoothing Period | 5 | Noise reduction filter for momentum signals |
---
## 📊 **Algorithmic Advantages**
✅ **Statistical Edge**: Exploits documented mean reversion tendency in Bitcoin markets
✅ **Volatility Adaptation**: Dynamic bands adjust to changing market conditions
✅ **Signal Confluence**: Multiple indicator confirmation reduces false positives
✅ **Momentum Integration**: RSI smoothing improves signal quality and timing
✅ **Risk-Controlled Exposure**: Systematic position sizing and long-only bias
---
## 🔬 **Mathematical Foundation**
The strategy leverages **Bollinger Band theory** (developed by John Bollinger) which assumes that prices tend to revert to the mean after extreme deviations. The RSI component adds **momentum confirmation** to the statistical price deviation signal.
**Statistical Basis:**
- Mean reversion follows the principle that extreme price deviations from the moving average are temporary
- The 2.2 standard deviation multiplier captures approximately 97.2% of price movements under normal distribution
- RSI momentum smoothing reduces noise inherent in oscillator calculations
---
## ⚠️ **Risk Considerations**
This algorithm is designed for traders with understanding of **quantitative finance principles** and **cryptocurrency market dynamics**. The strategy assumes mean-reverting behavior which may not persist during trending market phases. Proper risk management and position sizing are essential.
---
## 🎯 **Implementation Notes**
- **Market Regime Awareness**: Most effective in ranging/consolidating markets
- **Volatility Sensitivity**: Performance may vary during extreme volatility events
- **Backtesting Recommended**: Historical performance analysis advised before live implementation
- **Capital Allocation**: 10% per trade sizing assumes diversified portfolio approach
---
**Engineered for quantitative traders seeking systematic mean reversion exposure in Bitcoin markets through statistically-grounded technical analysis.**

Double Bottom Strategy (Long Only, ATR Trailing Stop + Alerts)Updated chart script:
This script implements a long-only breakout strategy based on the recognition of a Double Bottom price pattern, enhanced with a 50 EMA trend filter and a dynamic ATR-based trailing stop. It is suitable for traders looking to capture reversals in trending markets using a structured pattern-based entry system.
🧠 Key Features:
Double Bottom Detection: Identifies double bottom structures using pivot lows with configurable tolerance.
ATR-Based Trailing Stop: Manages exits using a trailing stop calculated from Average True Range (ATR), dynamically adjusting to market volatility.
EMA Filter (Optional): Filters trades to only go long when price is above the 50 EMA (trend confirmation).
Alerts: Real-time alerts on entry and exit, formatted in JSON for webhook compatibility.
Backtest Range Controls: Customize historical testing period with start and end dates.
✅ Recommended Markets:
Gold (XAUUSD)
S&P 500 (SPX, ES)
Nasdaq (NDX, NQ)
Stocks (Equities)
⚠️ Not recommended for Forex due to differing behavior and noise levels in currency markets.
🛠️ User Guidance:
Tune the pivot period, tolerance, and ATR settings for best performance on your chosen asset.
Backtest thoroughly over your selected date range to assess historical effectiveness.
Use small position sizes initially to test viability in live or simulated environments.

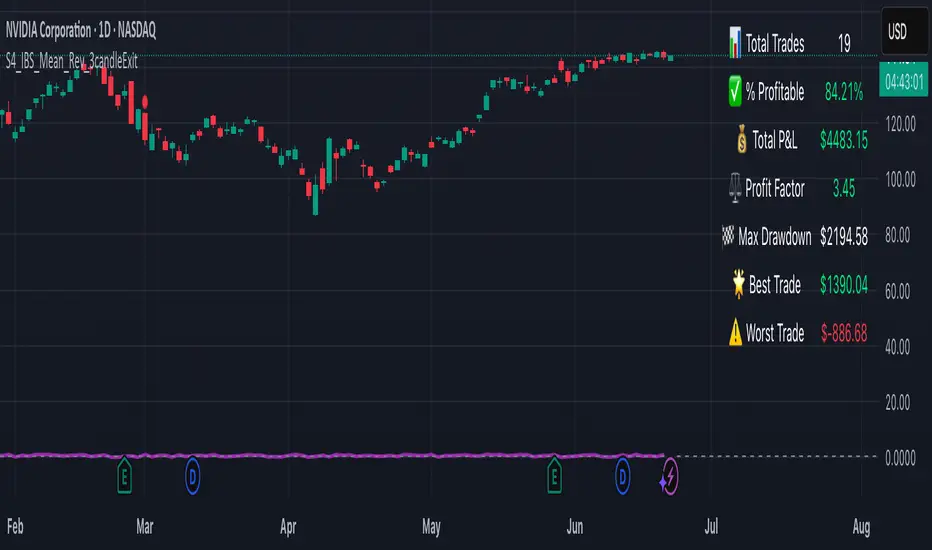
S4_IBS_Mean_Rev_3candleExitOverview:
This is a rules-based, mean reversion strategy designed to trade pullbacks using the Internal Bar Strength (IBS) indicator. The system looks for oversold conditions based on IBS, then enters long trades , holding for a maximum of 3 bars or until the trade becomes profitable.
The strategy includes:
✅ Strict entry rules based on IBS
✅ Hardcoded exit conditions for risk management
✅ A clean visual table summarizing key performance metrics
How It Works:
1. Internal Bar Strength (IBS) Setup:
The IBS is calculated using the previous bar’s price range:
IBS = (Previous Close - Previous Low) / (Previous High - Previous Low)
IBS values closer to 0 indicate price is near the bottom of the previous range, suggesting oversold conditions.
2. Entry Conditions:
IBS must be ≤ 0.25, signaling an oversold setup.
Trade entries are only allowed within a user-defined backtest window (default: 2024).
Only one trade at a time is permitted (long-only strategy).
3. Exit Conditions:
If the price closes higher than the entry price, the trade exits with a profit.
If the trade has been open for 3 bars without showing profit, the trade is forcefully exited.
All trades are closed automatically at the end of the backtest window if still open.
Additional Features:
📊 A real-time performance metrics table is displayed on the chart, showing:
- Total trades
- % of profitable trades
- Total P&L
- Profit Factor
- Max Drawdown
- Best/Worst trade performance
📈 Visual markers indicate trade entries (green triangle) and exits (red triangle) for easy chart interpretation.
Who Is This For?
This strategy is designed for:
✅ Traders exploring systematic mean reversion approaches
✅ Those who prefer strict, rules-based setups with no subjective decision-making
✅ Traders who want built-in performance tracking directly on the chart
Note: This strategy is provided for educational and research purposes. It is a backtested model and past performance does not guarantee future results. Users should paper trade and validate performance before considering real capital.
Strategi Ichimoku UniversalWe use Ichimoku as the only trend and signal filter, with a bit of "price action" logic from the candles.
📌 BUY rule:
1.Close above the cloud (Kumo) → uptrend
2.Bullish candle (close > open)
3.Tenkan > Kijun → strong upward momentum
📌 SELL rule:
1.Close below Kumo → downtrend
2.Bearish candle (close < open)
3.Tenkan < Kijun

OBV ATR Strategy (OBV Breakout Channel) bas20230503ผมแก้ไขจาก OBV+SMA อันเดิม ของเดิม ดูที่เส้น SMA สองเส้นตัดกันมั่นห่วยแตกสำหรับที่ผมลองเทรดจริง และหลักการเบรค ได้แรงบันดาลใจ ATR จาก เทพคอย ที่ใช้กับราคา แต่นี้ใช้กับ OBV แทน
และผมใช้เจมินี้ เพื่อแก้ ให้ เป็น strategy เพื่อเช็คย้อนหลังได้ง่ายกว่าเดิม
หลักการง่ายคือถ้ามันขึ้น มันจะขึ้นเรื่อยๆ
เขียน แบบสุภาพ (น่าจะอ่านได้ง่ายกว่าผมเขียน)
สคริปต์นี้ได้รับการพัฒนาต่อยอดจากแนวคิด OBV+SMA Crossover แบบดั้งเดิม ซึ่งจากการทดสอบส่วนตัวพบว่าประสิทธิภาพยังไม่น่าพอใจ กลยุทธ์ใหม่นี้จึงเปลี่ยนมาใช้หลักการ "Breakout" ซึ่งได้รับแรงบันดาลใจมาจากการใช้ ATR สร้างกรอบของราคา แต่เราได้นำมาประยุกต์ใช้กับ On-Balance Volume (OBV) แทน นอกจากนี้ สคริปต์ได้ถูกแปลงเป็น Strategy เต็มรูปแบบ (โดยความช่วยเหลือจาก Gemini AI) เพื่อให้สามารถทดสอบย้อนหลัง (Backtest) และประเมินประสิทธิภาพได้อย่างแม่นยำ
หลักการของกลยุทธ์: กลยุทธ์นี้ทำงานบนแนวคิดโมเมนตัมที่ว่า "เมื่อแนวโน้มได้เกิดขึ้นแล้ว มีโอกาสที่มันจะดำเนินต่อไป" โดยจะมองหาการทะลุของพลังซื้อ-ขาย (OBV) ที่แข็งแกร่งเป็นพิเศษเป็นสัญญาณเข้าเทร
----
สคริปต์นี้เป็นกลยุทธ์ (Strategy) ที่ใช้ On-Balance Volume (OBV) ซึ่งเป็นอินดิเคเตอร์ที่วัดแรงซื้อและแรงขายสะสม แทนที่จะใช้การตัดกันของเส้นค่าเฉลี่ย (SMA Crossover) ที่เป็นแบบพื้นฐาน กลยุทธ์นี้จะมองหาการ "ทะลุ" (Breakout) ของพลัง OBV ออกจากกรอบสูงสุด-ต่ำสุดของตัวเองในรอบที่ผ่านมา
สัญญาณกระทิง (Bull Signal): เกิดขึ้นเมื่อพลังการซื้อ (OBV) แข็งแกร่งจนสามารถทะลุจุดสูงสุดของตัวเองในอดีตได้ บ่งบอกถึงโอกาสที่แนวโน้มจะเปลี่ยนเป็นขาขึ้น
สัญญาณหมี (Bear Signal): เกิดขึ้นเมื่อพลังการขาย (OBV) รุนแรงจนสามารถกดดันให้ OBV ทะลุจุดต่ำสุดของตัวเองในอดีตได้ บ่งบอกถึงโอกาสที่แนวโน้มจะเปลี่ยนเป็นขาลง
ส่วนประกอบบนกราฟ (Indicator Components)
เส้น OBV
เส้นหลัก ที่เปลี่ยนเขียวเป็นแดง เป็นทั้งแนวรับและแนวต้าน และ จุด stop loss
เส้นนี้คือหัวใจของอินดิเคเตอร์ ที่แสดงถึงพลังสะสมของ Volume
เมื่อเส้นเป็นสีเขียว (แนวรับ): จะปรากฏขึ้นเมื่อกลยุทธ์เข้าสู่ "โหมดกระทิง" เส้นนี้คือระดับต่ำสุดของ OBV ในอดีต และทำหน้าที่เป็นแนวรับไดนามิก
เมื่อเส้นกลายเป็นสีแดงสีแดง (แนวต้าน): จะปรากฏขึ้นเมื่อกลยุทธ์เข้าสู่ "โหมดหมี" เส้นนี้คือระดับสูงสุดของ OBV ในอดีต และทำหน้าที่เป็นแนวต้านไดนามิก
สัญลักษณ์สัญญาณ (Signal Markers):
Bull 🔼 (สามเหลี่ยมขึ้นสีเขียว): คือสัญญาณ "เข้าซื้อ" (Long) จะปรากฏขึ้น ณ จุดที่ OBV ทะลุขึ้นไปเหนือกรอบด้านบนเป็นครั้งแรก
Bear 🔽 (สามเหลี่ยมลงสีแดง): คือสัญญาณ "เข้าขาย" (Short) จะปรากฏขึ้น ณ จุดที่ OBV ทะลุลงไปต่ำกว่ากรอบด้านล่างเป็นครั้งแรก
วิธีการใช้งาน (How to Use)
เพิ่มสคริปต์นี้ลงบนกราฟราคาที่คุณสนใจ
ไปที่แท็บ "Strategy Tester" ด้านล่างของ TradingView เพื่อดูผลการทดสอบย้อนหลัง (Backtest) ของกลยุทธ์บนสินทรัพย์และไทม์เฟรมต่างๆ
ใช้สัญลักษณ์ "Bull" และ "Bear" เป็นตัวช่วยในการตัดสินใจเข้าเทรด
ข้อควรจำ: ไม่มีกลยุทธ์ใดที่สมบูรณ์แบบ 100% ควรใช้สคริปต์นี้ร่วมกับการวิเคราะห์ปัจจัยอื่นๆ เช่น โครงสร้างราคา, แนวรับ-แนวต้านของราคา และการบริหารความเสี่ยง (Risk Management) ของตัวคุณเองเสมอ
การตั้งค่า (Inputs)
SMA Length 1 / SMA Length 2: ใช้สำหรับพล็อตเส้นค่าเฉลี่ยของ OBV เพื่อดูเป็นภาพอ้างอิง ไม่มีผลต่อตรรกะการเข้า-ออกของ Strategy อันใหม่ แต่มันเป็นของเก่า ถ้าชอบ ก็ใช้ได้ เมื่อ SMA สองเส้นตัดกัน หรือตัดกับเส้น OBV
High/Low Lookback Length: (ค่าพื้นฐาน30/แก้ตรงนี้ให้เหมาะสมกับ coin หรือหุ้น ตามความผันผวน ) คือระยะเวลาที่ใช้ในการคำนวณกรอบสูงสุด-ต่ำสุดของ OBV
ค่าน้อย: ทำให้กรอบแคบลง สัญญาณจะเกิดไวและบ่อยขึ้น แต่อาจมีสัญญาณหลอก (False Signal) เยอะขึ้น
ค่ามาก: ทำให้กรอบกว้างขึ้น สัญญาณจะเกิดช้าลงและน้อยลง แต่มีแนวโน้มที่จะเป็นสัญญาณที่แข็งแกร่งกว่า
แน่นอนครับ นี่คือคำแปลฉบับภาษาอังกฤษที่สรุปใจความสำคัญ กระชับ และสุภาพ เหมาะสำหรับนำไปใช้ในคำอธิบายสคริปต์ (Description) ของ TradingView ครับ
---Translate to English---
OBV Breakout Channel Strategy
This script is an evolution of a traditional OBV+SMA Crossover concept. Through personal testing, the original crossover method was found to have unsatisfactory performance. This new strategy, therefore, uses a "Breakout" principle. The inspiration comes from using ATR to create price channels, but this concept has been adapted and applied to On-Balance Volume (OBV) instead.
Furthermore, the script has been converted into a full Strategy (with assistance from Gemini AI) to enable precise backtesting and performance evaluation.
The strategy's core principle is momentum-based: "once a trend is established, it is likely to continue." It seeks to enter trades on exceptionally strong breakouts of buying or selling pressure as measured by OBV.
Core Concept
This is a Strategy that uses On-Balance Volume (OBV), an indicator that measures cumulative buying and selling pressure. Instead of relying on a basic Simple Moving Average (SMA) Crossover, this strategy identifies a "Breakout" of the OBV from its own highest-high and lowest-low channel over a recent period.
Bull Signal: Occurs when the buying pressure (OBV) is strong enough to break above its own recent highest high, indicating a potential shift to an upward trend.
Bear Signal: Occurs when the selling pressure (OBV) is intense enough to push the OBV below its own recent lowest low, indicating a potential shift to a downward trend.
On-Screen Components
1. OBV Line
This is the main indicator line, representing the cumulative volume. Its color changes to green when OBV is rising and red when it is falling.
2. Dynamic Support & Resistance Line
This is the thick Green or Red line that appears based on the strategy's current "mode." This line serves as a dynamic support/resistance level and can be used as a reference for stop-loss placement.
Green Line (Support): Appears when the strategy enters "Bull Mode." This line represents the lowest low of the OBV in the recent past and acts as dynamic support.
Red Line (Resistance): Appears when the strategy enters "Bear Mode." This line represents the highest high of the OBV in the recent past and acts as dynamic resistance.
3. Signal Markers
Bull 🔼 (Green Up Triangle): This is the "Long Entry" signal. It appears at the moment the OBV first breaks out above its high-low channel.
Bear 🔽 (Red Down Triangle): This is the "Short Entry" signal. It appears at the moment the OBV first breaks down below its high-low channel.
How to Use
Add this script to the price chart of your choice.
Navigate to the "Strategy Tester" panel at the bottom of TradingView to view the backtesting results for the strategy on different assets and timeframes.
Use the "Bull" and "Bear" signals as aids in your trading decisions.
Disclaimer: No strategy is 100% perfect. This script should always be used in conjunction with other forms of analysis, such as price structure, key price-based support/resistance levels, and your own personal risk management rules.
Inputs
SMA Length 1 / SMA Length 2: These are used to plot moving averages on the OBV for visual reference. They are part of the legacy logic and do not affect the new breakout strategy. However, they are kept for traders who may wish to observe their crossovers for additional confirmation.
High/Low Lookback Length: (Most Important Setting) This determines the period used to calculate the highest-high and lowest-low OBV channel. (Default is 30; adjust this to suit the asset's volatility).
A smaller value: Creates a narrower channel, leading to more frequent and faster signals, but potentially more false signals.
A larger value: Creates a wider channel, leading to fewer and slower signals, which are likely to be more significant.

Canuck Trading Trader StrategyCanuck Trading Trader Strategy
Overview
The Canuck Trading Trader Strategy is a high-performance, trend-following trading system designed for NASDAQ:TSLA on a 15-minute timeframe. Optimized for precision and profitability, this strategy leverages short-term price trends to capture consistent gains while maintaining robust risk management. Ideal for traders seeking an automated, data-driven approach to trading Tesla’s volatile market, it delivers strong returns with controlled drawdowns.
Key Features
Trend-Based Entries: Identifies short-term trends using a 2-candle lookback period and a minimum trend strength of 0.2%, ensuring responsive trade signals.
Risk Management: Includes a configurable 3.0% stop-loss to cap losses and a 2.0% take-profit to lock in gains, balancing risk and reward.
High Precision: Utilizes bar magnification for accurate backtesting, reflecting realistic trade execution with 1-tick slippage and 0.1 commission.
Clean Interface: No on-chart indicators, providing a distraction-free trading experience focused on performance.
Flexible Sizing: Allocates 10% of equity per trade with support for up to 2 simultaneous positions (pyramiding).
Performance Highlights
Backtested from March 1, 2024, to June 20, 2025, on NASDAQ:TSLA (15-minute timeframe) with $1,000,000 initial capital:
Net Profit: $2,279,888.08 (227.99%)
Win Rate: 52.94% (3,039 winning trades out of 5,741)
Profit Factor: 3.495
Max Drawdown: 2.20%
Average Winning Trade: $1,050.91 (0.55%)
Average Losing Trade: $338.20 (0.18%)
Sharpe Ratio: 2.468
Note: Past performance is not indicative of future results. Always validate with your own backtesting and forward testing.
Usage Instructions
Setup:
Apply the strategy to a NASDAQ:TSLA 15-minute chart.
Ensure your TradingView account supports bar magnification for accurate results.
Configuration:
Lookback Candles: Default is 2 (recommended).
Min Trend Strength: Set to 0.2% for optimal trade frequency.
Stop Loss: Default 3.0% to cap losses.
Take Profit: Default 2.0% to secure gains.
Order Size: 10% of equity per trade.
Pyramiding: Allows up to 2 orders.
Commission: Set to 0.1.
Slippage: Set to 1 tick.
Enable "Recalculate After Order is Filled" and "Recalculate on Every Tick" in backtest settings.
Backtesting:
Run backtests over March 1, 2024, to June 20, 2025, to verify performance.
Adjust stop-loss (e.g., 2.5%) or take-profit (e.g., 1–3%) to suit your risk tolerance.
Live Trading:
Use with a compatible broker or TradingView alerts for automated execution.
Monitor execution for slippage or latency, especially given the high trade frequency (5,741 trades).
Validate in a demo account before deploying with real capital.
Risk Disclosure
Trading involves significant risk and may result in losses exceeding your initial capital. The Canuck Trading Trader Strategy is provided for educational and informational purposes only. Users are responsible for their own trading decisions and should conduct thorough testing before using in live markets. The strategy’s high trade frequency requires reliable execution infrastructure to minimize slippage and latency.

Long/Short/Exit/Risk management Strategy # LongShortExit Strategy Documentation
## Overview
The LongShortExit strategy is a versatile trading system for TradingView that provides complete control over entry, exit, and risk management parameters. It features a sophisticated framework for managing long and short positions with customizable profit targets, stop-loss mechanisms, partial profit-taking, and trailing stops. The strategy can be enhanced with continuous position signals for visual feedback on the current trading state.
## Key Features
### General Settings
- **Trading Direction**: Choose to trade long positions only, short positions only, or both.
- **Max Trades Per Day**: Limit the number of trades per day to prevent overtrading.
- **Bars Between Trades**: Enforce a minimum number of bars between consecutive trades.
### Session Management
- **Session Control**: Restrict trading to specific times of the day.
- **Time Zone**: Specify the time zone for session calculations.
- **Expiration**: Optionally set a date when the strategy should stop executing.
### Contract Settings
- **Contract Type**: Select from common futures contracts (MNQ, MES, NQ, ES) or custom values.
- **Point Value**: Define the dollar value per point movement.
- **Tick Size**: Set the minimum price movement for accurate calculations.
### Visual Signals
- **Continuous Position Signals**: Implement 0 to 1 visual signals to track position states.
- **Signal Plotting**: Customize color and appearance of position signals.
- **Clear Visual Feedback**: Instantly see when entry conditions are triggered.
### Risk Management
#### Stop Loss and Take Profit
- **Risk Type**: Choose between percentage-based, ATR-based, or points-based risk management.
- **Percentage Mode**: Set SL/TP as a percentage of entry price.
- **ATR Mode**: Set SL/TP as a multiple of the Average True Range.
- **Points Mode**: Set SL/TP as a fixed number of points from entry.
#### Advanced Exit Features
- **Break-Even**: Automatically move stop-loss to break-even after reaching specified profit threshold.
- **Trailing Stop**: Implement a trailing stop-loss that follows price movement at a defined distance.
- **Partial Profit Taking**: Take partial profits at predetermined price levels:
- Set first partial exit point and percentage of position to close
- Set second partial exit point and percentage of position to close
- **Time-Based Exit**: Automatically exit a position after a specified number of bars.
#### Win/Loss Streak Management
- **Streak Cutoff**: Automatically pause trading after a series of consecutive wins or losses.
- **Daily Reset**: Option to reset streak counters at the start of each day.
### Entry Conditions
- **Source and Value**: Define the exact price source and value that triggers entries.
- **Equals Condition**: Entry signals occur when the source exactly matches the specified value.
### Performance Analytics
- **Real-Time Stats**: Track important performance metrics like win rate, P&L, and largest wins/losses.
- **Visual Feedback**: On-chart markers for entries, exits, and important events.
### External Integration
- **Webhook Support**: Compatible with TradingView's webhook alerts for automated trading.
- **Cross-Platform**: Connect to external trading systems and notification platforms.
- **Custom Order Execution**: Implement advanced order flows through external services.
## How to Use
### Setup Instructions
1. Add the script to your TradingView chart.
2. Configure the general settings based on your trading preferences.
3. Set session trading hours if you only want to trade specific times.
4. Select your contract specifications or customize for your instrument.
5. Configure risk parameters:
- Choose your preferred risk management approach
- Set appropriate stop-loss and take-profit levels
- Enable advanced features like break-even, trailing stops, or partial profit taking as needed
6. Define entry conditions:
- Select the price source (such as close, open, high, or an indicator)
- Set the specific value that should trigger entries
### Entry Condition Examples
- **Example 1**: To enter when price closes exactly at a whole number:
- Long Source: close
- Long Value: 4200 (for instance, to enter when price closes exactly at 4200)
- **Example 2**: To enter when an indicator reaches a specific value:
- Long Source: ta.rsi(close, 14)
- Long Value: 30 (triggers when RSI equals exactly 30)
### Best Practices
1. **Always backtest thoroughly** before using in live trading.
2. **Start with conservative risk settings**:
- Small position sizes
- Reasonable stop-loss distances
- Limited trades per day
3. **Monitor and adjust**:
- Use the performance table to track results
- Adjust parameters based on how the strategy performs
4. **Consider market volatility**:
- Use ATR-based stops during volatile periods
- Use fixed points during stable markets
## Continuous Position Signals Implementation
The LongShortExit strategy can be enhanced with continuous position signals to provide visual feedback about the current position state. These signals can help you track when the strategy is in a long or short position.
### Adding Continuous Position Signals
Add the following code to implement continuous position signals (0 to 1):
```pine
// Continuous position signals (0 to 1)
var float longSignal = 0.0
var float shortSignal = 0.0
// Update position signals based on your indicator's conditions
longSignal := longCondition ? 1.0 : 0.0
shortSignal := shortCondition ? 1.0 : 0.0
// Plot continuous signals
plot(longSignal, title="Long Signal", color=#00FF00, linewidth=2, transp=0, style=plot.style_line)
plot(shortSignal, title="Short Signal", color=#FF0000, linewidth=2, transp=0, style=plot.style_line)
```
### Benefits of Continuous Position Signals
- Provides clear visual feedback of current position state (long/short)
- Signal values stay consistent (0 or 1) until condition changes
- Can be used for additional calculations or alert conditions
- Makes it easier to track when entry conditions are triggered
### Using with Custom Indicators
You can adapt the continuous position signals to work with any custom indicator by replacing the condition with your indicator's logic:
```pine
// Example with moving average crossover
longSignal := fastMA > slowMA ? 1.0 : 0.0
shortSignal := fastMA < slowMA ? 1.0 : 0.0
```
## Webhook Integration
The LongShortExit strategy is fully compatible with TradingView's webhook alerts, allowing you to connect your strategy to external trading platforms, brokers, or custom applications for automated trading execution.
### Setting Up Webhooks
1. Create an alert on your chart with the LongShortExit strategy
2. Enable the "Webhook URL" option in the alert dialog
3. Enter your webhook endpoint URL (from your broker or custom trading system)
4. Customize the alert message with relevant information using TradingView variables
### Webhook Message Format Example
```json
{
"strategy": "LongShortExit",
"action": "{{strategy.order.action}}",
"price": "{{strategy.order.price}}",
"quantity": "{{strategy.position_size}}",
"time": "{{time}}",
"ticker": "{{ticker}}",
"position_size": "{{strategy.position_size}}",
"position_value": "{{strategy.position_value}}",
"order_id": "{{strategy.order.id}}",
"order_comment": "{{strategy.order.comment}}"
}
```
### TradingView Alert Condition Examples
For effective webhook automation, set up these alert conditions:
#### Entry Alert
```
{{strategy.position_size}} != {{strategy.position_size}}
```
#### Exit Alert
```
{{strategy.position_size}} < {{strategy.position_size}} or {{strategy.position_size}} > {{strategy.position_size}}
```
#### Partial Take Profit Alert
```
strategy.order.comment contains "Partial TP"
```
### Benefits of Webhook Integration
- **Automated Trading**: Execute trades automatically through supported brokers
- **Cross-Platform**: Connect to custom trading bots and applications
- **Real-Time Notifications**: Receive trade signals on external platforms
- **Data Collection**: Log trade data for further analysis
- **Custom Order Management**: Implement advanced order types not available in TradingView
### Compatible External Applications
- Trading bots and algorithmic trading software
- Custom order execution systems
- Discord, Telegram, or Slack notification systems
- Trade journaling applications
- Risk management platforms
### Implementation Recommendations
- Test webhook delivery using a free service like webhook.site before connecting to your actual trading system
- Include authentication tokens or API keys in your webhook URL or payload when required by your external service
- Consider implementing confirmation mechanisms to verify trade execution
- Log all webhook activities for troubleshooting and performance tracking
## Strategy Customization Tips
### For Scalping
- Set smaller profit targets (1-3 points)
- Use tighter stop-losses
- Enable break-even feature after small profit
- Set higher max trades per day
### For Day Trading
- Use moderate profit targets
- Implement partial profit taking
- Enable trailing stops
- Set reasonable session trading hours
### For Swing Trading
- Use longer-term charts
- Set wider stops (ATR-based often works well)
- Use higher profit targets
- Disable daily streak reset
## Common Troubleshooting
### Low Win Rate
- Consider widening stop-losses
- Verify that entry conditions aren't triggering too frequently
- Check if the equals condition is too restrictive; consider small tolerances
### Missing Obvious Trades
- The equals condition is extremely precise. Price must exactly match the specified value.
- Consider using floating-point precision for more reliable triggers
### Frequent Stop-Outs
- Try ATR-based stops instead of fixed points
- Increase the stop-loss distance
- Enable break-even feature to protect profits
## Important Notes
- The exact equals condition is strict and may result in fewer trade signals compared to other conditions.
- For instruments with decimal prices, exact equality might be rare. Consider the precision of your value.
- Break-even and trailing stop calculations are based on points, not percentage.
- Partial take-profit levels are defined in points distance from entry.
- The continuous position signals (0 to 1) provide valuable visual feedback but don't affect the strategy's trading logic directly.
- When implementing continuous signals, ensure they're aligned with the actual entry conditions used by the strategy.
---
*This strategy is for educational and informational purposes only. Always test thoroughly before using with real funds.*

Timeshifter Triple Timeframe Strategy w/ SessionsOverview
The "Enhanced Timeshifter Triple Timeframe Strategy with Session Filtering" is a sophisticated trading strategy designed for the TradingView platform. It integrates multiple technical indicators across three different timeframes and allows traders to customize their trading Sessions. This strategy is ideal for traders who wish to leverage multi-timeframe analysis and session-based trading to enhance their trading decisions.
Features
Multi-Timeframe Analysis and direction:
Higher Timeframe: Set to a daily timeframe by default, providing a broader view of market trends.
Trading Timeframe: Automatically set to the current chart timeframe, ensuring alignment with the trader's primary analysis period.
Lower Timeframe: Set to a 15-minute timeframe by default, offering a granular view for precise entry and exit points.
Indicator Selection:
RMI (Relative Momentum Index): Combines RSI and MFI to gauge market momentum.
TWAP (Time Weighted Average Price): Provides an average price over a specified period, useful for identifying trends.
TEMA (Triple Exponential Moving Average): Reduces lag and smooths price data for trend identification.
DEMA (Double Exponential Moving Average): Similar to TEMA, it reduces lag and provides a smoother trend line.
MA (Moving Average): A simple moving average for basic trend analysis.
MFI (Money Flow Index): Measures the flow of money into and out of a security, useful for identifying overbought or oversold conditions.
VWMA (Volume Weighted Moving Average): Incorporates volume data into the moving average calculation.
PSAR (Parabolic SAR): Identifies potential reversals in price movement.
Session Filtering:
London Session: Trade during the London market hours (0800-1700 GMT+1).
New York Session: Trade during the New York market hours (0800-1700 GMT-5).
Tokyo Session: Trade during the Tokyo market hours (0900-1800 GMT+9).
Users can select one or multiple sessions to align trading with specific market hours.
Trade Direction:
Long: Only long trades are permitted.
Short: Only short trades are permitted.
Both: Both long and short trades are permitted, providing flexibility based on market conditions.
ADX Confirmation:
ADX (Average Directional Index): An optional filter to confirm the strength of a trend before entering a trade.
How to Use the Script
Setup:
Add the script to your TradingView chart.
Customize the input parameters according to your trading preferences and strategy requirements.
Indicator Selection:
Choose the primary indicator you wish to use for generating trading signals from the dropdown menu.
Enable or disable the ADX confirmation based on your preference for trend strength analysis.
Session Filtering:
Select the trading sessions you wish to trade in. You can choose one or multiple Sessions based on your trading strategy and market focus.
Trade Direction:
Set your preferred trade direction (Long, Short, or Both) to align with your market outlook and risk tolerance. You can use this feature to gauge the market and understand the possible directions.
Tips for Profitable and Safe Trading:
Recommended Timeframes Combination:
LT: 1m , CT: 5m, HT: 1H
LT: 1-5m , CT: 15m, HT: 4H
LT: 5-15m , CT: 4H, HT: 1W
Backtesting:
Always backtest the strategy on historical data to understand its performance under various market conditions.
Adjust the parameters based on backtesting results to optimize the strategy for your specific trading style.
Risk Management:
Use appropriate risk management techniques, such as setting stop-loss and take-profit levels, to protect your capital.
Avoid over-leveraging and ensure that you are trading within your risk tolerance.
Market Analysis:
Combine the script with other forms of market analysis, such as fundamental analysis or market sentiment, to make well-rounded trading decisions.
Stay informed about major economic events and news that could impact market volatility and trading sessions.
Continuous Monitoring:
Regularly monitor the strategy's performance and make adjustments as necessary.
Keep an eye on the results and settings for real-time statistics and ensure that the strategy aligns with current market conditions.
Education and Practice:
Continuously educate yourself on trading strategies and market dynamics.
Practice using the strategy in a demo account before applying it to live trading to gain confidence and understanding.

[Mustang Algo] Channel Strategy# Mustang Algo Channel Strategy - Universal Market Sentiment Oscillator
## 🎯 ORIGINAL CONCEPT
This strategy employs a unique market sentiment oscillator that works on ALL financial assets. It uses Bitcoin supply dynamics combined with stablecoin market capitalization as a macro sentiment indicator to generate universal timing signals across stocks, forex, commodities, indices, and cryptocurrencies.
## 🌐 UNIVERSAL APPLICATION
- **Any Asset Class:** Stocks, Forex, Commodities, Indices, Crypto, Bonds
- **Market-Wide Timing:** BTC/Stablecoin ratio serves as a global risk sentiment gauge
- **Cross-Market Signals:** Trade any instrument using macro liquidity conditions
- **Ecosystem Approach:** One oscillator for all financial markets
## 🧮 METHODOLOGY
**Core Calculation:** BTC Supply / (Combined Stablecoin Market Cap / BTC Price)
- **Data Sources:** DAI + USDT + USDC market capitalizations
- **Signal Generation:** RSI(14) applied to the ratio, double-smoothed with WMA
- **Timing Logic:** Crossover signals filtered by overbought/oversold zones
- **Multi-Timeframe:** Configurable timeframe analysis (default: Daily)
## 📈 TRADING STRATEGY
**LONG Entries:** Bullish crossover when market sentiment is oversold (<48)
**SHORT Entries:** Bearish crossover when market sentiment is overbought (>55)
**Universal Timing:** These macro signals apply to trading any financial instrument
## ⚙️ FLEXIBLE RISK MANAGEMENT
**Three SL/TP Calculation Modes:**
- **Percentage Mode:** Traditional % based (4% SL, 12% TP default)
- **Ticks Mode:** Precise tick-based calculation (50/150 ticks default)
- **Pips Mode:** Forex-style pip calculation (50/150 pips default)
**Realistic Parameters:**
- Commission: 0.1% (adjustable for different asset classes)
- Slippage: 2 ticks
- Position sizing: 10% of equity (conservative)
- No pyramiding (single position management)
## 📊 KEY ADVANTAGES
✅ **Universal Application:** One strategy for all asset classes
✅ **Macro Foundation:** Based on global liquidity and risk sentiment
✅ **False Signal Filtering:** Overbought/oversold zones reduce noise
✅ **Flexible Risk Management:** Multiple SL/TP calculation methods
✅ **No Lookahead Bias:** Clean backtesting with realistic results
✅ **Cross-Market Correlation:** Captures broad market risk cycles
## 🎛️ CONFIGURATION GUIDE
1. **Asset Selection:** Apply to stocks, forex, commodities, indices, crypto
2. **Timeframe Setup:** Daily recommended for swing trading
3. **Sentiment Bounds:** Adjust 48/55 levels based on market volatility
4. **Risk Management:** Choose appropriate SL/TP mode for your asset class
5. **Direction Filter:** Select Long Only, Short Only, or Both
## 📋 BACKTESTING STANDARDS
**Compliant with TradingView Guidelines:**
- ✅ Realistic commission structure (0.1% default)
- ✅ Appropriate slippage modeling (2 ticks)
- ✅ Conservative position sizing (10% equity)
- ✅ Sustainable risk ratios (1:3 SL/TP)
- ✅ No lookahead bias (proper historical simulation)
- ✅ Sufficient sample size potential (100+ trades possible)
## 🔬 ORIGINAL RESEARCH
This strategy introduces a revolutionary approach to financial markets by treating the BTC/Stablecoin ratio as a global risk sentiment gauge. Unlike traditional indicators that analyze individual asset price action, this oscillator captures macro liquidity flows that affect ALL financial markets - from stocks to forex to commodities.
## 🎯 MARKET APPLICATIONS
**Stocks & Indices:** Risk-on/risk-off sentiment timing
**Forex:** Global liquidity flow analysis for major pairs
**Commodities:** Risk appetite for inflation hedges
**Bonds:** Flight-to-safety vs. risk-seeking behavior
**Crypto:** Native application with direct correlation
## ⚠️ RISK DISCLOSURE
- Designed for intermediate to long-term trading across all timeframes
- Market sentiment can remain extreme longer than expected
- Always use appropriate position sizing for your specific asset class
- Adjust commission and slippage settings for different markets
- Past performance does not guarantee future results
## 🚀 INNOVATION SUMMARY
**What makes this strategy unique:**
- First to use BTC/Stablecoin ratio as universal market sentiment indicator
- Applies macro-economic principles to technical analysis across all assets
- Single oscillator provides timing signals for entire financial ecosystem
- Bridges traditional finance with digital asset insights
- Combines fundamental liquidity analysis with technical precision
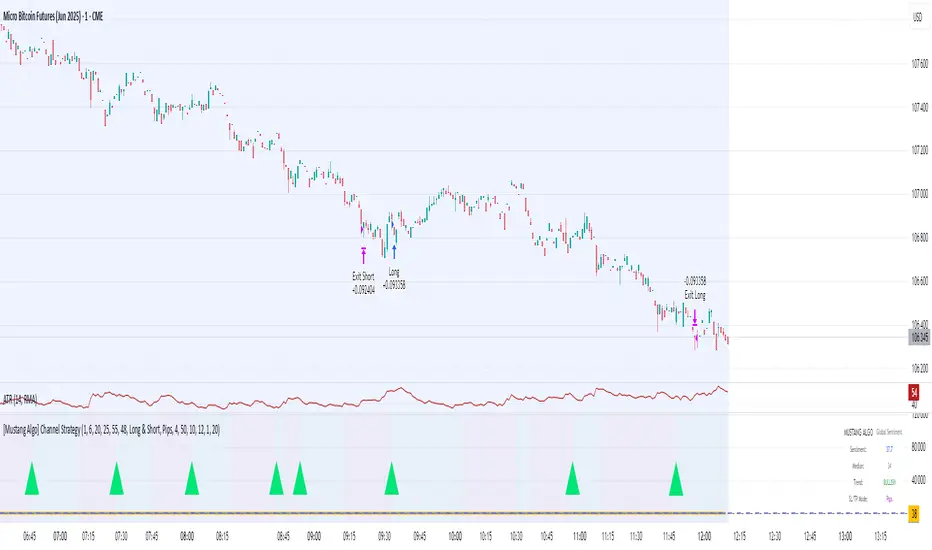
Long-Leg Doji Breakout StrategyThe Long-Leg Doji Breakout Strategy is a sophisticated technical analysis approach that capitalizes on market psychology and price action patterns.
Core Concept: The strategy identifies Long-Leg Doji candlestick patterns, which represent periods of extreme market indecision where buyers and sellers are in equilibrium. These patterns often precede significant price movements as the market resolves this indecision.
Pattern Recognition: The algorithm uses strict mathematical criteria to identify authentic Long-Leg Doji patterns. It requires the candle body to be extremely small (≤0.1% of the total range) while having long wicks on both sides (at least 2x the body size). An ATR filter ensures the pattern is significant relative to recent volatility.
Trading Logic: Once a Long-Leg Doji is identified, the strategy enters a "waiting mode," monitoring for a breakout above the doji's high (long signal) or below its low (short signal). This confirmation approach reduces false signals by ensuring the market has chosen a direction.
Risk Management: The strategy allocates 10% of equity per trade and uses a simple moving average crossover for exits. Visual indicators help traders understand the pattern identification and trade execution process.
Psychological Foundation: The strategy exploits the natural market cycle where uncertainty (represented by the doji) gives way to conviction (the breakout), creating high-probability trading opportunities.
The strength of this approach lies in its ability to identify moments when market sentiment shifts from confusion to clarity, providing traders with well-defined entry and exit points while maintaining proper risk management protocols.
How It Works
The strategy operates on a simple yet powerful principle: identify periods of market indecision, then trade the subsequent breakout when the market chooses direction.
Step 1: Pattern Detection
The algorithm scans for Long-Leg Doji candles, which have three key characteristics:
Tiny body (open and close prices nearly equal)
Long upper wick (significant rejection of higher prices)
Long lower wick (significant rejection of lower prices)
Step 2: Confirmation Wait
Once a doji is detected, the strategy doesn't immediately trade. Instead, it marks the high and low of that candle and waits for a definitive breakout.
Step 3: Trade Execution
Long Entry: When price closes above the doji's high
Short Entry: When price closes below the doji's low
Step 4: Exit Strategy
Positions are closed when price crosses back through a 20-period moving average, indicating potential trend reversal.
Market Psychology Behind It
A Long-Leg Doji represents a battlefield between bulls and bears that ends in a stalemate. The long wicks show that both sides tried to push price in their favor but failed. This creates a coiled spring effect - when one side finally gains control, the move can be explosive as trapped traders rush to exit and momentum traders jump aboard.
Key Parameters
Doji Body Threshold (0.1%): Ensures the body is truly small relative to the candle's range
Wick Ratio (2.0): Both wicks must be at least twice the body size
ATR Filter: Uses Average True Range to ensure the pattern is significant in current market conditions
Position Size: 10% of equity per trade for balanced risk management
Pros:
High Probability Setups: Doji patterns at key levels often lead to significant moves as they represent genuine shifts in market sentiment.
Clear Rules: Objective criteria for entry and exit eliminate emotional decision-making and provide consistent execution.
Risk Management: Built-in position sizing and exit rules help protect capital during losing trades.
Market Neutral: Works equally well for long and short positions, adapting to market direction rather than fighting it.
Visual Confirmation: The strategy provides clear visual cues, making it easy to understand when patterns are forming and trades are triggered.
Cons:
False Breakouts: In choppy or ranging markets, price may break the doji levels only to quickly reverse, creating whipsaws.
Patience Required: Traders must wait for both pattern formation and breakout confirmation, which can test discipline during active market periods.
Simple Exit Logic: The moving average exit may be too simplistic, potentially cutting profits short during strong trends or holding losers too long during reversals.
Volatility Dependent: The strategy relies on sufficient volatility to create meaningful doji patterns - it may underperform in extremely quiet markets.
Lagging Entries: Waiting for breakout confirmation means missing the very beginning of moves, reducing potential profit margins.
Best Market Conditions
The strategy performs optimally during periods of moderate volatility when markets are making genuine directional decisions rather than just random noise. It works particularly well around key support/resistance levels where the market's indecision is most meaningful.
Optimization Considerations
Consider combining with additional confluence factors like volume analysis, support/resistance levels, or other technical indicators to improve signal quality. The exit strategy could also be enhanced with trailing stops or multiple profit targets to better capture extended moves while protecting gains.
Best for Index option,
Enjoy !!

RSI Divergence StrategyOverview
The RSI Divergence Strategy Indicator is a trading tool that uses the RSI and divergences created to generate high-probability buy and sell signals.
I have provided the best formula of numbers to use for BTC on a 30 minute timeframe.
You can change where on RSI you enter and exit both long or short trades. This way you can experiment on different tokens using different entry/exit points. Can use on multiple timeframes.
This strategy is designed to open and close long or short trades based on the levels you provide it. You can then check on the RSI where the best levels are for each token you want to trade and amend it as required to generate a profitable strategy.
How It Works
The RSI Divergence Strategy Indicator uses bear and bull divergences in conjuction with a level you have input on the RSI.
RSI for Overbought/Oversold:
• Input variables for entry and exit levels and when the entry levels combine with a bear or bull divergence signal, a trade is alerted.
RSI Divergence:
• Buy and sell signals are confirmed when the RSI creates bearish or bullish divergences and these divergences are in the same area as your levels you input for entry to short or long.
After 7 years of experience and testing I have calculated the exact numbers required and produced a formula to calculate the exact input variables for a 30 minute Bitcoin chart.
Key Features
1️⃣ Divergence Identification – Ensures trades are taken only when a bull or bear divergence has formed.
2️⃣ Overbought/Oversold Input Filtering – Set up your own variables on the RSI for different markets after identifying patterns on the RSI in relation to a bearish or bullish divergence.
3️⃣ Works on any chart – Suitable for all markets and timeframes once you input the correct variables for entry and exit levels.
How to Use
🟢 Basic Trading:
• Use on any timeframe.
• Enter trade only when alert has fired off. Close when it says to exit.
• Change entry and exit levels in the properties of the strategy indicator.
• Make entry and exit levels coincide with bearish or bullish divergences on the RSI.
Check the strategy tester to see backtesting so you know if the indicator is profitable or not for that market and timeframe as each crypto token is different and so is the timeframe you choose.
📢 Webhook Automation:
• Set up TradingView Alerts to auto-execute trades via Webhook-compatible platforms.
Key additions for divergence visualization:
Divergence Arrows:
Bullish divergence: Green label with white 'bull ' text
Bearish divergence: Red label with white 'bear' text
Positioned at the pivot point
Divergence Lines:
Connects consecutive RSI pivot points
Automatically drawn between consecutive pivot points
Enhanced RSI Coloring:
Overbought zone: Red
Oversold zone: Green
Neutral zone: Gray
The visualization helps you instantly spot:
Where divergences are forming on the RSI
The pattern of higher lows (bullish) or lower highs (bearish)
Contextual coloring of RSI relative to standard levels
All divergence markers appear at the correct historical pivot points, making it easy to visually confirm divergence patterns as they develop.
Strategy levels and background zones also shown to help visual look.
Why This Combination?
This indicator is just a simple RSI tool.
It is designed to filter out weak trades and only execute trades that have:
✅ RSI Divergence
✅ Overbought or Oversold Conditions
It does not calculate downtrends or bear markets so care is recommended taking long trades during these times.
Why It’s Worth Using?
📈 Open Source – Free to use and learn from.
📉 Long or Short Term Trading Style – Entry/Exit parameters options are designed for both short or long term trades allowing you to experiment until you find a profitable strategy for that market you want to trade.
📢 Seamless Webhook Automation – Execute trades automatically with TradingView alerts.
💲 Ready to trade smarter?
✅ Add the RSI Divergence Strategy Indicator to your TradingView chart.

Anomalous Holonomy Field Theory🌌 Anomalous Holonomy Field Theory (AHFT) - Revolutionary Quantum Market Analysis
Where Theoretical Physics Meets Trading Reality
A Groundbreaking Synthesis of Differential Geometry, Quantum Field Theory, and Market Dynamics
🔬 THEORETICAL FOUNDATION - THE MATHEMATICS OF MARKET REALITY
The Anomalous Holonomy Field Theory represents an unprecedented fusion of advanced mathematical physics with practical market analysis. This isn't merely another indicator repackaging old concepts - it's a fundamentally new lens through which to view and understand market structure .
1. HOLONOMY GROUPS (Differential Geometry)
In differential geometry, holonomy measures how vectors change when parallel transported around closed loops in curved space. Applied to markets:
Mathematical Formula:
H = P exp(∮_C A_μ dx^μ)
Where:
P = Path ordering operator
A_μ = Market connection (price-volume gauge field)
C = Closed price path
Market Implementation:
The holonomy calculation measures how price "remembers" its journey through market space. When price returns to a previous level, the holonomy captures what has changed in the market's internal geometry. This reveals:
Hidden curvature in the market manifold
Topological obstructions to arbitrage
Geometric phase accumulated during price cycles
2. ANOMALY DETECTION (Quantum Field Theory)
Drawing from the Adler-Bell-Jackiw anomaly in quantum field theory:
Mathematical Formula:
∂_μ j^μ = (e²/16π²)F_μν F̃^μν
Where:
j^μ = Market current (order flow)
F_μν = Field strength tensor (volatility structure)
F̃^μν = Dual field strength
Market Application:
Anomalies represent symmetry breaking in market structure - moments when normal patterns fail and extraordinary opportunities arise. The system detects:
Spontaneous symmetry breaking (trend reversals)
Vacuum fluctuations (volatility clusters)
Non-perturbative effects (market crashes/melt-ups)
3. GAUGE THEORY (Theoretical Physics)
Markets exhibit gauge invariance - the fundamental physics remains unchanged under certain transformations:
Mathematical Formula:
A'_μ = A_μ + ∂_μΛ
This ensures our signals are gauge-invariant observables , immune to arbitrary market "coordinate changes" like gaps or reference point shifts.
4. TOPOLOGICAL DATA ANALYSIS
Using persistent homology and Morse theory:
Mathematical Formula:
β_k = dim(H_k(X))
Where β_k are the Betti numbers describing topological features that persist across scales.
🎯 REVOLUTIONARY SIGNAL CONFIGURATION
Signal Sensitivity (0.5-12.0, default 2.5)
Controls the responsiveness of holonomy field calculations to market conditions. This parameter directly affects the threshold for detecting quantum phase transitions in price action.
Optimization by Timeframe:
Scalping (1-5min): 1.5-3.0 for rapid signal generation
Day Trading (15min-1H): 2.5-5.0 for balanced sensitivity
Swing Trading (4H-1D): 5.0-8.0 for high-quality signals only
Score Amplifier (10-200, default 50)
Scales the raw holonomy field strength to produce meaningful signal values. Higher values amplify weak signals in low-volatility environments.
Signal Confirmation Toggle
When enabled, enforces additional technical filters (EMA and RSI alignment) to reduce false positives. Essential for conservative strategies.
Minimum Bars Between Signals (1-20, default 5)
Prevents overtrading by enforcing quantum decoherence time between signals. Higher values reduce whipsaws in choppy markets.
👑 ELITE EXECUTION SYSTEM
Execution Modes:
Conservative Mode:
Stricter signal criteria
Higher quality thresholds
Ideal for stable market conditions
Adaptive Mode:
Self-adjusting parameters
Balances signal frequency with quality
Recommended for most traders
Aggressive Mode:
Maximum signal sensitivity
Captures rapid market moves
Best for experienced traders in volatile conditions
Dynamic Position Sizing:
When enabled, the system scales position size based on:
Holonomy field strength
Current volatility regime
Recent performance metrics
Advanced Exit Management:
Implements trailing stops based on ATR and signal strength, with mode-specific multipliers for optimal profit capture.
🧠 ADAPTIVE INTELLIGENCE ENGINE
Self-Learning System:
The strategy analyzes recent trade outcomes and adjusts:
Risk multipliers based on win/loss ratios
Signal weights according to performance
Market regime detection for environmental adaptation
Learning Speed (0.05-0.3):
Controls adaptation rate. Higher values = faster learning but potentially unstable. Lower values = stable but slower adaptation.
Performance Window (20-100 trades):
Number of recent trades analyzed for adaptation. Longer windows provide stability, shorter windows increase responsiveness.
🎨 REVOLUTIONARY VISUAL SYSTEM
1. Holonomy Field Visualization
What it shows: Multi-layer quantum field bands representing market resonance zones
How to interpret:
Blue/Purple bands = Primary holonomy field (strongest resonance)
Band width = Field strength and volatility
Price within bands = Normal quantum state
Price breaking bands = Quantum phase transition
Trading application: Trade reversals at band extremes, breakouts on band violations with strong signals.
2. Quantum Portals
What they show: Entry signals with recursive depth patterns indicating momentum strength
How to interpret:
Upward triangles with portals = Long entry signals
Downward triangles with portals = Short entry signals
Portal depth = Signal strength and expected momentum
Color intensity = Probability of success
Trading application: Enter on portal appearance, with size proportional to portal depth.
3. Field Resonance Bands
What they show: Fibonacci-based harmonic price zones where quantum resonance occurs
How to interpret:
Dotted circles = Minor resonance levels
Solid circles = Major resonance levels
Color coding = Resonance strength
Trading application: Use as dynamic support/resistance, expect reactions at resonance zones.
4. Anomaly Detection Grid
What it shows: Fractal-based support/resistance with anomaly strength calculations
How to interpret:
Triple-layer lines = Major fractal levels with high anomaly probability
Labels show: Period (H8-H55), Price, and Anomaly strength (φ)
⚡ symbol = Extreme anomaly detected
● symbol = Strong anomaly
○ symbol = Normal conditions
Trading application: Expect major moves when price approaches high anomaly levels. Use for precise entry/exit timing.
5. Phase Space Flow
What it shows: Background heatmap revealing market topology and energy
How to interpret:
Dark background = Low market energy, range-bound
Purple glow = Building energy, trend developing
Bright intensity = High energy, strong directional move
Trading application: Trade aggressively in bright phases, reduce activity in dark phases.
📊 PROFESSIONAL DASHBOARD METRICS
Holonomy Field Strength (-100 to +100)
What it measures: The Wilson loop integral around price paths
>70: Strong positive curvature (bullish vortex)
<-70: Strong negative curvature (bearish collapse)
Near 0: Flat connection (range-bound)
Anomaly Level (0-100%)
What it measures: Quantum vacuum expectation deviation
>70%: Major anomaly (phase transition imminent)
30-70%: Moderate anomaly (elevated volatility)
<30%: Normal quantum fluctuations
Quantum State (-1, 0, +1)
What it measures: Market wave function collapse
+1: Bullish eigenstate |↑⟩
0: Superposition (uncertain)
-1: Bearish eigenstate |↓⟩
Signal Quality Ratings
LEGENDARY: All quantum fields aligned, maximum probability
EXCEPTIONAL: Strong holonomy with anomaly confirmation
STRONG: Good field strength, moderate anomaly
MODERATE: Decent signals, some uncertainty
WEAK: Minimal edge, high quantum noise
Performance Metrics
Win Rate: Rolling performance with emoji indicators
Daily P&L: Real-time profit tracking
Adaptive Risk: Current risk multiplier status
Market Regime: Bull/Bear classification
🏆 WHY THIS CHANGES EVERYTHING
Traditional technical analysis operates on 100-year-old principles - moving averages, support/resistance, and pattern recognition. These work because many traders use them, creating self-fulfilling prophecies.
AHFT transcends this limitation by analyzing markets through the lens of fundamental physics:
Markets have geometry - The holonomy calculations reveal this hidden structure
Price has memory - The geometric phase captures path-dependent effects
Anomalies are predictable - Quantum field theory identifies symmetry breaking
Everything is connected - Gauge theory unifies disparate market phenomena
This isn't just a new indicator - it's a new way of thinking about markets . Just as Einstein's relativity revolutionized physics beyond Newton's mechanics, AHFT revolutionizes technical analysis beyond traditional methods.
🔧 OPTIMAL SETTINGS FOR MNQ 10-MINUTE
For the Micro E-mini Nasdaq-100 on 10-minute timeframe:
Signal Sensitivity: 2.5-3.5
Score Amplifier: 50-70
Execution Mode: Adaptive
Min Bars Between: 3-5
Theme: Quantum Nebula or Dark Matter
💭 THE JOURNEY - FROM IMPOSSIBLE THEORY TO TRADING REALITY
Creating AHFT was a mathematical odyssey that pushed the boundaries of what's possible in Pine Script. The journey began with a seemingly impossible question: Could the profound mathematical structures of theoretical physics be translated into practical trading tools?
The Theoretical Challenge:
Months were spent diving deep into differential geometry textbooks, studying the works of Chern, Simons, and Witten. The mathematics of holonomy groups and gauge theory had never been applied to financial markets. Translating abstract mathematical concepts like parallel transport and fiber bundles into discrete price calculations required novel approaches and countless failed attempts.
The Computational Nightmare:
Pine Script wasn't designed for quantum field theory calculations. Implementing the Wilson loop integral, managing complex array structures for anomaly detection, and maintaining computational efficiency while calculating geometric phases pushed the language to its limits. There were moments when the entire project seemed impossible - the script would timeout, produce nonsensical results, or simply refuse to compile.
The Breakthrough Moments:
After countless sleepless nights and thousands of lines of code, breakthrough came through elegant simplifications. The realization that market anomalies follow patterns similar to quantum vacuum fluctuations led to the revolutionary anomaly detection system. The discovery that price paths exhibit holonomic memory unlocked the geometric phase calculations.
The Visual Revolution:
Creating visualizations that could represent 4-dimensional quantum fields on a 2D chart required innovative approaches. The multi-layer holonomy field, recursive quantum portals, and phase space flow representations went through dozens of iterations before achieving the perfect balance of beauty and functionality.
The Balancing Act:
Perhaps the greatest challenge was maintaining mathematical rigor while ensuring practical trading utility. Every formula had to be both theoretically sound and computationally efficient. Every visual had to be both aesthetically pleasing and information-rich.
The result is more than a strategy - it's a synthesis of pure mathematics and market reality that reveals the hidden order within apparent chaos.
📚 INTEGRATED DOCUMENTATION
Once applied to your chart, AHFT includes comprehensive tooltips on every input parameter. The source code contains detailed explanations of the mathematical theory, practical applications, and optimization guidelines. This published description provides the overview - the indicator itself is a complete educational resource.
⚠️ RISK DISCLAIMER
While AHFT employs advanced mathematical models derived from theoretical physics, markets remain inherently unpredictable. No mathematical model, regardless of sophistication, can guarantee future results. This strategy uses realistic commission ($0.62 per contract) and slippage (1 tick) in all calculations. Past performance does not guarantee future results. Always use appropriate risk management and never risk more than you can afford to lose.
🌟 CONCLUSION
The Anomalous Holonomy Field Theory represents a quantum leap in technical analysis - literally. By applying the profound insights of differential geometry, quantum field theory, and gauge theory to market analysis, AHFT reveals structure and opportunities invisible to traditional methods.
From the holonomy calculations that capture market memory to the anomaly detection that identifies phase transitions, from the adaptive intelligence that learns and evolves to the stunning visualizations that make the invisible visible, every component works in mathematical harmony.
This is more than a trading strategy. It's a new lens through which to view market reality.
Trade with the precision of physics. Trade with the power of mathematics. Trade with AHFT.
I hope this serves as a good replacement for Quantum Edge Pro - Adaptive AI until I'm able to fix it.
— Dskyz, Trade with insight. Trade with anticipation.

Zero Lag MACD + Kijun-sen + EOM StrategyThis strategy offers a robust approach to identifying high-probability trading opportunities in the fast-paced cryptocurrency markets, particularly on lower timeframes (e.g., 5-minute). It leverages the synergistic power of three distinct indicators to confirm entries, ensuring a disciplined approach to risk management.
Key Components:
Zero Lag MACD Enhanced Version 1.2: This core momentum indicator is used to identify precise shifts in trend and momentum, offering reduced lag compared to traditional MACD. Entry signals are filtered based on the histogram's position (below for buys, above for sells) to enhance signal reliability.
Kijun-sen (Ichimoku Cloud): Acting as a dynamic support/resistance and trend filter, the Kijun-sen line confirms the prevailing market direction. Long entries are confirmed when price is above Kijun-sen, and short entries when price is below.
Ease of Movement (EoM): This volume-based oscillator provides crucial confirmation of price movements by measuring the ease with which price changes. Positive EoM confirms buying pressure, while negative confirms selling pressure, adding an essential layer of validation to trade setups.
How it Works:
The strategy generates entry signals only when all three indicators align simultaneously:
For Long Entries: A Zero Lag MACD buy signal (crossover below histogram) must coincide with price trading above the Kijun-sen, and the Ease of Movement indicator being above its zero line.
For Short Entries: A Zero Lag MACD sell signal (crossover above histogram) must coincide with price trading below the Kijun-sen, and the Ease of Movement indicator being below its zero line.
Entries are executed at the open of the candle immediately following the signal confirmation.
Risk Management:
Disciplined risk management is paramount to this strategy:
Dynamic Stop-Loss: An Average True Range (ATR) based stop-loss is implemented, set at 2.5 times the current ATR. This adapts the stop-loss distance to market volatility, ensuring sensible risk sizing.
Fixed Take-Profit: A consistent Risk-to-Reward (R:R) ratio of 1:1.2 is applied for all trades, promoting stable profit realization.
Customization & Optimization:
The strategy is built with fully customizable input parameters for each indicator (MACD lengths, Kijun-sen period, ATR period, ATR multiplier, and Risk-to-Reward ratio). This allows users to fine-tune the strategy for different assets, timeframes, and market conditions, facilitating robust backtesting and optimization.
Disclaimer: Trading involves substantial risk and is not suitable for all investors. Past performance is not indicative of future results. This strategy is provided for educational and informational purposes only. Always use proper risk management and conduct your own due diligence.

GStrategy 1000Pepe 15mTrend Following Candlestick Strategy with EMA Filter and Exit Delay
Strategy Concept
This strategy combines candlestick patterns with EMA trend filtering to identify high-probability trade entries, featuring:
Entry Signals: Hammer and Engulfing patterns confirmed by EMA trend
Trend Filter: Fast EMA (20) vs Slow EMA (50) crossover system
Risk Management: 5% stop-loss + 1% trailing stop
Smart Exit: 2-bar delay after exit signals to avoid whipsaws
Key Components
Trend Identification:
Uptrend: Fast EMA > Slow EMA AND rising
Downtrend: Fast EMA < Slow EMA AND falling
Entry Conditions:
pinescript
// Bullish Entry (Long)
longCondition = (Hammer OR Bullish Engulfing)
AND Uptrend
AND no existing position
// Bearish Entry (Short)
shortCondition = Bearish Engulfing
AND Downtrend
AND no existing position
Exit Mechanics:
Primary Exit: EMA crossover (Fast crosses Slow)
Delayed Execution: Waits 2 full candles after signal
Emergency Exits:
5% fixed stop-loss
1% trailing stop
Visual Dashboard:
Colored EMA lines (Blue=Fast, Red=Slow)
Annotated candlestick patterns
Background highlighting for signals
Distinct markers for entries/exits
Unique Features
Pattern Recognition:
Enhanced Hammer detection (strict body/wick ratios)
Multi-candle engulfing confirmation
Trend-Confirmation:
Requires price and EMA alignment
Filters counter-trend patterns
Exit Optimization:
pinescript
// Delay implementation
if exit_signal_triggered
counter := 2 // Start countdown
else if counter > 0
counter -= 1 // Decrement each bar
exit_trade = (counter == 1) // Execute on final bar
Risk Parameters
Parameter Value Description
Stop Loss 5% Fixed risk per trade
Trailing Stop 1% Locks in profits
Exit Delay 2 bars Reduces false exits
Position Size 100% No pyramiding
Visualization Examples
🟢 Green Triangle: Bullish entry
🔴 Red Triangle: Bearish entry
⬇️ Blue X: Long exit (after delay)
⬆️ Green X: Short exit (after delay)
🎯 Pattern Labels: Identifies hammer/engulfing
Recommended Use
Timeframes: 1H-4H (reduces noise)
Markets: Trend-prone assets (FX, indices)
Best Conditions: Strong trending markets
Avoid: Choppy/Ranging markets

Donchian x WMA Crossover (2025 Only, Adjustable TP, Real OHLC)Short Description:
Long-only breakout system that goes long when the Donchian Low crosses up through a Weighted Moving Average, and closes when it crosses back down (with an optional take-profit), restricted to calendar year 2025. All signals use the instrument’s true OHLC data (even on Heikin-Ashi charts), start with 1 000 AUD of capital, and deploy 100 % equity per trade.
Ideal parameters configured for Temple & Webster on ASX 30 minute candles. Adjust parameter to suit however best to download candle interval data and have GPT test the pine script for optimum parameters for your trading symbol.
Detailed Description
1. Strategy Concept
This strategy captures trend-driven breakouts off the bottom of a Donchian channel. By combining the Donchian Low with a WMA filter, it aims to:
Enter when volatility compresses and price breaks above the recent Donchian Low while the longer‐term WMA confirms upward momentum.
Exit when price falls back below that same WMA (i.e. when the Donchian Low crosses back down through WMA), but only if the WMA itself has stopped rising.
Optional Take-Profit: you can specify a profit target in decimal form (e.g. 0.01 = 1 %).
2. Timeframe & Universe
In-sample period: only bars stamped between Jan 1 2025 00:00 UTC and Dec 31 2025 23:59 UTC are considered.
Any resolution (e.g. 30 m, 1 h, D, etc.) is supported—just set your preferred timeframe in the TradingView UI.
3. True-Price Execution
All indicator calculations (Donchian Low, WMA, crossover checks, take-profit) are sourced from the chart’s underlying OHLC via request.security(). This guarantees that:
You can view Heikin-Ashi or other styled candles, but your strategy will execute on the real OHLC bars.
Chart styling never suppresses or distorts your backtest results.
4. Position Sizing & Equity
Initial capital: 1 000 AUD
Size per trade: 100 % of available equity
No pyramiding: one open position at a time
5. Inputs (all exposed in the “Inputs” tab):
Input Default Description
Donchian Length 7 Number of bars to calculate the Donchian channel low
WMA Length 62 Period of the Weighted Moving Average filter
Take Profit (decimal) 0.01 Exit when price ≥ entry × (1 + take_profit_perc)
6. How It Works
Donchian Low: ta.lowest(low, DonchianLength) over the specified look-back.
WMA: ta.wma(close, WMALength) applied to true closes.
Entry: ta.crossover(DonchianLow, WMA) AND barTime ∈ 2025.
Exit:
Cross-down exit: ta.crossunder(DonchianLow, WMA) and WMA is not rising (i.e. momentum has stalled).
Take-profit exit: price ≥ entry × (1 + take_profit_perc).
Calendar exit: barTime falls outside 2025.
7. Usage Notes
After adding to your chart, open the Strategy Tester tab to review performance metrics, list of trades, equity curve, etc.
You can toggle your chart to Heikin-Ashi for visual clarity without affecting execution, thanks to the real-OHLC calls.