Enhanced RSI Divergence StrategyCore Strategy Logic
1. Higher Timeframe (HTF) Context
Purpose: Align with the dominant trend (e.g., "bullish made new highs").
Tools:
Price action (breakouts, key support/resistance levels).
Trend confirmation (e.g., 50EMA on 1H/4H charts).
2. Lower Timeframe (LTF) Entry Triggers
Momentum Breakdown (Short Example):
Signal: Price makes "high of the day" + reversal candlestick (e.g., bearish engulfing).
Confirmation: RSI divergence or volume spike.
Support Reversion (Long/Short):
Signal: False breakout (e.g., "faked bullish breakout and reversed").
Confirmation: Wick rejection at HTF support/resistance.
3. Trade Execution
Entry: On 5-minute close after trigger.
Stop Loss (SL):
Current: Fixed ticks (e.g., 7-13 pts) → Issue: Too tight for US100 volatility.
Improved: 1.5x ATR(14) or beyond recent swing high/low.
Take Profit (TP):
Current: Fixed price levels (e.g., 21523).
Improved: Tiered exits (50% at 1:1 RR, trail rest).
4. Position Sizing
Fixed contracts (e.g., 10 per trade).
Better Approach: Risk 1-2% of capital per trade (adjust size based on SL distance).
Key Strengths
HTF+LTF Alignment: Avoids counter-trend traps by trading in HTF direction.
Flexibility: Adapts to momentum and mean-reversion setups.
Journaling: Tracks emotions/mistakes (critical for improvement).
Indicators and strategies

MTF_MA RibbonThis script plots a ribbon of Moving Averages for Daily, Weekly and Monthly timeframes and helps in Multi-timeframe analysis of securities for swing & positional trades. once applied to chart, the moving averages change automatically according to the selected timeframe.
Following are the default moving averages :
Daily TF EMAs: 5D, 10D, 20D
Daily TF SMAs: 50D, 100D, 150D, 200D
Weekly TF SMAs: 10W, 20W, 30W, 40W
Monthly TF SMAs: 3M, 5M, 8M, 11M

Samil Dogru SmartTrailing v1.1📘 Samil Dogru SmartTrailing v1.1 – BTCUSDT Optimized Strategy (15-Minute)
Samil Dogru SmartTrailing v1.1 is an advanced trend-tracking and profit-locking strategy, specifically optimized for BTCUSDT on the 15-minute timeframe.
It integrates dynamic price following, intelligent trailing exit after trigger activation, and protective hard-stop loss logic to maximize profit while limiting downside risk.
⚙️ Core Strategy Logic:
Entry Signal: Based on a crossover of HMA100 and HMA200, filtered by the trend direction of HMA500 and HMA1000 (cloud logic).
Trigger Mechanism: When price moves a user-defined percentage (e.g., +1.2%) from the entry, the trailing logic is activated.
Smart Trailing Exit: Once triggered, the strategy tracks new highs (for long) or new lows (for short). A trailing stop is dynamically updated. If price pulls back by the defined margin (e.g., 0.8%), the position exits.
Hard Stop (Pre-Trigger): If price moves adversely by a defined percentage (e.g., 2.5%) before the trigger is hit, the position is forcefully exited to protect capital.
📊 Performance Note:
On BTCUSDT with 15-minute candles, historical testing has shown:
High directional accuracy
Optimized entry and exit timing
Improved profit retention with minimal user intervention
This setup is ideal for semi-automated swing scalping within structured trend conditions.
📎 User Controls:
All percentages are user-defined:
Trigger Threshold (%)
Trailing Margin (%)
Maximum Loss (%) before trigger
Trailing logic is active only after the trigger level is reached. One position at a time (pyramiding=0).
⚠️ Disclaimer:
This strategy is not financial advice. While historical performance is promising, future results are not guaranteed.
Always test in a simulated environment before deploying real capital. Use proper position sizing and risk management.


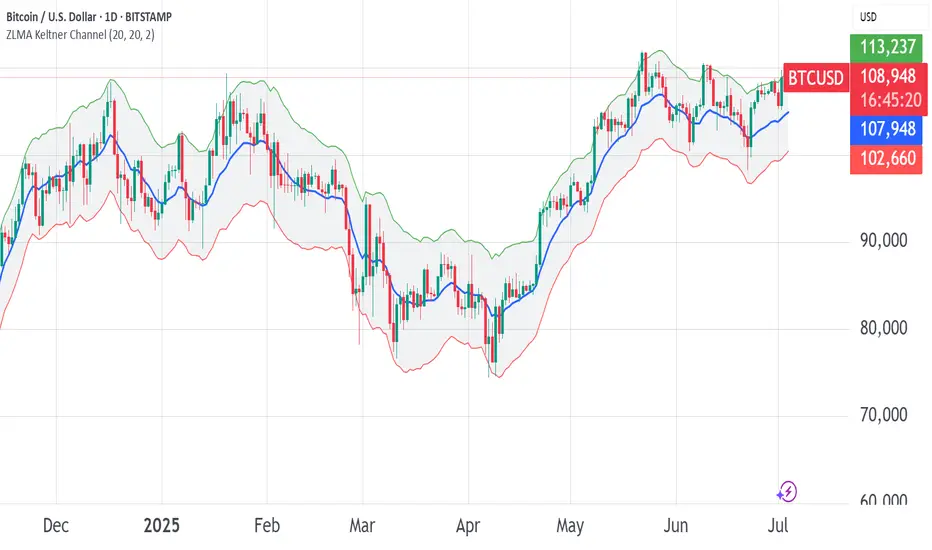
ZLMA Keltner ChannelThe ZLMA Keltner Channel uses a Zero-Lag Moving Average (ZLMA) as the centerline with ATR-based bands to track trends and volatility.
The ZLMA’s reduced lag enhances responsiveness for breakouts and reversals, i.e. it's more sensitive to pivots and trend reversals.
Unlike Bollinger Bands, which use standard deviation and are more sensitive to price spikes, this uses ATR for smoother volatility measurement.
Background:
Built on John Ehlers’ lag-reduction techniques, this indicator adapts the classic Keltner Channel for dynamic markets. It excels in trending (low-entropy) markets for breakouts and range-bound (high-entropy) markets for reversals.
How to Read:
ZLMA (Blue): Tracks price trends. Above = bullish, below = bearish.
Upper Band (Green): ZLMA + (Multiplier × ATR). Cross above signals breakout or overbought.
Lower Band (Red): ZLMA - (Multiplier × ATR). Cross below signals breakout or oversold.
Channel Fill (Gray): Shows volatility. Narrow = low volatility, wide = high volatility.
Signals (Optional): Enable to show “Buy” (green) on upper band crossovers, “Sell” (red) on lower band crossunders.
Strategies: Trade breakouts in trending markets, reversals in ranges, or use bands as trailing stops.
Settings:
ZLMA Period (20): Adjusts centerline responsiveness.
ATR Period (20): Sets volatility period.
Multiplier (2.0): Controls band width.
If you are still confused between the ZLMA Keltner Channels and Bollinger Bands:
Keltner Channel (ZLMA): Uses ATR for bands, which smooths volatility and is less reactive to sudden price spikes. The ZLMA centerline reduces lag for faster trend detection.
Bollinger Bands: Uses standard deviation for bands, making them more sensitive to price volatility and prone to wider swings in high-entropy markets. Typically uses an SMA centerline, which lags more than ZLMA.
Multi-Tool Indicator v6This is a versatile technical analysis tool designed to help traders quickly assess market trends and momentum. It combines a customizable Moving Average (MA) with Relative Strength Index (RSI) signals to highlight key market conditions directly on the chart.
🔧 Key Features:
Configurable Moving Average (MA):
Supports SMA (Simple Moving Average) and EMA (Exponential Moving Average).
User-defined length to match your strategy.
Plotted directly on the price chart for trend tracking.
RSI-Based Signal Detection:
Uses RSI to detect overbought (above 70) and oversold (below 30) conditions.
Plots red/green triangle shapes above/below bars when these conditions occur.
Background Highlighting:
Changes chart background to red when overbought and green when oversold to improve visual clarity.
Alerts for Key RSI Events:
Alerts can be triggered when RSI enters overbought or oversold zones.
Useful for automated strategy notifications.
MA Value Labels:
A label shows the current value of the MA near the most recent bar.

EMA Cross IndicatorHow to Use the Indicator
Interpreting Signals:
Bullish Crosses: Look for green triangles below the bars, indicating a shorter EMA crossing above a longer EMA (e.g., EMA 10 > EMA 20).
Bearish Crosses: Look for red triangles above the bars, indicating a shorter EMA crossing below a longer EMA (e.g., EMA 10 < EMA 20).
Setting Alerts: In TradingView, click the "Alerts" icon, select the condition (e.g., "Bullish Cross: EMA50 > EMA100"), and configure your notification preferences (e.g., email, popup).
Customization: Adjust the EMA lengths in the indicator settings to experiment with different periods if desired.
This indicator is designed to work on any timeframe and asset, including BTC/USDT, which you use to gauge trends for other coins. Let me know if you'd like to tweak it further or add more features!


Alım Algoritması (EMA + RSI + MACD + ATR + Pozisyon Takibi)//@version=5
indicator("Alım Algoritması (EMA + RSI + MACD + ATR + Pozisyon Takibi)", overlay=true)
// === INPUTS ===
ema1_len = input.int(21, title="EMA 1")
ema2_len = input.int(50, title="EMA 2")
ema3_len = input.int(100, title="EMA 3")
rsi_len = input.int(14, title="RSI Length")
atr_len = input.int(14, title="ATR Length")
macd_fast = input.int(12, title="MACD Fast")
macd_slow = input.int(26, title="MACD Slow")
macd_signal = input.int(9, title="MACD Signal")
max_distance_pct = input.float(5.0, title="Max EMA Distance %", step=0.1)
// === CALCULATIONS ===
ema1 = ta.ema(close, ema1_len)
ema2 = ta.ema(close, ema2_len)
ema3 = ta.ema(close, ema3_len)
avg_ema = (ema1 + ema2 + ema3) / 3
distance_pct = math.abs(close - avg_ema) / avg_ema * 100
ema_near = distance_pct <= max_distance_pct
basis = ta.sma(close, 20)
dev = ta.stdev(close, 20)
upper = basis + 2 * dev
lower = basis - 2 * dev
width = (upper - lower) / basis
is_range = width < 0.12 // %5'ten dar bant
rsi = ta.rsi(close, rsi_len)
rsi_trend = ta.sma(rsi, 5)
rsi_up = rsi > rsi_trend
= ta.macd(close, macd_fast, macd_slow, macd_signal)
ema1_cross = ta.crossover(close, ema1) or ta.crossover(close, ema2) or ta.crossover(close, ema3)
ema_recent_cross = ta.barssince(ema1_cross) < 5
// === BUY SIGNAL ===
//buy_signal = ema_near and ema_recent_cross and
// macdLine > signalLine and hist > 0 and
// rsi > 45 and rsi < 65 and rsi_up
buy_signal = not is_range and ema_near and ema_recent_cross and
macdLine > signalLine and hist > 0 and
rsi > 45 and rsi < 65 and rsi_up
//buy_signal = not is_range and ema_near and ema_recent_cross and
// macdLine > signalLine and hist > 0 and
// rsi > 45 and rsi < 65 and rsi_up
// === POSITION LOGIC ===
var bool in_position = false
var float entry_price = na
var float stop_loss = na
var float take_profit_1 = na
var float take_profit_2 = na
atr = ta.atr(atr_len)
// Koşullar
new_buy = buy_signal and not in_position
// SL ve TP seviyeleri hesaplama
new_sl = close - 1.5 * atr
new_tp1 = close + 2.0 * atr
new_tp2 = close + 3.5 * atr
// Pozisyon açma
if new_buy
in_position := true
entry_price := close
stop_loss := new_sl
take_profit_1 := new_tp1
take_profit_2 := new_tp2
label.new(bar_index, low, "BUY", style=label.style_label_up, color=color.green, textcolor=color.white)
sl_hit = in_position and low <= stop_loss
tp1_hit = in_position and high >= take_profit_1
tp2_hit = in_position and high >= take_profit_2
// Pozisyon kapama sinyali
if sl_hit
in_position := false
//label.new(bar_index, low, "SL", style=label.style_label_down, color=color.red, textcolor=color.white)
if tp2_hit
in_position := false
//label.new(bar_index, high, "TP2", style=label.style_label_down, color=color.rgb(209, 34, 222), textcolor=color.white)
else if tp1_hit
in_position := false
//label.new(bar_index, high, "TP1", style=label.style_label_down, color=color.rgb(209, 34, 222), textcolor=color.white)
// === PLOT ===
// Sadece BUY, SL ve TP seviyeleri çizilir
plot(in_position ? stop_loss : na, title="Stop Loss", color=color.red, style=plot.style_linebr)
//plot(in_position ? take_profit_1 : na, title="TP1", color=color.rgb(209, 34, 222), style=plot.style_linebr)
//plot(in_position ? take_profit_2 : na, title="TP2", color=color.rgb(209, 34, 222), style=plot.style_linebr)

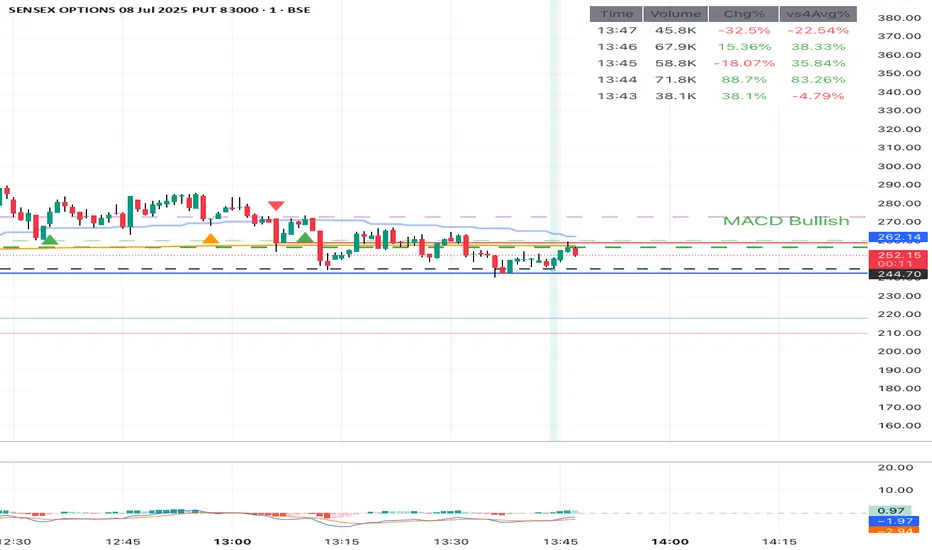
MACD Trend StatusOverview:
The Dynamic MACD Trend Status indicator is a sophisticated yet easy-to-interpret tool designed to provide instant, color-coded insights into the current MACD momentum and trend strength directly on your chart. Unlike traditional MACD indicators that clutter your main price panel, this indicator distills complex MACD calculations into a single, prominent text label, ideal for quick confirmations and fast-paced trading.
It features two distinct logic modes, allowing you to customize its sensitivity and confirmation level, making it adaptable to various market conditions and trading styles.
Key Features & How It Works:
Two Selectable Logic Modes:
This indicator offers a unique dropdown setting (Logic Selection) to switch between two powerful MACD interpretation algorithms:
a) Option 3 (Robust) - (Default)
This is the most stringent and reliable mode, designed to filter out market noise and highlight only strong, accelerating trends. It declares a "Bullish" or "Bearish" status when ALL of the following conditions are met:
Bullish: MACD Line is above Signal Line AND MACD Histogram is positive AND MACD Histogram is increasing (momentum is accelerating) AND both MACD Line and Signal Line are above the Zero Line (confirming an overall uptrend).
Bearish: MACD Line is below Signal Line AND MACD Histogram is negative AND MACD Histogram is decreasing (momentum is accelerating) AND both MACD Line and Signal Line are below the Zero Line (confirming an overall downtrend).
Neutral: If none of the above strong conditions are met, indicating sideways movement, weakening momentum, or a transition phase.
b) Option 4 (Simplified + Enhanced)
This mode offers a more responsive signal while still providing a clear distinction for exceptionally strong moves. It determines status based on:
"MACD Bullish +" (Super Bullish): If all the rigorous conditions of "Option 3 (Robust) - Bullish" are met. This provides an immediate visual cue of extreme bullish strength within the simpler logic.
"MACD Bearish +" (Super Bearish): If all the rigorous conditions of "Option 3 (Robust) - Bearish" are met. This highlights exceptional bearish strength.
"MACD Bullish": MACD Line is above Signal Line AND MACD Histogram is positive (basic bullish momentum).
"MACD Bearish": MACD Line is below Signal Line AND MACD Histogram is negative (basic bearish momentum).
"MACD Neutral": If none of the above conditions are met.
Instant Color-Coded Status:
The indicator provides clear visual feedback through dynamic text colors:
Green: "MACD Bullish" (Standard Bullish)
Red: "MACD Bearish" (Standard Bearish)
Gray: "MACD Neutral" (Choppy/Unclear)
Blue: "MACD Bullish +" (Enhanced Strong Bullish - when using Option 4)
Fuchsia/Purple: "MACD Bearish +" (Enhanced Strong Bearish - when using Option 4)
(Note: Colors for "+" signals are customizable in the code if you wish)
Unobtrusive Display:
The status is displayed in a transparent, discreet table positioned at the middle-right of your main chart panel. This avoids cluttering the top corners or the indicator sub-panel, keeping your price action clear.
Ideal Use Cases:
Quick Confirmation: Rapidly confirm your trade ideas with a glance at the MACD's underlying momentum.
Scalping & Day Trading: The instant visual feedback is invaluable for fast-paced short-term strategies.
Momentum Filtering: Use it to filter trades, ensuring you're entering when MACD momentum is in your favor.
Complementary Tool: Designed to work hand-in-hand with your primary analysis (price action, support/resistance, other indicators). It's not intended as a standalone signal but as a powerful re-confirmation tool.
Customization Options:
MACD Settings: Adjust Fast Length, Slow Length, and Signal Length.
Logic Selection: Toggle between "Option 3 (Robust)" and "Option 4 (Simplified)" for different sensitivities.
Show Status Text: Toggle the visibility of the status text On/Off.
Text Size: Choose from "tiny", "small", "normal", "large", "huge" for optimal visibility.
Important Disclaimer:
This indicator is a technical analysis tool and should be used as part of a comprehensive trading strategy. It is not financial advice. Trading in financial markets involves substantial risk, and you could lose money. Always perform your own research and risk management.
yuchenseo 15min intervalsHourly Candle Behaviour Indicator
- 0-15min look for continuation
- 15-30min look for reversal
- 30-45min look for reversal

Volatility Flow X – MACD + Ichimoku Hybrid Trail🌥️ Volatility Flow X – Hybrid Ichimoku Cloud Explained
This strategy combines Ichimoku’s cloud structure with real-time price position.
Unlike standard Ichimoku coloring, the cloud here reflects both trend direction and price behavior.
🔍 What the Cloud Colors Mean
🟢 Green Cloud
Senkou A > Senkou B
Price is above the cloud
→ Indicates strong uptrend; suitable for long entries
🔴 Red Cloud
Senkou A < Senkou B
Price is below the cloud
→ Indicates strong downtrend; suitable for short entries
⚪ Gray Cloud
Price contradicts trend, or price is inside the cloud
→ Represents indecision, low momentum; best to avoid entries
⚙️ Technical Features
Ichimoku Components: Tenkan-sen, Kijun-sen, Senkou Span A & B, Chikou Span
Cloud Transparency: 30%
MACD Filter: Optional momentum confirmation (customizable)
Trailing Stop: Optional dynamic trailing stop after trigger level
Directional Control: Long and short trailing rules can be set independently
📚 References
Ichimoku Charts – Nicole Elliott
Algorithmic Trading – Ernie Chan
TradingView Pine Script and hybrid trend models
⚠️ Disclaimer
This strategy is for educational and backtesting purposes only.
It is not financial advice. Always test thoroughly before applying to real trades.

Wave 2 Flat Detection - B Breaks A High, C Breaks A Low//@version=5
indicator("Wave 2 Flat Detection - B Breaks A High, C Breaks A Low", overlay=true)
// === Parameters ===
wave1_len = 10 // length of wave 1
a_len = 5 // candles to look for Wave A
b_len = 3 // candles to look for Wave B
c_len = 3 // candles to look for Wave C
// === Detect Wave 1 (upward impulse) ===
wave1_start = low
wave1_end = high
wave1_valid = wave1_end > wave1_start * 1.05 // 5% move up
// === Wave A ===
a_start = high // assumed wave 1 top
a_end = low // correction low (Wave A end)
wave_a_valid = a_end < a_start
// === Wave B ===
b_high = high
wave_b_valid = b_high > a_start // B breaks above A's high
// === Wave C ===
c_low = low
wave_c_break = c_low < a_end // C breaks below A's low
// === Final Condition ===
flat_pattern_confirmed = wave1_valid and wave_a_valid and wave_b_valid and wave_c_break
// === Plot + Alert ===
plotshape(flat_pattern_confirmed, title="Flat Wave 2 Detected", location=location.belowbar, color=color.red, style=shape.labelup, text="C↓")
alertcondition(flat_pattern_confirmed, title="Wave C Breaks Below A", message="Wave C broke below Wave A low — Flat correction confirmed, watch for Wave 3")


Spot Nachkauf-Zonen High TF (RSI + BB)**Spot Buy/Sell Zones High TF Indicator (RSI + Bollinger Bands + Trend & Volume Filters)**
This is an overlay indicator for TradingView that highlights optimal buy and sell areas on a higher timeframe (e.g. Daily, Weekly) while you view a lower timeframe chart. It combines volatility, momentum, trend and volume checks to reduce false signals.
---
### Key Features
* **Higher-Timeframe Calculations**
All indicators (Bollinger Bands, RSI, moving averages, volume) use data from a user-selected timeframe (for example “D” for daily or “W” for weekly).
* **Bollinger Bands**
* Middle line: Simple Moving Average (SMA) over N periods
* Upper/Lower bands: ±M × standard deviation
* Semi-transparent fill between the bands for quick visual reference
* **RSI Momentum**
* Classic 14-period RSI with adjustable overbought (e.g. 70) and oversold (e.g. 30) levels
* **Buy** when RSI crosses up out of oversold and price touches or goes below the lower Bollinger Band
* **Sell** when RSI crosses down out of overbought and price touches or goes above the upper Bollinger Band
* **Trend Filter (Optional)**
* Higher-TF SMA (default 200 periods) plotted in orange
* Signals only fire when price is above the SMA (for buys) or below (for sells) to align with the main trend
* **Volume Filter (Optional)**
* Compares current higher-TF volume against its SMA
* Signals require volume to exceed a user-set multiplier of average volume, ensuring real market participation
* **Visual Signals**
* Green triangles below bars mark buy zones; red triangles above bars mark sell zones
* Light green background highlights active buy areas
* **Built-In Alerts**
* Two alert conditions (“Buy Signal” and “Sell Signal”) ready to be used in TradingView’s Alert dialog
* Customizable alert messages include ticker and timeframe
---
### Inputs
| Setting | Default | Purpose |
| ------------------------- | ------- | ------------------------------------------------ |
| **Calculation Timeframe** | D | Higher timeframe for all calculations |
| **BB Periods** | 20 | Length of SMA for Bollinger middle line |
| **BB Std-Dev Multiplier** | 2.0 | Number of standard deviations for the bands |
| **RSI Periods** | 14 | Length of the RSI calculation |
| **Overbought / Oversold** | 70 / 30 | RSI thresholds for signal generation |
| **Enable Trend Filter** | true | Use higher-TF SMA to confirm trend direction |
| **Trend MA Periods** | 200 | SMA length for the trend filter |
| **Enable Volume Filter** | true | Require above-average volume to validate signals |
| **Volume MA Periods** | 20 | SMA length for volume filter |
| **Volume Multiplier** | 1.2 | How many times above average volume is needed |
---
### How to Use
1. **Add the Script**: Paste the Pine code into TradingView’s Pine Editor and save.
2. **Adjust Settings**: Choose your higher timeframe (“D”, “W”, etc.) and tweak BB, RSI, trend, and volume parameters.
3. **Activate Alerts**: In the Alerts panel, select the “Buy Signal” or “Sell Signal” alert condition.
4. **Interpret Signals**:
* A green triangle + green background = suggested buy zone
* A red triangle = suggested sell zone
This setup gives you clear, rule-based entry and exit areas by filtering noise and confirming market strength on a higher timeframe.

OBV-ROC Tilson Trend (Delta Toggle)IT Tracks Change between one fast OBV and One Slow OBV. Best for trend cfolowing.

Holy GrailThis is a long-only educational strategy that simulates what happens if you keep adding to a position during pullbacks and only exit when the asset hits a new All-Time High (ATH). It is intended for learning purposes only — not for live trading.
🧠 How it works:
The strategy identifies pullbacks using a simple moving average (MA).
When price dips below the MA, it begins monitoring for the first green candle (close > open).
That green candle signals a potential bottom, so it adds to the position.
If price goes lower, it waits for the next green candle and adds again.
The exit happens after ATH — it sells on each red candle (close < open) once a new ATH is reached.
You can adjust:
MA length (defines what’s considered a pullback)
Initial buy % (how much to pre-fill before signals start)
Buy % per signal (after pullback green candle)
Exit % per red candle after ATH
📊 Intended assets & timeframes:
This strategy is designed for broad market indices and long-term appreciating assets, such as:
SPY, NASDAQ, DAX, FTSE
Use it only on 1D or higher timeframes — it’s not meant for scalping or short-term trading.
⚠️ Important Limitations:
Long-only: The script does not short. It assumes the asset will eventually recover to a new ATH.
Not for all assets: It won't work on assets that may never recover (e.g., single stocks or speculative tokens).
Slow capital deployment: Entries happen gradually and may take a long time to close.
Not optimized for returns: Buy & hold can outperform this strategy.
No slippage, fees, or funding costs included.
This is not a performance strategy. It’s a teaching tool to show that:
High win rate ≠ high profitability
Patience can be deceiving
Many signals = long capital lock-in
🎓 Why it exists:
The purpose of this strategy is to demonstrate market psychology and risk overconfidence. Traders often chase strategies with high win rates without considering holding time, drawdowns, or opportunity cost.
This script helps visualize that phenomenon.

NEXGEN ADXNEXGEN ADX
NEXGEN ADX – Advanced Trend Strength & Directional Indicator
Purpose:
The NEXGEN ADX is a powerful trend analysis tool developed by NexGen Trading Academy to help traders identify the strength and direction of market trends with precision. Based on the Average Directional Index (ADX) along with +DI (Positive Directional Indicator) and –DI (Negative Directional Indicator), this custom indicator provides a reliable foundation for both trend-following strategies and trend reversal setups.

Volatility Flow X | Dual Trend Strategy [VWMA+SMA+ADX]📌 Strategy Title
Volatility Flow X | Dual Trend Strategy
🧾 Description
🚀 Strategy Overview
Volatility Flow X is a dual-directional trading strategy that combines Volume-Weighted MA (VWMA) for momentum, Simple MA (SMA) for trend direction, ADX for trend strength filtering, and ATR-based volatility cloud for dynamic support/resistance zones.
It is designed specifically for high-volatility assets like BTC/USD on intraday timeframes such as 15 min, 30 min, and 1 hour — offering both breakout and trend-following opportunities.
🔬 Technical Components and Sources
1. VWMA (Volume-Weighted Moving Average)
Captures volume-weighted momentum shifts.
📚 Kirkpatrick & Dahlquist (2010) — “Technical Analysis”
2. SMA (Simple Moving Average)
Used as a baseline trend direction validator.
📚 Ernie Chan — “Algorithmic Trading” (2013)
3. ADX (Average Directional Index)
Filters out low-conviction signals based on trend strength.
📚 J. Welles Wilder (1978) — ADX in directional movement systems
4. ATR Cloud (Volatility Envelope)
Creates upper and lower dynamic bands using ATR to visualize trend pressure.
📚 Zunino et al. (2017) — Fractal volatility behavior in Bitcoin markets
🧠 Key Features
✅ 3 configurable Long signal modes
✅ 3 configurable Short signal modes
✅ Manually switchable signals for flexibility
✅ Auto-calculated TP/SL using ATR and risk/reward ratio
✅ ADX filter to avoid choppy trends
✅ Visual cloud overlay for support/resistance
✅ Suitable for scalping and short-term swing trading
⚙️ Recommended Settings (for BTC/USDT – 30min)
VWMA Length = 18
SMA Length = 50
ATR Length = 14, Multiplier = 2.5
Risk-Reward Ratio = 1.5
ADX Length = 14, Threshold = 18, Lookback = 4
⚠️ Disclaimer
This strategy is not financial advice. Please backtest and understand the risks before using it in live markets.

MVWAP 5/21/50 + LWMA 400Moving vwap de 5,21,50 y media movil ponderada de 400
se puede utilizar con cruces


Relative Volume Strategy📈 Relative Volume Strategy by GabrielAmadeusLau
This Pine Script strategy combines volume-based momentum analysis with price action filtering, breakout detection, and dynamic stop-loss/take-profit logic, allowing for highly adaptable long and short entries. It is particularly suited for traders looking to identify reversals or continuation setups based on relative volume spikes and candle behavior.
🧠 Core Concept
At its core, this strategy uses a Relative Volume %R oscillator, comparing the current volume to its historical range using a Williams %R-like calculation. The oscillator is paired with dual moving average filters (Fast & Slow) to identify when volume is expanding or contracting.
Entries are further refined using a configurable price action filter based on the structure of bullish or bearish candles:
Simple: Basic up/down bar
Filtered: Range-based strength confirmation
Aggressive: Momentum-based breakout
Inside: Reversal bar patterns
Combinations of the above can be toggled for both long and short entries.
⚙️ Configurable Features
Trade Direction Control: Choose between Long Only, Short Only, or Both.
Directional Bar Modes: Set different conditions for long and short bar types (Simple, Filtered, Aggressive, Inside).
Breakout Filter: Optional filter to exclude trades near 5-bar highs/lows to avoid poor R/R trades.
Stop Loss & Take Profit System:
ATR-based dynamic SL/TP.
Configurable multipliers for both SL and TP.
Timed Exit: Optional bar-based exit after a fixed number of candles.
Custom Volume MA Smoothing: Choose from various smoothing algorithms (SMA, EMA, JMA, T3, Super Smoother, etc.) for both fast and slow volume trends.
Relative Volume Threshold: Minimum %R level for trade filtering.
📊 Technical Indicators Used
Relative Volume %R: A modified version of Williams %R, calculated on volume.
Dual Volume MAs: Fast and Slow MAs for volume trends using user-selected smoothing.
ATR: Average True Range for dynamic SL/TP calculation.
Breakout High/Low: 5-bar breakout thresholds to avoid late entries.
🚀 Trade Logic
Long Entry:
Volume > Fast MA > Slow MA
Relative Volume %R > Threshold
Price passes long directional filter
Optional: below recent breakout high
Short Entry:
Volume < Fast MA < Slow MA
Relative Volume %R < 100 - Threshold
Price passes short directional filter
Optional: above recent breakout low
Exits:
After N bars (configurable)
ATR-based Stop Loss / Take Profit if enabled
📈 Visualization
Orange Columns: Relative Volume %R
Green Line: Fast Volume MA
Red Line: Slow Volume MA
💡 Use Case
Ideal for:
Reversal traders catching capitulation or accumulation spikes
Momentum traders looking for volume-confirmed trends
Quantitative strategy developers wanting modular MA and price action filter logic
Intraday scalpers or swing traders using relative volume dynamics
Created by: GabrielAmadeusLau
License: Mozilla Public License 2.0
🔗 mozilla.org
