Market Shift Levels [ChartPrime]Market Shift Levels
This indicator detects trend shifts and visualizes key market structure turning points using Hull Moving Average logic. It highlights potential areas of support and resistance where price is likely to react, empowering traders to spot early trend transitions.
Market Shift Levels are horizontal zones that mark the moment of a directional change in market behavior. These shifts are based on crossovers between two smoothed Hull Moving Averages (HMA), allowing the indicator to detect potential reversals with minimal lag.
Once a shift is detected:
A dashed horizontal Market Shift Level is plotted at the low (for bullish shift) or high (for bearish shift) of the candle.
These levels often become key reaction points during pullbacks and trend retests.
Volume or price labels are added when price wicks into these levels, helping traders gauge the strength of rejection or acceptance.
⯁ KEY FEATURES
Uses HMA-based logic to detect when price momentum shifts.
Plots clean Market Shift Levels (MSLs) that act as dynamic support and resistance.
Automatically colors bars and candles based on the price positioning relative to levels.
Labels wick-based retests with either:
Volume data of the 3-bar cluster (default).
Price level if toggled.
⯁ HOW TO USE
Look for trend shifts where the HMA crossover triggers a new level — this marks a possible structural pivot .
Use the horizontal level as a dynamic support or resistance zone — especially when price returns with wick rejections.
Watch for volume labels near the level — higher values signal stronger rejection and potential continuation.
Combine with confluence tools like Smart Money concepts or Fibonacci levels for added edge.
⯁ EXAMPLE SETUPS
After a bullish shift, wait for price to return and wick into the level — if volume spikes and candle closes strong, it’s a retest confirmation entry .
After a bearish shift, bearish wick rejections with volume may signal short re-entry zones .
⯁ CONCLUSION
The Market Shift Levels indicator offers a visual and data-backed approach to spotting trend reversals and critical retest zones. It’s a simple yet powerful tool to structure your trades around objective, repeatable market behavior — all in real-time.
Trend Analysis

IDKFAIDKFA - Advanced Order Blocks & Volume Profile with Market Structure Analysis
Why IDKFA?
Named after the legendary DOOM cheat code that gives players "all weapons and full ammo," IDKFA provides traders with a comprehensive arsenal of market analysis tools. Just as the cheat code arms players with everything needed for combat, this indicator equips traders with essential market structure tools: Order Blocks, Volume Profile, LVN/HVN areas, Fibonacci retracements, and intelligent buy/sell signals - all in one unified system.
Core Features
Order Blocks Detection
Automatically identifies institutional order blocks using pivot high/low analysis
Extends blocks dynamically until price interaction occurs
Bullish blocks (demand zones) and bearish blocks (supply zones)
Customizable opacity and extend functionality
Advanced Volume Profile
Real-time volume profile calculation for multiple session types
Point of Control (POC), Value Area High (VAH), and Value Area Low (VAL)
Mode 1: Side-by-side bull/bear volume display
Mode 2: Overlapped volume display with percentage analysis
Shows buying vs selling pressure at each price level
LVN/HVN Area Detection
Low Volume Nodes (LVN): Areas below VAL where price moves quickly
High Volume Nodes (HVN): Areas above VAH with strong resistance
NPOC (Naked Point of Control): Single print areas within Value Area
Volume-based gradient coloring shows relative activity levels
Smart Fibonacci Retracements
Auto-detects trend direction for proper fibonacci orientation
Dynamic color coding: Red levels in uptrends, Gold in downtrends
Special 88.6% level turns lime green in downtrends
Key levels: 23.6%, 38.2%, 50%, 61.8%, 65%, 78.6%, 88.6%
Intelligent Signal System
Works best on higher timeframes
Identifies high-probability reversal setups at key levels
Buy signals: Large bearish rejection followed by bullish reclaim
Sell signals: Large bullish rejection followed by bearish breakdown
Signals only trigger near significant support/resistance areas
Signal Analysis & Usage Guidelines
Buy Signal Mechanics
The buy signal triggers when:
Previous candle shows significant bearish movement (minimum ATR multiplier)
Current candle reclaims a configurable percentage of the previous candle's range
Price is near a key support level (order blocks, fibonacci, volume levels)
Sell Signal Mechanics
The sell signal triggers when:
Previous candle shows significant bullish movement (minimum ATR multiplier)
Current candle rejects below a configurable percentage of the previous candle's range
Price is near a key resistance level (order blocks, fibonacci, volume levels)
When to TAKE Signals
High Probability Buy Signals:
Signal appears AT or BELOW the VAL (Value Area Low)
Signal occurs at bullish order block confluence
Price is in LVN area below VAL (momentum acceleration zone)
Signal aligns with fibonacci 61.8% or 78.6% support
Multiple session POC levels provide support confluence
Previous session's VAL acting as current support
High Probability Sell Signals:
Signal appears AT or ABOVE the VAH (Value Area High)
Signal occurs at bearish order block confluence
Price is in HVN area above VAH (heavy resistance zone)
Signal aligns with fibonacci 61.8% or 78.6% resistance
Multiple session POC levels provide resistance confluence
Previous session's VAH acting as current resistance
When to AVOID Signals
Avoid Buy Signals When:
Signal appears ABOVE the VAH (buying into resistance)
Price is in HVN red zones (high volume resistance areas)
No clear support structure below current price
Volume profile shows heavy selling pressure (high bear percentages)
Signal occurs during low-volume periods between major sessions
Multiple bearish order blocks exist below current price
Avoid Sell Signals When:
Signal appears BELOW the VAL (selling into support)
Price is in LVN green zones (momentum could continue)
No clear resistance structure above current price
Volume profile shows heavy buying pressure (high bull percentages)
Signal occurs during Asian session ranges without clear direction
Multiple bullish order blocks exist above current price
Volume Profile Context for Signals
Understanding Bull/Bear Percentages:
70%+ Bull dominance at a level = Strong support expected
70%+ Bear dominance at a level = Strong resistance expected
50/50 Split = Neutral zone, less predictable
Use percentages to gauge conviction behind moves
POC (Point of Control) Interactions:
Signals above POC in uptrend = Higher probability
Signals below POC in downtrend = Higher probability
Signals against POC bias require extra confirmation
POC often acts as magnetic level for price return
Trading Strategies
Strategy 1: VAL/VAH Bounce Strategy
Wait for price to approach VAL (support) or VAH (resistance)
Look for signal confirmation at these critical levels
Enter with tight stops beyond the Value Area
Target opposite boundary or next session's levels
Strategy 2: Order Block + Volume Confluence
Identify order block alignment with VAL/VAH
Wait for signal within the confluence zone
Enter on signal with stop beyond order block
Use LVN areas as acceleration zones for targets
Strategy 3: LVN/HVN Strategy
LVN (Green) Areas: "Go Zones" - expect quick price movement through low volume
HVN (Red) Areas: "Stop Zones" - expect resistance and potential reversals
NPOC Areas: "Fill Zones" - price often returns to fill single print gaps
Strategy 4: Multi-Session Analysis
Use Daily/Weekly for major structure context
Use 4H for intermediate levels
Use 1H for precise entry timing
Ensure all timeframes align before taking signals
Strategy 5: Fibonacci + Volume Profile
Buy signals at 61.8% or 78.6% fibonacci near VAL
Sell signals at 61.8% or 78.6% fibonacci near VAH
Use 88.6% level as final support/resistance before major moves
50% level often aligns with POC for confluence
Signal Quality Assessment
Grade A Signals (Highest Probability):
Signal at VAL/VAH with order block confluence
Fibonacci level alignment (61.8%, 78.6%)
Volume profile shows 70%+ dominance in signal direction
Multiple timeframe structure alignment
Signal occurs during high-volume sessions (London/NY)
Grade B Signals (Moderate Probability):
Signal near POC with some confluence
Fibonacci 50% or 38.2% alignment
Mixed volume profile readings (50-70% dominance)
Some timeframe alignment present
Signal during overlap sessions
Grade C Signals (Lower Probability):
Signal with minimal confluence
Weak fibonacci alignment or none
Volume profile neutral or against signal
Conflicting timeframe signals
Signal during low-volume periods
Risk Management Guidelines
Position Sizing Based on Signal Quality:
Grade A: Standard position size
Grade B: Reduced position size (50-75%)
Grade C: Minimal position size (25%) or skip entirely
Stop Loss Placement:
Beyond order block boundaries
Outside Value Area (VAL/VAH)
Below/above fibonacci confluence levels
Account for session volatility ranges
Profit Targets:
First target: Opposite VAL/VAH boundary
Second target: Next session's key levels
Final target: Major order blocks or fibonacci extensions
Credits & Attribution
Original components derived from:
Market Sessions & Volume Profile by © Leviathan (Mozilla Public License 2.0)
Volume Profile elements inspired by @LonesomeTheBlue's volume profile script
Pivot Order Blocks by TradingWolf / © MensaTrader (Mozilla Public License 2.0)
Auto Fibonacci Retracement code (public domain)
Significant enhancements and modifications include:
Advanced LVN/HVN detection and visualization
Bull/Bear percentage analysis for Mode 2/3
Comprehensive alert system with market context
Integrated buy/sell signals at key levels
Performance optimizations and extended session support
Enhanced Mode 2/3 with percentage pressure analysis
Important Disclaimers
This indicator is a technical analysis tool designed for educational purposes. It does not provide financial advice, investment recommendations, or trading signals that guarantee profits. All trading involves substantial risk of loss, and past performance does not guarantee future results. Users should conduct their own research, understand the risks involved, and consider consulting with qualified financial advisors before making trading decisions. The signals and analysis provided are based on historical price patterns and volume data, which may not predict future market movements accurately.
Best Practices
Never trade signals blindly - always consider volume profile context
Wait for confluence between multiple tools before entering
Respect the Value Area - avoid buying above VAH or selling below VAL
Use session context - Asian ranges vs London/NY breakouts
Practice proper risk management - position size based on signal quality
Understand the bigger picture - use multiple timeframes for context
Remember: Like the IDKFA cheat code, having all the tools doesn't guarantee success. The key is learning to use them together effectively and understanding when NOT to take a signal is often more important than knowing when to take one.

ZYTX GKDDThe ZYTX High-Sell Low-Buy Indicator Strategy is a trend-following indicator that integrates multiple indicator resonances. It demonstrates the perfect performance of an automated trading robot, truly achieving the high-sell low-buy strategy in trading.

Navy Seal Trading - EdgarTrader📌 Navy Seal Trading – Asia, London, and NY Sessions
This indicator clearly displays the ranges of the Asia, London, and New York sessions, featuring:
✅ Full range visualization for each session
✅ Asia session high, low, and midline, with extended projection lines for precise reaction analysis
✅ Clean, minimalistic, and professional colors to keep your chart focused
🔷 Designed for the Navy Seal Trading community, focused on precision, discipline, and professional execution in the markets.
Use it to:
✔️ Mark liquidity zones
✔️ Identify Asia manipulation ranges
✔️ Prepare executions in London and NY with clear context
💡 Remember: Clarity in your zones gives you the confidence and discipline to execute like a true Navy Seal Trader.

LOVE JINSwing highs and lows are calculated based on the Dow Theory. The current trend is visually depicted.
Fibonacci charts are also drawn automatically.
Swing high and low lines for the higher time frame are also displayed to assist with trading.

OG SuperTrend + RSI Option + Enhanced ORB v2 © 2025This elite-level indicator combines the precision of SuperTrend and RSI signals with a mathematically accurate Opening Range Breakout (ORB) system and Previous Day High/Low zones, providing traders with real-time directional bias and sniper-level entry guidance.
🔍 Core Features:
✅ SuperTrend + RSI Buy/Sell Signals
✅ Real-time RSI Tracker (Top Right)
✅ Clean visual BUY/SELL labels on trend shifts
✅ Mathematically accurate 5-Min & 10-Min ORB Levels
✅ Live tracking of Previous Day High/Low Zones
✅ Clean chart layout with elite color-coded precision
✅ Instant alert conditions for both bullish and bearish setups
🔔 Recommended Use:
Combine with price action, candlestick patterns, and volume spikes
Ideal for options flow, intraday scalping, and breakout strategies
Works beautifully on 1m, 5m, 15m, and 1H timeframes
📊 Settings Include:
Adjustable ATR Period & SuperTrend Multiplier
Toggle Buy/Sell Labels
Customizable RSI Length

PRO Investing - Apex Engine FREE VERSION🧠 The Apex Engine: True Self-Tuning Intelligence
The biggest flaw in most indicators is that they rely on fixed settings. The Apex Engine solves this with two layers of adaptation:
Fully Auto-Adjustable Parameters: The engine first analyzes the volatility of the asset on your chart to derive its own optimal "Fast," "Mid," and "Slow" momentum lengths. You never have to guess settings again—it tunes itself for any instrument and timeframe.
Performance-Based Selection: It then uses statistical correlation to constantly measure which of its auto-tuned parameters is most in-sync with recent price action. It deploys the "winning" engine to generate signals, ensuring you're always using the most relevant analysis.
🎨 An All-in-One, Unified View
We've engineered this script to deliver maximum information with minimum clutter, all within a single indicator.
High-Confluence Buy/Sell Signals (▲/▼): Clear triangles appear directly on your chart. These are not simple crossovers; a signal is only plotted if it aligns with the dominant trend (above/below the 200MA) and the market is not choppy (ADX > 20).
Compact Oscillator Display: A "lite" version of the oscillator is displayed in a compact panel at the bottom of your price chart, showing the active Velocity line and its signal.
Transparent Dashboard: A small table in the corner shows you the engine's "brain" at work, displaying the real-time correlation scores and highlighting the active parameter.
Smart Background Coloring: The entire chart background changes color to give you immediate context:
🟩 Green: Bullish trend, favorable conditions for buys.
🟥 Red: Bearish trend, favorable conditions for sells.
⬛ Gray: Caution zone. Market is choppy or counter-trend.
This tool is designed to be the ultimate all-in-one solution for traders who value automation, clarity, and adaptive analysis.
If you find this indicator powerful, please leave a Boost 👍 and Follow our Profile for more professional-grade tools.
Disclaimer: All indicators are for analytical and educational purposes only. Trading involves significant risk. Always use your own judgment and risk management.

MTF Dashboard 9 Timeframes + Signals📊 MTF Dashboard — Multi-Timeframe Market Signal Matrix
Overview
The MTF Dashboard is an open-source Pine Script tool that enables traders to monitor key trend and momentum indicators across nine timeframes simultaneously—ranging from 1 minute to monthly—within a single unified view. This script is designed to support both discretionary and rules-based traders by improving efficiency in multi-timeframe analysis.
✅ Key Features
🔄 Multi-Timeframe Coverage
1m, 5m, 15m, 30m, 1H, 4H, 1D, 1W, 1M supported
Toggle individual timeframes on/off as per your trading style
📈 Built-in Technical Indicators
Trend Detection: Based on moving average (EMA) crossovers
Momentum Evaluation: Using Relative Strength Index (RSI)
MACD Status: Displays histogram trend
Volume Confirmation: Compares current volume to average
Confluence Rating: Optional logic combining indicator signals
🎨 Custom Dashboard Appearance
Supports light/dark chart modes
Adjustable panel positioning (Top/Bottom/Center Left/Right)
Multiple text size options
Color settings for bullish, bearish, and neutral signals
🔔 Optional Alerts
Alert conditions for confluence setups or trend changes (user must configure manually)
Use Cases
Identify trend alignment across short, medium, and long timeframes
Confirm entry or exit signals with high-confidence confluence
Detect early shifts in trend direction using EMA, RSI, MACD divergence
Quickly assess overall market sentiment in one glance
Limitations:
This script does not provide financial advice or guaranteed signals
Not intended for automatic trading or strategy backtesting
Users should interpret dashboard signals in the context of price structure and risk management
How to Use:
Add the script to your chart from your favorites
Open the settings panel:
Enable only the timeframes you want to analyze
Customize colors, position, and table layout
Optionally, right-click the script to configure alerts based on confluence or indicator changes
Technical Notes
EMA settings can be adjusted to match your trading system
Designed for visual clarity and performance with multiple timeframes enabled
Credits
This tool was developed to help the TradingView community simplify MTF analysis. Inspired by institutional-grade dashboards and adapted for manual charting use by retail traders.
Tags
#multi-timeframe #EMA #RSI #MACD #volume #confluence #dashboard #trend #momentum #open-source #pine-script #tradingview
License
Published as open-source under the TradingView community sharing model. Users are encouraged to modify, improve, and credit respectfully.

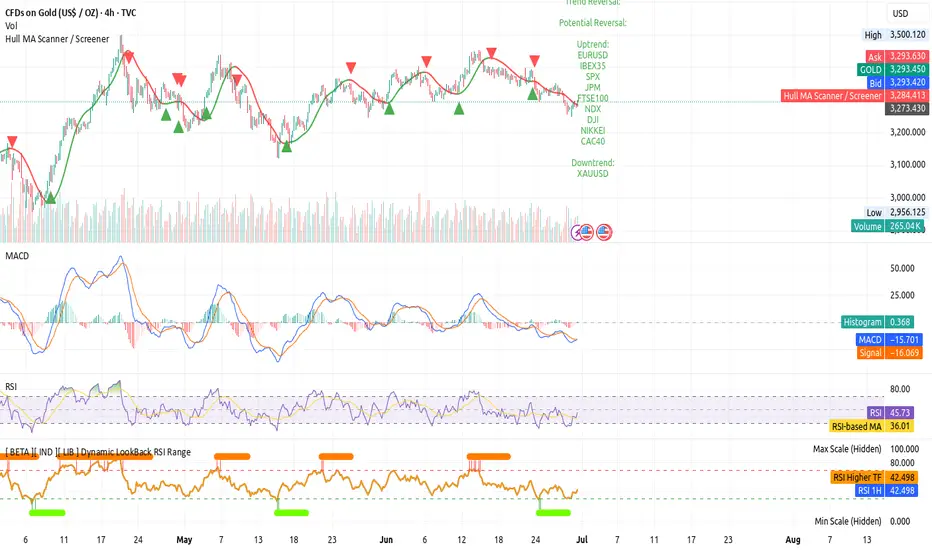
[ BETA ][ IND ][ LIB ] Dynamic LookBack RSI RangeGet visual confirmation with this indicator if the current range selected had been oversold or overbough in the latest n bars
DhanOne3 | Candle Regression LineThis indicator plots price candles based on linear regression of Open, High, Low, and Close values — providing a smooth and predictive visualization of price trends. It helps traders filter market noise, identify directional momentum, and spot potential trend reversals with visually clean, color-coded regression candles.

TrendBoxThis indicator is called "TrendBox," designed to help traders analyze daily price ranges using several technical indicators. Below is a breakdown of its functionality, purpose, and key components:
Purpose
The script overlays indicators on a chart to assess whether the price is above or below key levels and moving in a trend.
VIX-based expected range (index fund targeted)
- This helps calculate the expected dealers range based on VIX implications. You can expect to see ranges be bought on and sold on. Moving outside this range creates heightened volatility and most of the time a gamma squeeze follows.
VWAP (Volume Weighted Average Price)
- This allows you to understand the mid point or average pricing of the daily session. If you're paying a premium or getting a discount on the daily session.
Daily Market Open
- Identifying the market open price is a key level on a daily session and allows you to identify some level of intraday trend.
Daily 4-period VWMA
- This is a crucial role of our indicator and showing short term time frame bias. Seeing price move over the top of our daily 4 level establishes a short term trend and can be used as a distribution guide, closing positions when we see longer time frame candles close under it. Vice versa for shorting.
It also displays a status box (optional) summarizing whether the price is above or below these levels, helping traders quickly evaluate market conditions.

Pro Scalping Strategy [1Min | No Repaint | High Precision]Pro Scalping Strategy
Dual-Mode Precision Scalping System | EMA Trend + RSI + ATR | Non-Repainting
🔍 Overview
This indicator is a precision-engineered scalping tool optimized for lower timeframes (1–5 min), offering stable Buy/Sell signals without repainting.
Built on a robust trend-following framework, this system gives you the choice of two operating modes:
🔒 High Accuracy: Strict filters, fewer but stronger signals
⚡ More Signals: Looser filters, more frequent entries
🧠 How It Works
The logic is based on a multi-filter engine applied on closed candles only, ensuring non-repainting, clean, and confirmed entries.
⚙️ Technical Filters Used
1. EMA Trend Stack
Defines market trend using 3 EMAs (9, 21, 50)
Buy: EMA9 > EMA21 > EMA50
Sell: EMA9 < EMA21 < EMA50
2. EMA Crossover Filter
A confirmed crossover or crossunder is required from 2 candles back
Ensures trend momentum is validated before signal appears
3. EMA Slope Filter
Only accepts signals if mid EMA (EMA21) is sloping in trend direction
4. RSI Filter
Filters out signals when RSI is too extreme
RSI < overbought for Buy / RSI > oversold for Sell
5. ATR Filter
Confirms market has enough volatility
ATR must exceed a minimum threshold
✅ Modes Comparison
Feature High Accuracy Mode More Signals Mode
Min EMA Gap 0.1 0.05
Min ATR 0.2 0.1
RSI Range 30–70 25–75
Entry Frequency Lower Higher
Signal Quality Tighter + Stronger Looser + Flexible
🔔 Features
🔁 No repaint logic
⚙️ Adjustable settings with simple mode switch
⚡ Real-time alerts via alertcondition()
✅ Visual confirmation with BUY/SELL labels
💹 Suitable for scalping crypto, forex, gold, indices, and more
📌 Author: ALIP FX
“Success Elevated, Trade Smarter.”

Squeeze Breakout Pro🔥 What This Script Does
This is a Breakout Strength Scanner with Squeeze + Pattern Range + Volume Confirmation + Risk Management + Take Profits.
✅ Core Functions:
Squeeze Detector:
Finds low volatility zones using Bollinger Band width compression.
Marks them with a “Squeeze” label — this signals that a big move is likely coming soon.
Pattern Range Detection:
Automatically identifies recent pivot highs (resistance) and pivot lows (support) using the pivotLen.
Draws the current consolidation range visually with horizontal lines.
Breakout Confirmation:
Requires:
✅ A break above resistance or below support.
✅ Confirmed with above-average volume.
✅ Must occur while in a volatility squeeze.
Plots arrows:
🔼 Green Up Arrow = Confirmed Bullish Breakout.
🔽 Red Down Arrow = Confirmed Bearish Breakout.
Trade Management Built-In:
Stop Loss: Just beyond the opposite side of the pattern range.
Take Profits:
✅ TP1 = 1.5x risk.
✅ TP2 = 2x risk.
Position Size Calculator:
Based on your input account size (accountBal) and risk percentage (riskPct).
Shows how many contracts, shares, or units to buy/sell to risk exactly that % of your account.
Higher Timeframe Trend Filter:
Default is 4-hour trend filter (can be changed).
✅ Only shows if the higher timeframe trend is Bullish (EMA50 > EMA200) or Bearish.
Displayed on the dashboard.
📊 How to Use It Step-By-Step
🟧 1. Look for a Squeeze:
A “Squeeze” label will appear.
This means price is coiled tight — a breakout is likely.
🟩 2. Wait for a Breakout Arrow:
🔼 Green Arrow: Bullish breakout (price breaks resistance + volume confirms + squeeze active).
🔽 Red Arrow: Bearish breakout (price breaks support + volume confirms + squeeze active).
🟥 3. Check the Dashboard:
✅ Trend Bias: Should ideally match your breakout.
If the higher timeframe is Bullish, long breakouts have better odds.
If Bearish, short breakouts are higher probability.
✅ Vol Confirm: Will say “Yes” if the volume condition is met.
🏹 4. Manage the Trade (Auto Levels):
The script draws:
🔴 Stop Loss Line (below range for longs, above for shorts).
🟢 Take Profit 1 (1.5x risk).
🟢 Take Profit 2 (2x risk).
Use these as guidelines for exits.
💰 5. Use Position Size Display:
Check the TP and SL distances and the suggested position size based on your account balance and risk percentage.
🚀 Pro Tips for Maximum Success
✅ Use Trend Confluence:
Only trade long breakouts when the higher timeframe trend is Bullish (EMA50 > EMA200).
Only trade short breakouts when the higher timeframe trend is Bearish.
✅ Avoid Fakeouts:
If a breakout arrow forms but the candle closes far away from the pattern breakout — wait for a retest or confirmation.
Higher volume + clean breakout works better than low-volume squeezes.
✅ Best Timeframes:
4H to Daily: For swing trades.
15m to 1H: For intraday trades (adjust htf to "240" for 4H trend confirmation even on lower charts).
✅ Increase Win Rate:
Use this script with key support/resistance zones, weekly ranges, or fib retracements.
Breakouts that happen near macro key levels have the highest follow-through.
✅ Set Alerts:
Right-click the breakout arrow or use alertcondition() events in the script.
Set alerts for:
📈 Breakout UP
📉 Breakout DOWN
🏹 Squeeze Active (prep for breakout)
✅ Walk Away Once In:
Let TP1 or TP2 hit.
Or move stop to breakeven after TP1 hits for free runners.
🔥 What Makes This Script Powerful:
Combines price action (pattern range) + volatility squeeze + volume confirmation + trend bias + risk management.
Most traders use these individually. This does it all in one clean tool.
💎 Professional Edge:
This is the type of script that turns reactive trading into systematic trading. No guessing. Clean rules. Repeatable.

Advanced Day Separator with Future ProjectionsThe general indicator works on historical data, meaning they develop after the fact. The same is for indicators that show day separation. I was always forced to manually draw in vertical lines for the upcoming week. This indicator I built solves that issue by projecting vertical day separations for the upcoming week. Enjoy! :-)

FS JIMENEZ)FS JIMENEZ is a tactical breakout-retest strategy optimized for volatile price action and disciplined entries. It features:
• Swing structure validation
• Smart cooldown and price spacing logic
• SL compression after 3 bars
• Dynamic TP targeting based on candle strength and ATR
• Optional trailing SL via buffer multiplier
Built for traders seeking precision and controlled exposure across volati

CMF Tilson Scalper (1m Optimized)This indicator tracks CMF based on Tilson MA with buy zone above zero and Sell zone below zero

📈 DhanOne3 | RSI Colored Bars📈 DhanOne3 | RSI Colored Bars
This indicator visually highlights price bars based on RSI conditions. Green bars indicate overbought levels (RSI > 70), and red bars indicate oversold levels (RSI < 30). It helps traders quickly spot momentum shifts and potential reversal zones directly on the chart without opening a separate RSI panel.

Smoothed CMF-ROC Trend (Auto TF Adjust)This Trend is adjusted for multi time frame. It measure CMF and its rate of change. Changes colors if crosses the zero line

CMF Tilson Scalper (1m Optimized)Calculates CMF and smoothens it based on Tilson MA and then sets buy sone > 0 and sell zone < 0

📈 Linearity (ER 0–1) + ADRMAX % Table
This indicator combines two powerful concepts to help traders assess trend efficiency and intraday thrust strength:
🔹 1. Linearity (Kaufman Efficiency Ratio)
Measures how efficiently price has trended over a selected lookback period.
Values range from 0 to 1, where:
1.0 = perfectly trending market (no noise)
0.0 = completely choppy market (all noise)
Optional method: New High Persistence (fraction of bars in the period that hit a new high).
🔹 2. ADRMAX % (Average Daily Range Max as %)
Calculates the average of top % biggest green daily candles (measured as % range: (high - low) / low × 100) over a given lookback.
Projects this ADRMAX % above current lows as a thrust-level expectation.
Marks candles exceeding this dynamic threshold, helping identify unusual momentum.
📊 On-Chart Table Display
Real-time display of:
Linearity (0–1 scale)
ADRMAX %
Table is color-coded and position-customizable.
🛠️ Use Cases:
Trend-following filters: only act when ER > 0.75.
Thrust detection: breakout days with range > ADRMAX.
Adaptive entries: combine both for better timing.

Last 10 Sessions: High, Low, Pivot, GapLast 10 Sessions: High, Low, Pivot, Gap
This indicator highlights the most important price levels from the last 10 completed trading sessions to help intraday and swing traders quickly spot potential support, resistance, and price reaction zones.
Key Features:
Previous Highs and Lows : Visualize the high and low from each of the past 10 sessions. These are the most commonly tested breakout and reversal points for day trading.
Session Pivots: The classic pivot formula ((High + Low + Close) / 3) for each of the last 10 sessions, often acting as a market “equilibrium” or intraday magnet.
Gaps: Displays the difference between each day’s open and the previous session’s close (“gap”), showing sentiment shifts and possible gap fill targets.
Clean, Faded Visuals: All lines and labels are subtly faded so your chart remains clear and uncluttered, with each level labeled by how many sessions ago it occurred.
Full Customization: Instantly toggle any level type (High, Low, Pivot, Gap) ON/OFF in settings, extend lines to the right, and adjust their forward length.
Bulletproof Logic: Never throws runtime errors. Lines and labels only display when valid data is present.
How to Use:
Use recent highs/lows for breakout, breakdown, or mean reversion trades.
Spot where multiple levels from past sessions cluster together for high-probability reversal or breakout areas.
Watch pivots for intraday bias, and gaps for sentiment and possible fill plays.
Perfect for all intraday timeframes.
If you want a powerful yet minimal map of where price is most likely to react, this indicator is for you!
Developed by

XRP 4H UTC Edge | metaduro.com🔍 Strategy Overview
The XRP 16H Strong strategy is a time-based intraday trading system built specifically for XRP on the 4-hour chart. It focuses on the 16:00–20:00 UTC session, targeting short-term price moves during this high-activity window.
✅ Entry Condition
📅 Time = 16:00 UTC → A long position is opened at the start of the 16:00–20:00 UTC candle. This time period often captures late-day momentum and volatility.
❌ Exit Condition
📅 Time = 20:00 UTC → The position is closed at the start of the 20:00–00:00 UTC candle, realizing gains or cutting risk quickly.
📊 No Indicators Used
This strategy is purely based on time-of-day logic — no indicators like RSI, MACD, or moving averages are used. It aims to isolate specific market behavior tied to certain hours.
⚙️ Settings
• Timeframe: 4H (required for correct execution)
• Trade Type: Long only
• Position Size: 100% equity per trade (default setting, adjustable)
💡 Use Cases
• Ideal for testing statistically favorable trading hours
• Can be applied to other crypto assets or combined with filters (e.g., volume spikes, price action patterns)
• Simple foundation for more complex hybrid models (time + indicator-based)
📉 No Stop-Loss or Take-Profit Logic
This script does not use SL/TP. It's recommended to combine with external risk management or modify the code for tighter control.

Capitulation Candle Color✅ What It Does:
Candles turn bright green when the score ≥4 (i.e., multiple capitulation signals active).
Otherwise, candles keep their default coloring.
You can visually confirm extreme oversold conditions by seeing these green bars.
Moving averages and the lower Bollinger Band are displayed for context.
✅ How to Customize:
Adjust thresholds (e.g., make ATR threshold less strict).
Change the minimum score to trigger coloring (e.g., ≥3).
Use a different color (color.rgb(0,255,0) for neon green).
