ETH-BCH Strategy(Powered by BCH)Introducing ETH-BCH Strategy (Powered by BCH)
Unlock a new perspective on crypto trading with our innovative ETH-BCH Strategy, now specially optimized for the ETHUSDT 2-hour chart. Available exclusively on TradingView for a limited time, this strategy leverages the unique interplay between Bitcoin Cash (BCH), Ethereum (ETH), and Bitcoin (BTC) to identify high-probability trading opportunities—without relying on conventional single-asset signals.
Key Highlights:
Multi-Asset Analysis: Dynamically compares price movements and momentum between BCH, ETH, and BTC, seeking to capture relative strength and weakness across major cryptocurrencies.
Advanced Technical Filters: Incorporates a blend of classic and proprietary indicators, including:
Bollinger Bands for volatility-based entry and exit zones
Volume surges to confirm genuine market interest
Momentum oscillators for trend validation and overbought/oversold detection
Smart Entry & Exit Logic: Buy and sell conditions are designed to avoid noise and false signals, focusing on periods of significant divergence and market inflection points.
Risk Management Built-In: Includes timing filters to prevent overtrading and optimize entry and exit timing.
Visual Insights: Key indicator levels and signals are clearly plotted for intuitive chart-based decision-making.
The full algorithmic logic remains proprietary, ensuring a competitive edge for early adopters. Experience the performance and transparency of the strategy in action—without revealing the core code.
Try it now and see how cross-asset crypto analytics—tailored for the ETHUSDT 2-hour timeframe—can elevate your trading decisions.
Available as a protected script—contact us for access or more information.
Note: This strategy is for educational and informational purposes only. Past performance does not guarantee future results.
Trend Analysis

Active PMI Support/Resistance Levels [EdgeTerminal]The PMI Support & Resistance indicator revolutionizes traditional technical analysis by using Pointwise Mutual Information (PMI) - a statistical measure from information theory - to objectively identify support and resistance levels. Unlike conventional methods that rely on visual pattern recognition, this indicator provides mathematically rigorous, quantifiable evidence of price levels where significant market activity occurs.
- The Mathematical Foundation: Pointwise Mutual Information
Pointwise Mutual Information measures how much more likely two events are to occur together compared to if they were statistically independent. In our context:
Event A: Volume spikes occurring (high trading activity)
Event B: Price being at specific levels
The PMI formula calculates: PMI = log(P(A,B) / (P(A) × P(B)))
Where:
P(A,B) = Probability of volume spikes occurring at specific price levels
P(A) = Probability of volume spikes occurring anywhere
P(B) = Probability of price being at specific levels
High PMI scores indicate that volume spikes and certain price levels co-occur much more frequently than random chance would predict, revealing genuine support and resistance zones.
- Why PMI Outperforms Traditional Methods
Subjective interpretation: What one trader sees as significant, another might ignore
Confirmation bias: Tendency to see patterns that confirm existing beliefs
Inconsistent criteria: No standardized definition of "significant" volume or price action
Static analysis: Doesn't adapt to changing market conditions
No strength measurement: Can't quantify how "strong" a level truly is
PMI Advantages:
✅ Objective & Quantifiable: Mathematical proof of significance, not visual guesswork
✅ Statistical Rigor: Levels backed by information theory and probability
✅ Strength Scoring: PMI scores rank levels by statistical significance
✅ Adaptive: Automatically adjusts to different market volatility regimes
✅ Eliminates Bias: Computer-calculated, removing human interpretation errors
✅ Market Structure Aware: Reveals the underlying order flow concentrations
- How It Works
Data Processing Pipeline:
Volume Analysis: Identifies volume spikes using configurable thresholds
Price Binning: Divides price range into discrete levels for analysis
Co-occurrence Calculation: Measures how often volume spikes happen at each price level
PMI Computation: Calculates statistical significance for each price level
Level Filtering: Shows only levels exceeding minimum PMI thresholds
Dynamic Updates: Refreshes levels periodically while maintaining historical traces
Visual System:
Current Levels: Bright, thick lines with PMI scores - your actionable levels
Historical Traces: Faded previous levels showing market structure evolution
Strength Tiers: Line styles indicate PMI strength (solid/dashed/dotted)
Color Coding: Green for support, red for resistance
Info Table: Real-time display of strongest levels with scores
- Indicator Settings:
Core Parameters
Lookback Period (Default: 200)
Lower (50-100): More responsive to recent price action, catches short-term levels
Higher (300-500): Focuses on major historical levels, more stable but less responsive
Best for: Day trading (100-150), Swing trading (200-300), Position trading (400-500)
Volume Spike Threshold (Default: 1.5)
Lower (1.2-1.4): More sensitive, catches smaller volume increases, more levels detected
Higher (2.0-3.0): Only major volume surges count, fewer but stronger signals
Market dependent: High-volume stocks may need higher thresholds (2.0+), low-volume stocks lower (1.2-1.3)
Price Bins (Default: 50)
Lower (20-30): Broader price zones, less precise but captures wider areas
Higher (70-100): More granular levels, precise but may be overly specific
Volatility dependent: High volatility assets benefit from more bins (70+)
Minimum PMI Score (Default: 0.5)
Lower (0.2-0.4): Shows more levels including weaker ones, comprehensive view
Higher (1.0-2.0): Only statistically strong levels, cleaner chart
Progressive filtering: Start with 0.5, increase if too cluttered
Max Levels to Show (Default: 8)
Fewer (3-5): Clean chart focusing on strongest levels only
More (10-15): Comprehensive view but may clutter chart
Strategy dependent: Scalpers prefer fewer (3-5), swing traders more (8-12)
Historical Tracking Settings
Update Frequency (Default: 20 bars)
Lower (5-10): More frequent updates, captures rapid market changes
Higher (50-100): Less frequent updates, focuses on major structural shifts
Timeframe scaling: 1-minute charts need lower frequency (5-10), daily charts higher (50+)
Show Historical Levels (Default: True)
Enables the "breadcrumb trail" effect showing evolution of support/resistance
Disable for cleaner charts focusing only on current levels
Max Historical Marks (Default: 50)
Lower (20-30): Less memory usage, shorter history
Higher (100-200): Longer historical context but more resource intensive
Fade Strength (Default: 0.8)
Lower (0.5-0.6): Historical levels more visible
Higher (0.9-0.95): Historical levels very subtle
Visual Settings
Support/Resistance Colors: Choose colors that contrast well with your chart theme Line Width: Thicker lines (3-4) for better visibility on busy charts Show PMI Scores: Toggle labels showing statistical strength Label Size: Adjust based on screen resolution and chart zoom level
- Most Effective Usage Strategies
For Day Trading:
Setup: Lookback 100-150, Volume Threshold 1.8-2.2, Update Frequency 10-15
Use PMI levels as bounce/rejection points for scalp entries
Higher PMI scores (>1.5) offer better probability setups
Watch for volume spike confirmations at levels
For Swing Trading:
Setup: Lookback 200-300, Volume Threshold 1.5-2.0, Update Frequency 20-30
Enter on pullbacks to high PMI support levels
Target next resistance level with PMI score >1.0
Hold through minor levels, exit at major PMI levels
For Position Trading:
Setup: Lookback 400-500, Volume Threshold 2.0+, Update Frequency 50+
Focus on PMI scores >2.0 for major structural levels
Use for portfolio entry/exit decisions
Combine with fundamental analysis for timing
- Trading Applications:
Entry Strategies:
PMI Bounce Trades
Price approaches high PMI support level (>1.0)
Wait for volume spike confirmation (orange triangles)
Enter long on bullish price action at the level
Stop loss just below the PMI level
Target: Next PMI resistance level
PMI Breakout Trades
Price consolidates near high PMI level
Volume increases (watch for orange triangles)
Enter on decisive break with volume
Previous resistance becomes new support
Target: Next major PMI level
PMI Rejection Trades
Price approaches PMI resistance with momentum
Watch for rejection signals and volume spikes
Enter short on failure to break through
Stop above the PMI level
Target: Next PMI support level
Risk Management:
Stop Loss Placement
Place stops 0.1-0.5% beyond PMI levels (adjust for volatility)
Higher PMI scores warrant tighter stops
Use ATR-based stops for volatile assets
Position Sizing
Larger positions at PMI levels >2.0 (highest conviction)
Smaller positions at PMI levels 0.5-1.0 (lower conviction)
Scale out at multiple PMI targets
- Key Warning Signs & What to Watch For
Red Flags:
🚨 Very Low PMI Scores (<0.3): Weak statistical significance, avoid trading
🚨 No Volume Confirmation: PMI level without recent volume spikes may be stale
🚨 Overcrowded Levels: Too many levels close together suggests poor parameter tuning
🚨 Outdated Levels: Historical traces are reference only, not tradeable
Optimization Tips:
✅ Regular Recalibration: Adjust parameters monthly based on market regime changes
✅ Volume Context: Always check for recent volume activity at PMI levels
✅ Multiple Timeframes: Confirm PMI levels across different timeframes
✅ Market Conditions: Higher thresholds during high volatility periods
Interpreting PMI Scores
PMI Score Ranges:
0.5-1.0: Moderate statistical significance, proceed with caution
1.0-1.5: Good significance, reliable for most trading strategies
1.5-2.0: Strong significance, high-confidence trade setups
2.0+: Very strong significance, institutional-grade levels
Historical Context: The historical trace system shows how support and resistance evolve over time. When current levels align with multiple historical traces, it indicates persistent market memory at those prices, significantly increasing the level's reliability.

5/21 EMA Crossover AlertThis is a basic indicator which shows when the 5 EMA crosses through the 21 indicating a possible buy or sell signal. remember, this is only an indicator—indicators indicate and the mroe indicators you have, the more confirmation you may find...all to say, don't just rely on any one "holy grail" indicator.

Zen Open - 18 Bar v2Zen Open – 18 Bar Box (RTH Study Tool)
📄 Description:
This script highlights the first 18 bars of each Regular Trading Hours (RTH) session with a visual box and optional range label. It is intended as a study aid for traders analyzing early session structure.
Features:
• Draws a box around the first 18 bars of the RTH session
• Displays the total range as a label (optional)
• Fully customizable box color and transparency
Intended Use:
This is an educational and visual analysis tool to help traders research how the RTH open influences the rest of the session.
Tight opening range may suggest range expansion
Wide opening range may indicate reduced movement or reversal risk
This script does not generate trading signals, does not offer financial advice, and does not promote any service. It is provided for discretionary study and chart analysis only.

[GalihRidha] Scalping Dashboard 5m Scalping Dashboard 5m is a practical, real-time, and user-friendly indicator designed for 5-minute intraday scalping strategies. This indicator provides clear, actionable signals along with dynamic risk management levels, all visualized in a single vertical dashboard on your chart.
Key Features:
Actionable Next Signal:
Generates a strong, easy-to-follow trading signal ("LONG" or "SHORT") every 5 minutes, based on a multi-factor algorithm (MA20/MA50 trend, RSI, price/volume strength, candle momentum, and market structure).
Dynamic TP/SL Calculation:
Automatically displays recommended Take Profit (TP) and Stop Loss (SL) price ranges, calculated from recent price action, support/resistance, and volatility (ATR).
Vertical Dashboard Layout:
Information is neatly split between "LAST SECTION" (your most recent executed signal, TP, and SL) and "NEXT SECTION" (real-time signal, recommended TP/SL, and current price). Perfectly formatted for both desktop and mobile TradingView use.
Live "Capturing" Status:
When a new signal is forming (1 minute before candle close), the dashboard shows an animated "Capturing..." status—so you always know when the indicator is preparing the next actionable trade.
Buffered Signal Logic:
Prevents “signal repainting” by ensuring that your "Last Signal" and TP/SL levels are exactly what was shown in the previous Next Signal, never the recalculated value from a new bar. This is vital for honest backtesting and live trade confidence.
Zero Lag, Mobile Ready:
Designed to be lightweight and responsive, with instant dashboard updates and no visual lag—even on slower connections or when switching timeframes.
No repaint, no lagging, pure price action + volatility logic.
How to Use:
Add to Chart
Apply the indicator to any liquid crypto or forex pair on the 5-minute (5m) timeframe.
Watch the Dashboard
1 minute before the close of each 5-minute candle, the "Next Signal" section will activate.
"Capturing..." status (with animated dots) means a new entry signal is forming.
Use the suggested Entry, TP Range, and SL for your scalping strategy.
Follow the Signal
When "Next Signal" appears, you have 1 minute to enter the trade if desired.
After the signal passes, the values are locked into the "Last Section" for reference, record-keeping, or trade management.
Mobile Friendly
The vertical format ensures the dashboard is always visible and readable on both web and mobile versions of TradingView.
No need to manually refresh or guess when a new signal is forming—just watch for "Capturing..."!
Best Practice & Tips:
For best results, use on trending or high-volume assets. Avoid low liquidity or choppy sideways markets.
Combine with your own risk management and execution strategy for maximum performance.
This dashboard is 100% Pine Script v5, fully open-source, and does not repaint. You can customize TP/SL logic or integrate with alerts for even more automation.
Why This Indicator?
Most scalping indicators provide signals, but don't show you the real, actionable context—especially in mobile or fast-moving markets.
This dashboard solves that problem by giving you everything you need for quick, clear, and confident trading—all in one place, with true buffer logic so your entries and results are always honest and reproducible.
Happy scalping and stay disciplined—let the dashboard do the heavy lifting for you! 🚀

EMA CPR Double Candle Strategy# EMA CPR Double Candle Strategy
## Strategy Overview
The **EMA CPR Double Candle Strategy** is a comprehensive technical analysis trading system that combines multiple indicators to identify high-probability entry points in trending markets. This strategy uses a systematic approach to filter trades based on trend direction, momentum, trend strength, and support/resistance levels.
## Core Components
### 1. **EMA (Exponential Moving Average) System**
- **EMA1** (Fast EMA - Default: 20 periods)
- **EMA2** (Slow EMA - Default: 50 periods)
- **Purpose**: Determines overall trend direction and provides dynamic support/resistance
- **Trend Identification**:
- Bullish when EMA1 > EMA2
- Bearish when EMA1 < EMA2
### 2. **CPR (Central Pivot Range)**
- **Components**: Pivot Point, Top Central (TC), Bottom Central (BC)
- **Calculation**: Based on previous day's High, Low, Close
- **Purpose**: Acts as support/resistance filter
- **Logic**:
- Long entries: CPR should be below current price (no resistance above)
- Short entries: CPR should be above current price (no support below)
### 3. **RSI (Relative Strength Index)**
- **Default Settings**: 14 periods, 30/70 levels
- **Purpose**: Momentum filter to avoid extreme overbought/oversold conditions
- **Logic**: RSI should be between oversold and overbought levels for both long and short entries
### 4. **ADX (Average Directional Index)**
- **Default Settings**: 14 periods, 25 threshold
- **Purpose**: Trend strength filter
- **Logic**: ADX must be above threshold to ensure strong trending conditions
## Entry Logic
### Bullish Entry Conditions
1. **Trend Confirmation**: EMA1 crossed above EMA2 (and remains above)
2. **Pattern Setup**:
- A red candle touches EMA1 (at selected candle position)
- Current candle is green and closes above EMA1
3. **CPR Filter** (if enabled): All CPR levels (TC, Pivot, BC) below current price
4. **RSI Filter** (if enabled): RSI between oversold and overbought levels
5. **ADX Filter** (if enabled): ADX above threshold (strong trend)
### Bearish Entry Conditions
1. **Trend Confirmation**: EMA1 crossed below EMA2 (and remains below)
2. **Pattern Setup**:
- A green candle touches EMA1 (at selected candle position)
- Current candle is red and closes below EMA1
3. **CPR Filter** (if enabled): All CPR levels (TC, Pivot, BC) above current price
4. **RSI Filter** (if enabled): RSI between oversold and overbought levels
5. **ADX Filter** (if enabled): ADX above threshold (strong trend)
## Risk Management
### Stop Loss
- **Long Positions**: Stop loss at EMA2 level
- **Short Positions**: Stop loss at EMA2 level
- **Logic**: Uses slower EMA as dynamic stop loss
### Take Profit
- **Calculation**: Risk-Reward ratio based (default 1:2)
- **Formula**: Risk × Risk-Reward Ratio
- **Example**: If risk is 10 points, TP is 20 points away
## Customizable Parameters
### EMA Settings
- **EMA1 Length**: Fast EMA period (default: 20)
- **EMA2 Length**: Slow EMA period (default: 50)
- **EMA1 Source**: Price source (close, open, high, low, hlc3, etc.)
- **EMA2 Source**: Price source (close, open, high, low, hlc3, etc.)
### Entry Settings
- **Entry Candle Position**: Which candle in sequence to use (1-5)
- 1 = First candle touching EMA
- 2 = Second candle (default)
- 3+ = Third candle and beyond
### CPR Settings
- **Show CPR Lines**: Display CPR levels on chart
- **Use CPR Filter**: Enable/disable CPR filtering
- **CPR Lookback**: Days to look back for CPR calculation
### RSI Settings
- **Use RSI Filter**: Enable/disable RSI filtering
- **RSI Length**: Period for RSI calculation (default: 14)
- **RSI Source**: Price source for RSI
- **Oversold Level**: Lower threshold (default: 30)
- **Overbought Level**: Upper threshold (default: 70)
### ADX Settings
- **Use ADX Filter**: Enable/disable ADX filtering
- **ADX Length**: Period for ADX calculation (default: 14)
- **ADX Threshold**: Minimum value for strong trend (default: 25)
### Risk Management
- **Risk-Reward Ratio**: Target profit vs risk ratio (default: 2.0)
## Strategy Advantages
### 1. **Multi-Layered Filtering**
- Combines trend, momentum, and volatility filters
- Reduces false signals significantly
- Adaptable to different market conditions
### 2. **Flexibility**
- Each filter can be independently enabled/disabled
- Customizable parameters for different instruments
- Adaptable entry candle positions
### 3. **Clear Risk Management**
- Defined stop loss and take profit levels
- Risk-reward ratio based position sizing
- Dynamic stop loss using EMA2
### 4. **Visual Clarity**
- Clear entry signals with triangular markers
- Optional indicator displays (RSI, ADX, CPR)
- Background color coding for trend direction
- Detailed debug labels showing all conditions
## Best Practices
### 1. **Market Conditions**
- Works best in trending markets (confirmed by ADX)
- Avoid during high volatility news events
- Consider market session timing
### 2. **Timeframe Selection**
- Higher timeframes (1H, 4H, Daily) for swing trading
- Lower timeframes (15M, 30M) for intraday trading
- Adjust EMA periods based on timeframe
### 3. **Parameter Optimization**
- Test different EMA combinations (8/21, 13/34, 20/50)
- Adjust RSI levels based on market volatility
- Optimize ADX threshold for different instruments
### 4. **Risk Management**
- Never risk more than 1-2% per trade
- Use proper position sizing
- Consider correlation between trades
## Common Use Cases
### 1. **Forex Trading**
- Major pairs during trending sessions
- Adjust for different volatility levels
- Consider economic news impact
### 2. **Stock Trading**
- Individual stocks with good liquidity
- Sector rotation strategies
- Earnings season considerations
### 3. **Cryptocurrency**
- Major cryptocurrencies with high volume
- Adjust for 24/7 market conditions
- Consider whale movements
### 4. **Index Trading**
- S&P 500, NASDAQ, DAX indices
- During market hours with good volume
- Economic data release timing
## Limitations
### 1. **Trending Markets Only**
- Performs poorly in ranging/sideways markets
- Requires ADX confirmation for effectiveness
### 2. **Lagging Nature**
- EMA-based signals can be delayed
- May miss very fast market moves
### 3. **Multiple Filters**
- Fewer signals due to strict conditions
- May miss some profitable opportunities
### 4. **Market Gaps**
- Stop losses may not be effective during gaps
- Consider gap risk in position sizing
## Conclusion
The EMA CPR Double Candle Strategy is a sophisticated trading system that combines multiple technical indicators to identify high-probability trading opportunities. Its strength lies in its comprehensive filtering system that helps traders avoid false signals while maintaining flexibility through customizable parameters. The strategy is particularly effective in trending markets and provides clear risk management rules for consistent trading performance.
**Remember**: No strategy guarantees profits. Always backtest thoroughly, use proper risk management, and consider market conditions before implementing any trading strategy.

Price Range Tracker by smaThis tool plots dynamic zones based on recent price extremes and midpoint levels. It tracks the highest, lowest, and average price over a customizable period, helping traders identify key reference zones for potential reaction or balance.
Each level is updated in real-time and displayed with optional percentage labels relative to the current price. The lines and label colors can be fully customized for visual clarity.
—
Note: The internal logic is proprietary and not publicly disclosed.

BskLAB - Money Flow X🧠 BskLAB – Money Flow X | Full Usage Guide & Description
BskLAB – Money Flow X is a professional-grade volume analysis tool featuring two core modes designed to detect market pressure, momentum, and divergence with precision. When used alongside BskLAB Signal Assistant, it provides powerful volume-based confirmation to enhance signal quality.
🔧 Preset Modes Overview
📊 Mode 1: Money Flow (WaveTrend + Divergence)
This mode uses a custom WaveTrend oscillator to reflect momentum from buying/selling pressure, along with automatic divergence detection. It starts by calculating the average price from and filters through the EMA and SMA to create WT1 and WT2.
Key Features:Dual WaveTrend lines (WT1 & WT2) with crossover signals
Visual display of overbought / oversold zones
Automatic divergence detection:
🟢 Green = Classic Bullish Divergence
🔴 Red = Classic Bearish Divergence
🔵 Blue = Hidden Bullish Divergence
🟠 Orange = Hidden Bearish Divergence
Best Used For:
Identifying early reversals and exhaustion zones during high or low volatility phases.
🚀 Mode 2: Volume Momentum (Dynamic Histogram)
This mode displays volume-driven pressure using histogram bars that expand or contract with momentum. It calculates PercentB (%B) from Bollinger Band behavior to reflect how far price stretches away from its recent average range.
Key Features:Histogram expands with growing momentum
Dynamic bar coloring:
🔴 Red = selling pressure emerges
⚪ White = buying pressure emerges
Uses %B from Bollinger Band for calculation
Best Used For:
Confirming strong directional moves or identifying momentum buildup or fade — especially when price moves far from the average.
🔬 Internal Logic Breakdown (Main WT & Money Flow)
✅ 1. WaveTrend System (WT1 & WT2)
WT1 = Fast line (short-term momentum)
WT2 = Trend filter (slower)
Derived from (H+L+C)/3 with EMA and SMA smoothing
Color Logic:
🔼 WT1 crosses above WT2 → Cyan (Bullish Momentum)
🔽 WT1 crosses below WT2 → White (Bearish Momentum)
Zero Line Behavior:
Above 0 = strong uptrend confirmation
Below 0 = strong downtrend confirmation
✅ 2. Money Flow Line (MF Line)
Measures volume pressure based on price vs. long-period EMA
Displayed as an area plot underneath
Color Logic:
🔵 Light Cyan = Buying pressure emerging
⚪ Light White = Selling pressure emerging
Color dynamically changes based on volume shifts
Signal Strategy:
WT1 crossover + Cyan MF = Buy Confirmation
WT1 crossover + White MF = Sell Confirmation
Mismatched signals = caution advised
🧩 Designed to Pair with BskLAB – Signal Assistant
BskLAB – Money Flow X works best when used alongside 👉 BskLAB – Signals Assistant
Both tools are designed to complement each other:
Signals Assistant provides structural and momentum-based trade entries
Money Flow X confirms whether real buy/sell volume supports those entries
✅ How to Use Together:
Wait for a Buy/Sell signal from Signal Assistant
Confirm with:
WT crossover + MF color (Money Flow mode)
Histogram color shift (Volume Momentum mode)
✅ Money Flow X acts as the official volume confirmation layer within the BskLAB system to reduce false signals and improve decision-making confidence.
⚙️ Customization Options
Volume Length (for Volume Momentum)
WT Smoothing (for Money Flow)
Toggle Classic / Hidden Divergences
🔶 CONCLUSION
BskLAB – Money Flow X isn’t just another indicator — it’s a decision-making support system designed to uncover the truth behind price movements.
It helps traders gain clarity during uncertainty, separate strong signals from noise, and develop a systematic approach to entries.
By combining oscillator-based momentum + volume behavior + divergences, this tool becomes essential for traders who prioritize execution accuracy in real-world conditions.
🔶 RISK DISCLAIMER
Trading involves high risk and is not suitable for everyone. All tools, scripts, and content provided by BskLAB are for educational purposes only and do not constitute financial advice.
Past results do not guarantee future performance — trade responsibly.

BskLAB - Signals Assistant 🧠 BSKLab Signal Assistant – Full Description & Usage Guide
BSKLab Signal Assistant is a multi-strategy signal framework developed for traders seeking precise, filtered entries across different market conditions. Rather than being a simple combination of classic indicators, this script integrates custom-built tools and dynamic overlays that work synergistically to improve signal quality and reduce false entries.
It offers two distinct modes — Swing and Following — each designed with its own core logic, ensuring flexibility for traders whether they focus on reversals or trend-following strategies.
🌀 Mode 1: Swing (Reversal-Based Entries)
Objective: Detect price exhaustion and reversal zones.
This mode uses a custom TMA-based dynamic zone system (“Zone Style”) to define potential reversal areas. When price breaks below/above this zone and the Bollinger Band boundary, it suggests overextension. A confirmation from SuperTrend ensures that the price is not just bouncing but showing true directional momentum.
📌 Why this combination?
Each component plays a role:
Zone Style = defines reversal structure dynamically based on recent volatility.
Bollinger Bands = detects price extremes (OB/OS).
SuperTrend = filters noise with momentum confirmation.
🟢 Buy Logic:
Price closes below Zone Style and lower Bollinger Band
Then rebounds upward
SuperTrend shifts to bullish
🔴 Sell Logic:
Price closes above Zone Style and upper Bollinger Band
Then reverses down
SuperTrend shifts to bearish
✅ This helps traders avoid false breakouts or fake reversals in ranging markets.
Enhancing Swing Trade Accuracy with BSKLab - MoneyFlow X (Volume Momentum)
In Swing Trading Mode, we aim to catch price reversals after the market moves beyond extreme zones (TMA-based support/resistance). To avoid premature entries or false reversals, it’s highly recommended to confirm signals using BSKLab - MoneyFlow X in Volume Momentum mode.
📈 Mode 2: Following (Trend-Following System)
Objective: Trade only in the direction of the dominant market trend.
This mode replaces the reversal logic with a trend-filtering mechanism using BskLAB Cloud, a custom-modified version of Ichimoku Cloud. It scores trend strength using ATR-multiplied zones and offers 3 levels of confirmation strictness (Lv1–Lv3).
📌 Why this combination?
BskLAB Cloud provides a structured, flexible trend confirmation.
Bollinger Bands help detect entries during trend pullbacks or breakouts.
SuperTrend (optional) supports directional momentum validation.
🟢 Buy Logic:
Cloud confirms bullish trend (based on level)
Price breaks above Bollinger Band midline or upper zone
Entry is allowed only in the direction of the trend
🔴 Sell Logic:
Cloud confirms bearish trend
Price breaks below midline or lower Bollinger Band zone
✅ Perfect for momentum traders who want to stay in the direction of trend and avoid early reversals.
Advanced Confirmation with Volume Momentum (BSKLab - MoneyFlow X)
Improving Trend Signal Accuracy with BSKLab - MoneyFlow X
To increase confidence in each entry, we recommend using this trend-following mode together with the
BSKLab - MoneyFlow X indicator, set to Volume Momentum mode.
✅ How to use together:
Wait for a valid Buy/Sell signal from the Trend-Following Mode
Check volume reaction on MoneyFlow X:
🟢 Strong green spike = bullish momentum = confirms Buy
🔴 Strong red spike = bearish momentum = confirms Sell
🧩 Component Breakdown & Why They Work Together
📍 Zone Style (TMA + ATR Overlay)
A custom dynamic support/resistance zone using Triangular Moving Average with ATR-based width adjustment. It expands or contracts based on market volatility — making reversal zones adaptive to current conditions.
Prevents entries when price is in the middle of a range
Acts as a volatility filter, removing "weak" signals
☁️ BskLAB Cloud (Custom Ichimoku)
A custom trend engine adapted from Ichimoku Cloud. Uses ATR-weighted midlines to define trend strength with 3 adjustable strictness levels.
Used only in Following Mode
Avoids trendless/noise zones
Helps traders stay aligned with the macro trend
📊 Bollinger Band Behavior
Used in all modes, but especially in Swing and following, to detect overbought/oversold zones.
Provides clear statistical boundaries
Combines well with SuperTrend to detect exhaustion
✅ SuperTrend Confirmation
A momentum-based filter using ATR-based trailing stop logic.
Filters fake reversals
Confirms breakout direction
Used across all modes for high-accuracy entries
🔥 BSKLab Signal Assistant isn’t just another mashup of public indicators — it’s a purpose-built trading framework crafted for real market conditions.
Instead of throwing signals on every move, it combines structure, momentum, volatility, and trend filters to deliver clean, high-conviction entries.
📍 RISK DISCLAIMER
Trading involves significant risk and is not suitable for everyone. All tools, scripts, and educational materials provided by BSKLab are for informational and educational purposes only. We do not offer financial advice.
Past performance does not guarantee future results. Always trade responsibly
📍 CONCLUSION
At BSKLab, we believe that consistent trading success doesn't come from indicators alone — it comes from the trader’s ability to apply them with context, discipline, and understanding. Tools are only as powerful as the hands they’re in.
The goal of the BSKLab Signal Assistant is not to provide magic signals, but to empower traders with a clean, adaptive, and intelligent framework that helps identify high-probability opportunities while filtering out the noise.
Whether you’re a beginner or experienced trader, this tool is designed to support real decisions in real markets — not just theory.
You can request access below to join the BSKLab system and unlock our full trading suite.

VDN 6 - Dual MACD Strategy (TP:20 / SL:10)This strategy uses a dual MACD crossover confirmation system with two different parameter sets:
• MACD(12, 26, 8) – Standard
• MACD(13, 34, 9) – Fibonacci-based
A trade is opened only when both MACDs give the same signal (buy or sell) simultaneously.
Take Profit is fixed at 20 points and Stop Loss at 10 points per trade.
This setup is optimized for scalping or short-term trend continuation. Lot size is set to 1 by default.

Staccked SMA - Regime Switching & Persistance StatisticsThis indicator is designed to identify the prevailing market regime by analyzing the behavior of a "stack" of Simple Moving Averages (SMAs). It helps you understand whether the market is currently trending, mean-reverting, or moving randomly.
Core Concept: SMA Correlation
At its heart, the indicator examines the relationship between a set of nine SMAs with different lengths (3, 5, 8, 13, 21, 34, 55, 89, 144) and the lengths themselves.
In a strong trending market (either up or down), the SMAs will be neatly "stacked" in order of their length. The shortest SMA will be furthest from the longest SMA, creating a strong, almost linear visual pattern. When we measure the statistical correlation between the SMA values and their corresponding lengths, we get a value close to +1 (perfect uptrend stack) or -1 (perfect downtrend stack). The absolute value of this correlation will be very high (close to 1).
In a mean-reverting or sideways market, the SMAs will be tangled and crisscrossing each other. There is no clear order, and the relationship between an SMA's length and its price value is weak. The correlation will be close to 0.
This indicator calculates this Pearson correlation on every bar, giving a continuous measure of how ordered or "trendy" the SMAs are. An absolute correlation above 0.8 is considered strongly trending, while a value between 0.4 and 0.8 suggests a mean-reverting character. Below 0.4, the market is likely random or choppy.
Regime Classification and Statistics
The indicator doesn't just look at the current correlation; it analyzes its behavior over a user-defined lookback window (default is 252 bars) to classify the overall market "regime."
It presents its findings in a clear table:
📊 |SMA Correlation| Regime Table: This main table provides a snapshot of the current market character.
Median: Shows the median absolute correlation over the lookback period, giving a central tendency of the market's behavior.
% > 0.80: The percentage of time the market was in a strong trend during the lookback period.
% < 0.80 & > 0.40: The percentage of time the market showed mean-reverting characteristics.
🧠 Regime: The final classification. It's labeled "📈 Trend-Dominant" if the median correlation is high and it has spent a significant portion of the time trending. It's labeled "🔄 Mean-Reverting" if the median is in the middle range and it has spent significant time in that state. Otherwise, it's considered "⚖️ Random/ Choppy".
📐 Regime Significance: This tells you how statistically confident you can be in the current regime classification, using a Z-score to compare its occurrence against random chance. ⭐⭐⭐ indicates high confidence (99%), while "❌ Not Significant" means the pattern could be random.
Regime Transition Probabilities
Optionally, a second table can be displayed that shows the historical probability of the market transitioning from one regime to another over different time horizons (t+5, t+10, t+15, and t+20 bars).
📈 → 🔄 → ⚖️ Transition Table: This table answers questions like, "If the market is trending now (From: 📈), what is the probability it will be mean-reverting (→ 🔄) in 10 bars?"
This provides powerful insights into the market's cyclical nature, helping you anticipate future behavior based on past patterns. For example, you might find that after a period of strong trending, a transition to a choppy state is more likely than a direct switch to a mean-reverting
Indicator Settings
Lookback Window for Regime Classification: This sets the number of recent bars (default is 252) the script analyzes to determine the current market regime (Trending, Mean-Reverting, or Random). A larger number provides a more stable, long-term view, while a smaller number makes the classification more sensitive to recent price action.
Show Regime Transition Table: A simple toggle (on/off) to show or hide the table that displays the probabilities of the market switching from one regime to another.
Lookback Offset for Starting Regime: This determines the "starting point" in the past for calculating regime transitions. The default is 20 bars ago. The script looks at the regime at this point and then checks what it became at later points.
Step 1, 2, 3, 4 Offset (bars): These define the future time intervals (5, 10, 15, and 20 bars by default) for the transition probability table. For example, the script checks the regime at the "Lookback Offset" and then sees what it transitioned to 5, 10, 15, and 20 bars later.
Significance Filter Settings
Use Regime Significance Filter: When enabled, this filter ensures that the regime transition statistics only count transitions that were "statistically significant." This helps to filter out noise and focus on more reliable patterns.
Min Stars Required (1=90%, 2=95%, 3=99%): This sets the minimum confidence level required for a regime to be included in the transition statistics when the significance filter is on.
1 ⭐: Requires at least 90% confidence.
2 ⭐⭐: Requires at least 95% confidence (default).
3 ⭐⭐⭐: Requires at least 99% confidence.

EMA-Pack MTFEMA-Pack MTF
This TradingView Pine Script defines a custom indicator called "EMA-Pack MTF" that overlays various types of moving averages and Bollinger Bands across multiple timeframes on a chart. It begins by importing the built-in technical analysis library and defining a custom ma function that calculates several types of moving averages (SMA, EMA, TEMA, DEMA, HMA, and ALMA) based on user input. The ema function is the core logic, retrieving market data for the specified timeframe and calculating fast, mid, slow, 50, 100, and 200-period moving averages along with Bollinger Band components (basis, upper, and lower bands). The function adjusts values to the nearest valid price tick and returns them.
User input fields allow customization of timeframes, source data, moving average types, and Bollinger Band parameters. The script calls the ema function for each selected timeframe (1 minute, 5 minutes, 15 minutes, 1 hour, 4 hours, and 1 day), storing their respective computed values. It then plots the calculated moving averages and Bollinger Band basis lines on the chart, using different colors and line widths to distinguish between them. Some plots are hidden by default (display.none) to reduce chart clutter. This script is useful for multi-timeframe trend analysis using customizable moving averages and Bollinger Bands.

Jags Dynamic S/R with Breakout & Weakness SignalsThis script is designed to automatically identify and display significant support and resistance levels on your chart. It then goes a step further by actively monitoring for potential breakouts and signs of support weakness.
Core Functionality: Identifying Key Levels
At its heart, the script uses a pivot logic to find recent price highs and lows, which it then plots as horizontal lines representing potential resistance and support, respectively. You have full control over how these levels are identified:
Timeframe: You can choose to find these pivot points on the current chart's timeframe or a higher one (e.g., daily pivots on an hourly chart).
Lookback Period: You can define how many bars to the left and right of a pivot point the script should consider, allowing you to fine-tune the significance of the levels it identifies.
Line Management: To keep your chart clean, you can set the maximum number of support and resistance lines to display. The script also has a clever "merge" feature that combines new pivot levels with existing ones if they are very close together, preventing clutter.
Breakout Detection
A key feature of this indicator is its ability to signal when the price breaks through one of these identified support or resistance levels. You can enable or disable this feature and choose from several confirmation methods to suit your trading style:
Simple Price Action: A breakout is confirmed simply by the price closing above a resistance level or below a support level.
ATR (Average True Range): For a breakout to be valid, the price must close a certain distance (based on the ATR) beyond the level, filtering out minor fluctuations.
Volume: This option adds another layer of confirmation by requiring a significant increase in trading volume during the breakout, suggesting strong conviction behind the move.
Momentum: This method uses the RSI (Relative Strength Index) to confirm that the breakout is supported by strong underlying momentum.
Quantitative: A more advanced option that uses a combination of the Rate of Change (ROC) and a Volume-Weighted Moving Average (VWMA) to provide a robust, multi-faceted confirmation of the breakout.
When a confirmed breakout occurs, the script will:
Color the breakout bar green for a bullish breakout (upward) or red for a bearish breakout (downward).
Place an arrow below a bullish breakout or above a bearish breakout.
Trigger an alert to notify you of the event.
Support Weakness Detection
To provide an early warning of a potential breakdown, the script includes a unique "Support Weakness Detection" feature. When enabled, it looks for a specific confluence of bearish signals as the price approaches a support level:
The price is hovering just above a key support level.
The short-term trend has already turned bearish (based on a moving average).
Momentum is fading (indicated by a falling RSI).
If all these conditions are met, a blue down-arrow will appear above the price bar, signalling that the nearby support may not hold.

ADX_Power_IndikatorThe ADX Power Indicator is a technical analysis tool based on the well-known Average Directional Index (ADX) developed by Welles Wilder.
This script visualizes the core components of the ADX system – +DI, –DI, and ADX – in a clean and focused way. It emphasizes the crossovers between +DI and –DI, which can serve as potential entry or exit signals.
🔍 Features
Plots the ADX line as a stepped line to represent trend strength
Displays +DI (green) and –DI (red) lines clearly
Highlights important crossovers with colored crosses:
✅ Buy signal: +DI crosses above –DI (green cross)
❌ Sell signal: –DI crosses above +DI (red cross)
Clean and minimalistic layout – great for combining with other strategies
📈 How to Use
This indicator is ideal for traders who want to:
Measure trend strength using ADX
Detect trend reversals through DI crossovers
Confirm entries and exits based on momentum shifts
The default parameters (14-period DI and ADX) can be adjusted in the script to suit your trading style or market conditions.

ma rationing🧠 MA Rationing Indicator – Multi-Averaged Momentum + Divergence Zones
This script blends various moving average ratios (SMA, EMA, WMA, RMA) to create a smoothed and zero-centered momentum oscillator. Its goal is to highlight shifts in trend strength and spot possible divergences confirmed by volume.
🔍 Key Features:
• MA Ratio Core: Composite of multiple MA types across a short vs. long smoothing window, plotted against zero for trend clarity.
• Visual Acceleration Markers: Circle color intensity reflects momentum acceleration or deceleration.
• Volume-Supported Divergence: Highlights when price diverges from momentum and volume supports the signal.
• RSI Zone Highlighting: Dynamically draws boxes over RSI Overbought/Oversold regions as sentiment zones form.
• Custom Alerts: Includes alerts for zero-line crosses and divergence + volume confirmation.
This tool is designed for users seeking to combine price action, momentum, and volume into one clear visualization. It does not provide direct trade signals and should be used alongside your broader analysis.

K1 - Quarterly Theory Primary Price LevelsThe K1 indicator is a specialized tool designed for traders practicing Quarterly Theory (QT) and related concepts of smart money. It focuses on calculating and displaying Primary Price Levels (PPLs) that form the backbone of many QT-based strategies.
Unlike generic indicators using standard levels like previous highs/lows or session opens, K1 offers three uniquely integrated capabilities not found together in any open-source indicators on TradingView:
✅ Unique Features
Customizable PPL Visibility per Chart Context
Each price level can be individually toggled on or off, enabling traders to fine-tune their charts for specific timeframes and trading setups. For example, some traders prefer only the PWH, PWL, and Q3 Daily Open on higher timeframes, while others prioritize PDH, PDL, London Open, and NY AM Open on intraday charts. This level of flexibility supports multi-timeframe analysis with minimal clutter.
Historical PPL Display for Backtestin g
K1 supports historical plotting of PPLs for backtesting trade setups across multiple days or weeks. Historical levels can also be toggled, giving traders granular control over how far back the data is displayed and which levels to analyze retrospectively.
Consequent Encroachment (C.E.) Calculations
The indicator includes dashed lines marking the 50% wick levels (C.E.) of both the daily and 12-hour candles. These C.E. levels often signal potential retracement or reversal points. This concept, rooted in ICT methodology, is not commonly included in standard indicators and offers traders an advanced reference for precise entries.
📘 Background & Theory
K1 was developed in response to specific feature requests from QT traders and incorporates ideas from Traderdaye, who was influenced by ICT (Inner Circle Trader) teachings. It is also compatible with extended QT concepts such as:
Sequential Smart Money Technique (SSMT)
Precision Swing Point (PSP)
Terminus Price Divergence (TPD), a concept by Jacob Speculates
These concepts work together with the PPLs to build confluence zones and refine high-probability entries.
📍 Included PPLs in K1
Prior Week High (PWH) / Low (PWL)
Prior Day High (PDH) / Low (PDL)
True Day Open (000)
London Open (130)
Q3 Daily Open (600)
New York AM (730) / PM Open (1300)
True Week Open (TWO)
Sunday True Open (STO)
Consequent Encroachment Daily Wick (C.E. D)
Consequent Encroachment 12H Wick (C.E. 12H)
K1 is closed-source due to the proprietary logic used for session-specific time logic, precision wick encroachment calculations, and a multi-context plotting engine explicitly designed for QT workflows.
This script is currently available by invitation only and is intended for traders familiar with QT methodologies who want to add higher precision and flexibility to their technical charting.

Alpha - Combined BreakoutThis Pine Script indicator, "Alpha - Combined Breakout," is a combination between Smart Money Breakout Signals and UT Bot Alert, The UT Bot Alert indicator was initially developer by Yo_adriiiiaan
The idea of original code belongs HPotter.
This Indicator helps you identify potential trading opportunities by combining two distinct strategies: Smart Money Breakout and a modified UT Bot (likely a variation of the Ultimate Trend Bot). It provides visual signals, draws lines for potential take profit (TP) and stop loss (SL) levels, and includes a dashboard to track performance metrics.
Tutorial:
Understanding and Using the "Alpha - Combined Breakout" Indicator
This indicator is designed for traders looking for confirmation of market direction and potential entry/exit points by blending structural analysis with a trend-following oscillator.
How it Works (General Concept)
The indicator combines two main components:
Smart Money Breakout: This part identifies significant breaks in market structure, which "smart money" traders often use to gauge shifts in supply and demand. It looks for higher highs/lows or lower highs/lows and flags when these structural points are broken.
UT Bot: This is a trend-following component that generates buy and sell signals based on price action relative to an Average True Range (ATR) based trailing stop.
You can choose to use these signals independently or combined to generate trading alerts and visual cues on your chart. The dashboard provides a quick overview of how well the signals are performing based on your chosen settings and display mode.
Parameters and What They Do
Let's break down each input parameter:
1. Smart Money Inputs
These settings control how the indicator identifies market structure and breakouts.
swingSize (Market Structure Time-Horizon):
What it does: This integer value defines the number of candles used to identify significant "swing" (pivot) points—highs and lows.
Effect: A larger swingSize creates a smoother market structure, focusing on longer-term trends. This means signals might appear less frequently and with some delay but could be more reliable for higher timeframes or broader market movements. A smaller swingSize will pick up more minor market structure changes, leading to more frequent but potentially noisier signals, suitable for lower timeframes or scalping.
Analogy: Think of it like a zoom level on your market structure map. Higher values zoom out, showing only major mountain ranges. Lower values zoom in, showing every hill and bump.
bosConfType (BOS Confirmation Type):
What it does: This string input determines how a Break of Structure (BOS) is confirmed. You have two options:
'Candle Close': A breakout is confirmed only if a candle's closing price surpasses the previous swing high (for bullish) or swing low (for bearish).
'Wicks': A breakout is confirmed if any part of the candle (including its wick) surpasses the previous swing high or low.
Effect: 'Candle Close' provides stronger, more conservative confirmation, as it implies sustained price movement beyond the structure. 'Wicks' provides earlier, more aggressive signals, as it captures momentary breaches of the structure.
Analogy: Imagine a wall. 'Candle Close' means the whole person must get over the wall. 'Wicks' means even a finger touching over the top counts as a breach.
choch (Show CHoCH):
What it does: A boolean (true/false) input to enable or disable the display of "Change of Character" (CHoCH) labels. CHoCH indicates the first structural break against the current dominant trend.
Effect: When true, it helps identify early signs of a potential trend reversal, as it marks where the market's "character" (its tendency to make higher highs/lows or lower lows/highs) first changes.
BULL (Bullish Color) & BEAR (Bearish Color):
What they do: These color inputs allow you to customize the visual appearance of bullish and bearish signals and lines drawn by the Smart Money component.
Effect: Purely cosmetic, helps with visual identification on the chart.
sm_tp_sl_multiplier (SM TP/SL Multiplier (ATR)):
What it does: A float value that acts as a multiplier for the Average True Range (ATR) to calculate the Take Profit (TP) and Stop Loss (SL) levels specifically when you're in "Smart Money Only" mode. It uses the ATR calculated by the UT Bot's nLoss_ut as its base.
Effect: A higher multiplier creates wider TP/SL levels, potentially leading to fewer trades but larger wins/losses. A lower multiplier creates tighter TP/SL levels, potentially leading to more frequent but smaller wins/losses.
2. UT Bot Alerts Inputs
These parameters control the behavior and sensitivity of the UT Bot component.
a_ut (UT Key Value (Sensitivity)):
What it does: This integer value adjusts the sensitivity of the UT Bot.
Effect: A higher value makes the UT Bot less sensitive to price fluctuations, resulting in fewer and potentially more reliable signals. A lower value makes it more sensitive, generating more signals, which can include more false signals.
Analogy: Like a noise filter. Higher values filter out more noise, keeping only strong signals.
c_ut (UT ATR Period):
What it does: This integer sets the look-back period for the Average True Range (ATR) calculation used by the UT Bot. ATR measures market volatility.
Effect: This period directly influences the calculation of the nLoss_ut (which is a_ut * xATR_ut), thus defining the distance of the trailing stop loss and take profit levels. A longer period makes the ATR smoother and less reactive to sudden price spikes. A shorter period makes it more responsive.
h_ut (UT Signals from Heikin Ashi Candles):
What it does: A boolean (true/false) input to determine if the UT Bot calculations should use standard candlestick data or Heikin Ashi candlestick data.
Effect: Heikin Ashi candles smooth out price action, often making trends clearer and reducing noise. Using them for UT Bot signals can lead to smoother, potentially delayed signals that stay with a trend longer. Standard candles are more reactive to raw price changes.
3. Line Drawing Control Buttons
These crucial boolean inputs determine which type of signals will trigger the drawing of TP/SL/Entry lines and flags on your chart. They act as a priority system.
drawLinesUtOnly (Draw Lines: UT Only):
What it does: If checked (true), lines and flags will only be drawn when the UT Bot generates a buy/sell signal.
Effect: Isolates UT Bot signals for visual analysis.
drawLinesSmartMoneyOnly (Draw Lines: Smart Money Only):
What it does: If checked (true), lines and flags will only be drawn when the Smart Money Breakout logic generates a bullish/bearish breakout.
Effect: Overrides drawLinesUtOnly if both are checked. Isolates Smart Money signals.
drawLinesCombined (Draw Lines: UT & Smart Money (Combined)):
What it does: If checked (true), lines and flags will only be drawn when both a UT Bot signal AND a Smart Money Breakout signal occur on the same bar.
Effect: Overrides both drawLinesUtOnly and drawLinesSmartMoneyOnly if checked. Provides the strictest entry criteria for line drawing, looking for strong confluence.
Dashboard Metrics Explained
The dashboard provides performance statistics based on the lines drawing control button selected. For example, if "Draw Lines: UT Only" is active, the dashboard will show stats only for UT Bot signals.
Total Signals: The total number of buy or sell signals generated by the selected drawing mode.
TP1 Win Rate: The percentage of signals where the price reached Take Profit 1 (TP1) before hitting the Stop Loss.
TP2 Win Rate: The percentage of signals where the price reached Take Profit 2 (TP2) before hitting the Stop Loss.
TP3 Win Rate: The percentage of signals where the price reached Take Profit 3 (TP3) before hitting the Stop Loss. (Note: TP1, TP2, TP3 are in order of distance from entry, with TP3 being furthest.)
SL before any TP rate: This crucial metric shows the number of times the Stop Loss was hit / the percentage of total signals where the stop loss was triggered before any of the three Take Profit levels were reached. This gives you a clear picture of how often a trade resulted in a loss without ever moving into profit target territory.
Short Tutorial: How to Use the Indicator
Add to Chart: Open your TradingView chart, go to "Indicators," search for "Alpha - Combined Breakout," and add it to your chart.
Access Settings: Once added, click the gear icon next to the indicator name on your chart to open its settings.
Choose Your Signal Mode:
For UT Bot only: Uncheck "Draw Lines: Smart Money Only" and "Draw Lines: UT & Smart Money (Combined)". Ensure "Draw Lines: UT Only" is checked.
For Smart Money only: Uncheck "Draw Lines: UT Only" and "Draw Lines: UT & Smart Money (Combined)". Ensure "Draw Lines: Smart Money Only" is checked.
For Combined Signals: Check "Draw Lines: UT & Smart Money (Combined)". This will override the other two.
Adjust Parameters:
Start with default settings. Observe how the signals appear on your chosen asset and timeframe.
Refine Smart Money: If you see too many "noisy" market structure breaks, increase swingSize. If you want earlier breakouts, try "Wicks" for bosConfType.
Refine UT Bot: Adjust a_ut (Sensitivity) to get more or fewer UT Bot signals. Change c_ut (ATR Period) if you want larger or smaller TP/SL distances. Experiment with h_ut to see if Heikin Ashi smoothing suits your trading style.
Adjust TP/SL Multiplier: If using "Smart Money Only" mode, fine-tune sm_tp_sl_multiplier to set appropriate risk/reward levels.
Interpret Signals & Lines:
Buy/Sell Flags: These indicate the presence of a signal based on your selected drawing mode.
Entry Line (Blue Solid): This is where the signal was generated (usually the close price of the signal candle).
SL Line (Red/Green Solid): Your calculated stop loss level.
TP Lines (Dashed): Your three calculated take profit levels (TP1, TP2, TP3, where TP3 is the furthest target).
Smart Money Lines (BOS/CHoCH): These lines indicate horizontal levels where market structure breaks occurred. CHoCH labels might appear at the first structural break against the prior trend.
Monitor Dashboard: Pay attention to the dashboard in the top right corner. This dynamically updates to show the win rates for each TP and, crucially, the "SL before any TP rate." Use these statistics to evaluate the effectiveness of the indicator's signals under your current settings and chosen mode.
*
Set Alerts (Optional): You can set up alerts for any of the specific signals (UT Bot Long/Short, Smart Money Bullish/Bearish, or the "Line Draw" combined signals) to notify you when they occur, even if you're not actively watching the chart.
By following this tutorial, you'll be able to effectively use and customize the "Alpha - Combined Breakout" indicator to suit your trading strategy.

Golden Pocket Syndicate [GPS]Golden Pocket Syndicate is a multi-layered market analysis toolkit built for precision entries and sniper-style reversals in both trending and ranging conditions. The script fuses volume dynamics, golden pocket structures, market maker behavior, and liquidation cluster tracking into one high-confluence system.
Core Features:
• 📐 Golden Pocket Zones: Dynamic GP levels from daily, weekly, monthly, and yearly timeframes. These levels update in real-time and serve as confluence zones for entries and exits.
• 📊 WaveTrend Divergence Diamonds: Momentum shifts are detected using a custom filtered WaveTrend cross system to mark high-probability reversal conditions.
• 🧠 Market Maker Premium Divergence: Tracks price dislocation between CME and Binance to detect large player manipulation using a configurable premium threshold.
• 💎 MM Reversal Diamonds: Identifies potential market maker traps and large player pivots using historical candle behavior, EMA alignment, and price structure breaks.
• 📉 Stealth Liquidation Cluster Arrows: Volume-based liquidation pressure visualized as lightweight directional arrows based on calculated wick expansion and volume bursts. Highlights key zones where price is likely to bounce or reject.
• 🧭 Trend Validation: Uses volume-based trend conditions and short-term EMA positioning to further qualify signals and eliminate noise.
How to Use:
This indicator is designed to help traders visualize confluence between key institutional price levels, momentum shifts, and volume-based pressure points. Long/short opportunities can be explored at marked reversal diamonds or liquidation zones that align with key GP levels. Intended for use on higher timeframes (15m to 4H), though flexible across any pair or market.

Advanced ORB [MOT]📈 Advanced ORB – Multi-Session Opening Range Breakout System
The Advanced ORB indicator is a professional-grade tool designed to help intraday and futures traders identify high-probability breakout and reversal zones across multiple global trading sessions.
Unlike standard ORB tools that only cover the NY open, this script includes 10 proprietary, backtested session times, as well as support for 3 fully customizable user-defined sessions. Built-in signal detection and a higher-timeframe confluence engine make this a full-featured ORB solution for scalping, day trading, and momentum-based setups.
🔍 Core Features
✅ 10 Predefined ORB Sessions
This indicator includes 10 battle-tested ORB sessions derived from institutional market behavior — including:
New York AM session (e.g., 9:30–9:45 AM)
New York PM session (e.g., 3:30–3:45 PM)
Global sessions such as London AM and others
(The exact timing of proprietary sessions is not disclosed here to protect edge and backtest integrity.)
✅ Enable Multiple Sessions Simultaneously
You can plot multiple sessions on the same chart — each with its own range, labels, and signals. This is made possible through optimized array logic, giving traders a comprehensive view of overlapping session breakouts.
📷 Picture of Chart Showing AM and PM ORB Session Overlays
🎯 Signal Engine
🔷 3-Bar Breakout Signals
Detects structured price breakouts over 3 candles — including confirmation volume and breakout direction. Ideal for catching early momentum out of the ORB.
🔁 Reversal Signals
Identifies false breakouts and traps around ORB highs and lows. Triggers when price breaks out, then closes back inside the range with volume confirmation — perfect for fade setups and mean reversion traders.
🚀 Continuation Breakouts
Fires when price cleanly breaks out and pushes further with strong momentum. Uses a configurable breakout buffer and volume filter to prevent weak or failed breakouts.
📷 Picture of Chart Showing Buy and Sell Signals
🧠 HTF Confluence Engine – 3-Bar Pattern Projection
Detects 3-bar inside bar patterns on a higher timeframe (default is 15m) and plots dotted projection lines at the breakout level. These serve as strong confluence zones when they align with a lower timeframe ORB setup.
Green dotted lines = Bullish breakout threshold from HTF
Red dotted lines = Bearish breakdown threshold from HTF
📷 Picture of Chart Showing 3 Bar Projection Lines
⚙️ Customization & Visuals
Customize line colors, line width, and label appearance
Show/hide midlines and price labels per session
Use the breakout buffer input to add breakout buffer logic to signals
Works across timeframes, though optimized for 1-minute charts
📷 Picture of Chart with Customization Settings
🔔 Alerts
Built-in alert conditions for:
✅ 3-Bar Breakouts
🔁 Reversal Triggers
🚀 Continuation Breakouts
These fire on any active session and are ideal for live trading or integration with platforms like TradersPost, 3Commas, or webhook automation.
📷 Picture of Chart with Alert Settings
📌 Usage Notes
Script works best on indexes or stocks with clear market open behavior (e.g., SPY, QQQ, AAPL, TSLA)
Also effective for futures traders who follow index-driven setups (e.g., NQ, ES, MNQ) — even though the gaps themselves appear on index charts
Signals are volume-confirmed, but users can disable or combine logic using the built-in toggles
All ORB sessions operate independently and can be enabled/disabled individually
Chart layout is designed for visual clarity in both real-time and backtesting environments
⚠️ Disclaimer
This script is for educational and informational purposes only. It does not constitute financial advice or a recommendation to buy or sell any security. Always conduct your own research and trade at your own risk. The creators are not responsible for any financial losses incurred.

HL/OL Histogram + (Close-Open)🧠 Core Concept
This indicator is designed to detect meaningful directional intent in price action using a combination of:
Intrabar candle structure (high - open, open - low)
Net price momentum (close - open)
Timed trigger levels (frozen buy/sell prices based on selected timeframe closes)
The core idea is to visually separate bullish and bearish energy in the current bar, and to mark the price at which momentum flips from down to up or vice versa, based on a change in the close - open differential.
🔍 Components Breakdown
1. Histogram Bars
Green Bars (high - open): Represent bullish upper wicks, showing intrabar strength above the open.
Red Bars (open - low): Represent bearish lower wicks, showing pressure below the open.
Plotted as histograms above and below the zero line.
2. Close–Open Line (White)
Plots the difference between close and open for each bar.
Helps you visually track when momentum flips from negative to positive, or vice versa.
A bold black zero line provides clear reference for these flips.
3. Buy/Sell Signal Logic
A Buy Trigger is generated when close - open crosses above zero
A Sell Trigger occurs when close - open crosses below zero
These trigger events are one-shot, meaning they’re only registered once per signal direction. No retriggers occur until the opposite condition is met.
📈 Trigger Price Table (Static)
On a signal trigger, the close price from a lower timeframe (15S, 30S, 1, 2, 3, or 5 min) is captured.
This price is frozen and displayed in a table at the top-right of the pane.
The price remains fixed until the opposite trigger condition fires, at which point it is replaced.
Why close price?
Using the close from the lower timeframe gives a precise, decisive reference point — ideal for planning limit entries or confirming breakout commitment.
🛠️ Use Cases
Momentum traders can use the histogram and line to time entries after strong open rejection or close breakouts.
Scalpers can quickly gauge intrabar sentiment reversals and react to new momentum without waiting for candle closes.
Algo builders can use the frozen price logic as precise entry or confirmation points in automated strategies.
khahana OscillatorThe Khahana Oscillator is a directional strength tool that helps traders align with dominant market momentum.
It visualizes two forces:
🟢 Green Line = Bullish strength
🔴 Red Line = Bearish strength
These lines measure how consistently price aligns with a core trend engine across multiple perspectives, giving you a reliable read on which side — bulls or bears — currently dominates.
Rather than generating entry signals, this oscillator serves as a confirmation and filtering tool, perfect for:
Avoiding trades against the trend
Confirming breakout or pullback entries
Staying out of choppy or indecisive markets
📈 How to Use:
✅ 1. Confirm Trade Direction
Buy entries:
→ Only when the green line is rising
→ And green is higher than the red line
→ This signals building bullish dominance.
Sell entries:
→ Only when the red line is rising
→ And red is higher than the green line
→ This confirms bearish momentum is in control.
🧮 2. Read the Strength Scores
At the bottom-right corner, a table shows:
🟢 Bull Score – number of aligned bullish layers
🔴 Bear Score – number of aligned bearish layers
These scores range from 0 to 9 and reflect how strongly the market supports one direction.
→ Use this as a secondary filter — the higher the score, the stronger the conviction.
⚠️ 3. Avoid No-Consensus Zones
When both lines are flat or scores are low/close together, the market lacks direction.
→ Reduce exposure or wait for clearer signals.
🔄 4. Use for Confirmation, Not Signals
The oscillator is not a signal generator — it's a momentum filter.
→ Pair it with your strategy (breakouts, price action, etc.) and only take trades when the oscillator supports your direction.
💡 Pro Tips:
The oscillator value and scores are bounded between 0 and 9 — making it easy to gauge extreme strength or weakness.
Strong trends usually show one line rising while the other stays low or falls.
Crossover or reversal in dominance (green overtakes red or vice versa) often signals a shift in trend.
Best used on all markets: forex, crypto, gold, indices, and stocks.

Deep Z pi SP MA + 2 CC + OB + CPR + last 5 MinThis script is a comprehensive price action and market structure analysis tool designed for intraday traders, particularly those focused on Nifty and derivatives. It combines multiple strategies and signals into a single, customizable indicator.
🔍 Features Included:
1. 📉 2-Consecutive Candle Logic (Strict Coloring)
Highlights strong bullish or bearish momentum using consecutive green/red candle logic.
Detects candles that close above the previous high or below the previous low.
2. 📍 Order Block (OB) Detection
Identifies large, impulsive reversal candles based on body size and wick breakout.
Labels the OB with a customizable tag and direction.
3. 📊 Central Pivot Range (CPR)
Plots daily CPR, along with yesterday’s R1 and S1 levels.
Detects and labels Narrow CPR Days (potential breakout setups).
4. 🔁 MA21 / MA50 Dynamic Crossover
Plots 21 and 50-period moving averages (SMA or EMA).
Fills background color between MAs to visually indicate trend direction.
Buy/Sell triangle signals on crossover events.
5. 📦 Last 5-Minute Box (Previous Day Close Range)
Highlights the last 5-minute candle of the previous day.
Colors the box based on how the market opens and closes relative to that range (breakout/rejection box logic).
6. 💡 Weak Candle Detection
Identifies weak candle patterns like Doji, Hammer, Inverted Hammer, Dragonfly, Gravestone, Hanging Man.
Applies a soft gray tone to visually de-emphasize indecision candles.
7. 💬 CPR-Based Options Strike Price Labels
Automatically calculates CE and PE strikes using Nifty Index spot CPR.
Displays Put, Call, and Exit strike levels at 9:15 AM.
8. 📘 Additional Strike Labels Based on Previous Day Range
Shows Buy CE strike (floored from previous Nifty spot High).
Shows Buy PE strike (ceiled from previous Nifty spot Low).
Useful for directional option strategies.
9. 🔴 One-Time Dot Signal for Rejection
Plots a small dot on the first 5-minute candle that:
Closes above the previous day’s high, or
Closes below the previous day’s low.
Only appears once per day to avoid clutter.

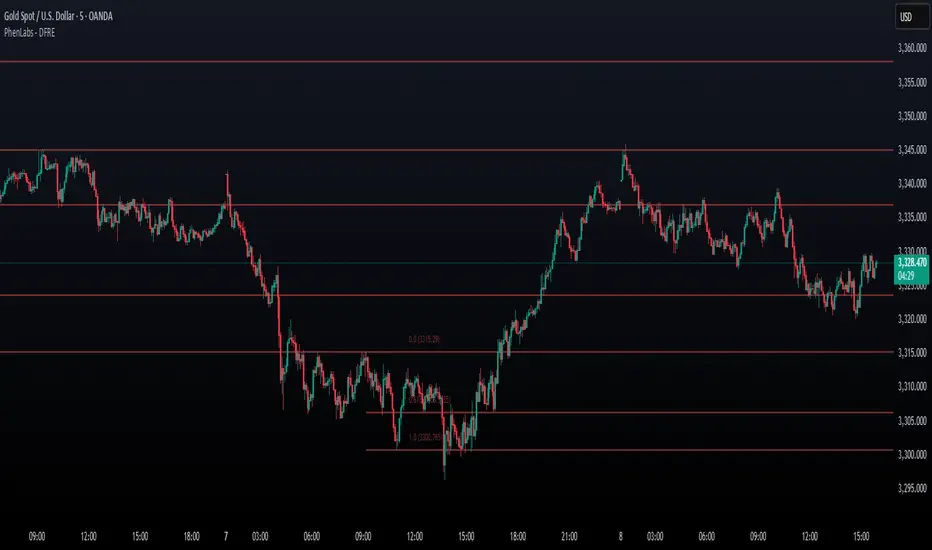
Fibonacci Retracement Engine (DFRE) [PhenLabs]📊 Fibonacci Retracement Engine (DFRE)
Version: PineScript™ v6
📌 Description
Dynamic Fibonacci Retracement Engine (DFRE) is a sophisticated technical analysis tool that automatically detects important swing points and draws precise Fibonacci retracement levels on various timeframes. The intelligent indicator eliminates the subjectivity of manual Fibonacci drawing using intelligent swing detection algorithms combined with multi timeframe confluence analysis.
Built for professional traders who demand accuracy and consistency, DFRE provides real time Fibonacci levels that adapt to modifications in market structure without sacrificing accuracy in changing market conditions. The indicator excels at identifying key support and resistance levels where price action is more likely to react, giving traders a potent edge in entry and exit timing.
🚀 Points of Innovation
Intelligent Swing Detection Algorithm : Advanced pivot detection with customizable confirmation bars and minimum swing percentage thresholds
Multi-Timeframe Confluence Engine : Simultaneous analysis across three timeframes to identify high-probability zones
Dynamic Level Management : Automatically updates and manages multiple Fibonacci sets while maintaining chart clarity
Adaptive Visualization System : Smart labeling that shows only the most relevant levels based on user preferences
Real-Time Confluence Detection : Identifies zones where multiple Fibonacci levels from different timeframes converge
Automated Alert System : Comprehensive notifications for level breakouts and confluence zone formations
🔧 Core Components
Swing Point Detection Engine : Uses pivot high/low calculations with strength confirmation to identify significant market turns
Fibonacci Calculator : Automatically computes standard retracement levels (0.236, 0.382, 0.5, 0.618, 0.786, 0.886) plus extensions (1.272, 1.618)
Multi-Timeframe Security Function : Safely retrieves Fibonacci data from higher timeframes without repainting
Confluence Analysis Module : Mathematically identifies zones where multiple levels cluster within specified thresholds
Dynamic Drawing Management : Efficiently handles line and label creation, updates, and deletion to maintain performance
🔥 Key Features
Customizable Swing Detection : Adjust swing length (3-50 bars) and strength confirmation (1-10 bars) to match your trading style
Selective Level Display : Choose which Fibonacci levels to show, from core levels to full extensions
Multi-Timeframe Analysis : Analyze up to 3 different timeframes simultaneously for confluence identification
Intelligent Labeling System : Options to show main levels only or all levels, with latest-set-only functionality
Visual Customization : Adjustable line width, colors, and extension options for optimal chart clarity
Performance Optimization : Limit maximum Fibonacci sets (1-5) to maintain smooth chart performance
Comprehensive Alerting : Get notified on level breakouts and confluence zone formations
🎨 Visualization
Dynamic Fibonacci Lines : Color-coded lines (green for uptrends, red for downtrends) with customizable width and extension
Smart Level Labels : Precise level identification with both ratio and price values displayed
Confluence Zone Highlighting : Visual emphasis on areas where multiple timeframe levels converge
Clean Chart Management : Automatic cleanup of old drawing objects to prevent chart clutter
Responsive Design : All visual elements adapt to different chart sizes and timeframes
📖 Usage Guidelines
Swing Detection Settings
Swing Detection Length - Default: 25 | Range: 3-50 | Controls the lookback period for identifying pivot points. Lower values detect more frequent swings but may include noise, while higher values focus on major market turns.
Swing Strength (Confirmation Bars) - Default: 2 | Range: 1-10 | Number of bars required to confirm a swing point. Higher values reduce false signals but increase lag.
Minimum Swing % Change - Default: 1.0% | Range: 0.1-10.0% | Minimum percentage change required to register a valid swing. Filters out insignificant price movements.
Fibonacci Level Settings
Individual Level Toggles : Enable/disable specific Fibonacci levels (0.236, 0.382, 0.5, 0.618, 0.786, 0.886)
Extensions : Show projection levels (1.272, 1.618) for target identification
Multi-Timeframe Settings
Timeframe Selection : Choose three higher timeframes for confluence analysis
Confluence Threshold : Percentage tolerance for level clustering (0.5-5.0%)
✅ Best Use Cases
Swing Trading : Identify optimal entry and exit points at key retracement levels
Confluence Trading : Focus on high-probability zones where multiple timeframe levels align
Support/Resistance Trading : Use dynamic levels that adapt to changing market structure
Breakout Trading : Monitor level breaks for momentum continuation signals
Target Setting : Utilize extension levels for profit target placement
⚠️ Limitations
Lagging Nature : Requires confirmed swing points, which means levels appear after significant moves
Market Condition Dependency : Works best in trending markets; less effective in extremely choppy conditions
Multiple Signal Complexity : Multiple timeframe analysis may produce conflicting signals requiring experience to interpret
Performance Considerations : Multiple Fibonacci sets and MTF analysis may impact indicator loading time on slower devices
💡 What Makes This Unique
Automated Precision : Eliminates manual drawing errors and subjective level placement
Multi-Timeframe Intelligence : Combines analysis from multiple timeframes for superior confluence detection
Adaptive Management : Automatically updates and manages multiple Fibonacci sets as market structure evolves
Professional-Grade Alerts : Comprehensive notification system for all significant level interactions
🔬 How It Works
Step 1 - Swing Point Identification : Scans price action using pivot high/low calculations with specified lookback periods, applies confirmation logic to eliminate false signals, and calculates swing strength based on surrounding price action for quality assessment.
Step 2 - Fibonacci Level Calculation : Automatically computes retracement and extension levels between confirmed swing points, creates dynamic level sets that update as new swing points are identified, and maintains multiple active Fibonacci sets for comprehensive market analysis.
Step 3 - Multi-Timeframe Confluence : Retrieves Fibonacci data from higher timeframes using secure request functions, analyzes level clustering across different timeframes within specified thresholds, and identifies high-probability zones where multiple levels converge.
💡 Note: This indicator works best when combined with other technical analysis tools and proper risk management. The multi-timeframe confluence feature provides the highest probability setups, but always confirm signals with additional analysis before entering trades.