KOG - Trading the Range - Update:RANGE BOX:
This post was update on the 8th of January. Its a continuation of previous posts about the range box and how to trade it. Please read the linked posts at the bottom.
When the price is in a ranging market look for date og when the price was last in its range. Example above shows we had the range, a breakout above and then a break back inside the range. Draw a box around the range and then identify the buy area and the sell area. This stops you from trading in the middle of the range and getting chopped up by the market. Always wait for the lower levels to buy and the higher levels to sell. If either level breaks wait for the support or resistance to turn into support or resistance. This give you an indication of potential further movement in the direction of the breakout.
Within the range you will find trends, smaller support and resistance levels and chart patterns. This will further help you to trade within that range of scalp in between levels. Identifying these levels and patterns also give you a view of potential future movement. Again, this helps towards making sure you don’t get caught trading in the middle and getting caught the wrong of the market.
Now we’ve updated the range to present day and it gives us a clearer picture of what the market has been trying to do since October 2021. We can the H&S back in November which as yet hasn’t been tested, with patterns like this they don’t always get a retest but on most occasion the price will come back to test it. This tells us that if we break above the range high again there is potential for the price to test that 1860 at some point.
We can also see that there is a double top recently which caused the price to break back inside the range. Again, on most occasions its likely the price will want to test the pattern or neckline at some point. This gives us an indication of potential movement in the direction of the double top and if we break the double top (we fail a triple top) then there is a chance we could go further up based on support below to test the shoulder of the H&S from Oct. We then add our every day analysis, support and resistance levels and smaller timeframes to further confirm movement and potential challenges on different price regions.
If we now look at the bottom of the chart we have one significant area of interest. That’s the buy area we have been using to take the long trades within the range. We can see its given us a triple bottom in this region where we have seen rejection in price. This area has worked well for Bulls but now we will need to be cautious if the price comes down to challenge this area again. Based on what we mentioned above with patterns its likely the price will want to come down to test this level again at some point. Keeping that in mind we also have to be cautious here as the level has been rejected 3 times forming the triple bottom. The is huge potential now for the next test on this level to break this level aggressively which could take us down towards the lower key support of 1730-20.
Update: 20/01/22
So if you look at what was written above you can see that we are close now to testing the pattern which sits around the 1860 level. The range box shows Gold is using the previous liquidity area at the moment as supply to keep the price above the 1830-35 level. So from here what can we expect? As long as that supply levels hold its likely we are going to attempt to test that 1855-60 region where its possible we will see more liquidity enter the market. At the moment bulls are strong which suggest bears are waiting higher up to get in short. So keep an eye on the levels and the zones.
Hope this helps traders, its more an educational post rather than our usual analysis but please do back test it and see how it works for you. Any questions please do ask, we try our best to answer everyone.
Supply and Demand

How To Trade Sideways Markets-When trading a sideways market, I simply buy low, sell high with confirmation.
-Some of my best trade setups occur in a sideways market.
-If price has respected a high or low 4x times then why not play the probability game and say "the previous 4x times price has came high on the range the sellers have taken control so next time I will play the probability game and look for shorts if price gives me evidence of sellers". same thing for when the price is low on the higher timeframe.

HOW-TO: FibDev Indicator This tutorial is to explain our FibDev Indicator using AMD 15m chart example.
Overview of the daily zones:
-- Starting with red zones, these are our daily supply zones. We expect these zones provide resistance and act as potential pivot points for the price to reverse
-- The yellow zone is the neutral zone, when price is in this zone we expect that it will continue to chop around until it has chosen a direction for the day.
-- The green zones are demand zones. Similar to the supply zones, we expect these zones to provide support and act as possible pivots for the price to rebound
-- These zones are built based on previous daily price action and ** the zones will be the same on all time periods for any given day **
Overview of the intraday clouds:
-- The upper cloud (red outline) is where we expect to encounter an overbought condition, and that price may reverse down
-- The lower cloud (green outline) is where we expect to encounter an oversold condition, and that the price may rebound upwards
-- These clouds are built based upon ** the time period of the chart that is selected **. Thus the 5m clouds will be different than the 15m clouds.
Overview of the automated signals:
-- These signals are printed when we expect there is a chance of trend reversal. It should be noted that trading against the trend is very risky.
-- They do NOT serve as buy and sell signals, they are merely indications that price has entered a place of possible reversal.
Our thoughts on how to use this data:
--The main way we like to use this is by looking for scenarios where we have a wick or close that has broken above or below the intraday cloud at the same time that it is testing a supply or demand zone. Looking at this AMD example here, you can see a few scenarios where it wicked or closed into the lower cloud (some creating Bull signals) and was also testing a demand zone. This provides a layer of confluence as it's not only testing a daily demand zone but it's also testing the faster, intraday oversold zone (the lower cloud).
-- A secondary way to use this data is similar to the ORB strategy, where you essentially chase (or ride the momentum) the price once it has broken to the upside or downside of the yellow neutral zone. With this strategy, your potential profit zones would then become the supply or demand zones depending on which way the price moved.
Conclusion:
-- Ultimately it's up to you and how you choose to use this data and confluence it with other TA tools is completely up to you and your trading strategy.
-- For more information on using this indicator, please send us a message here or on Twitter (link found in our profile).
Thank you!
Great Blue Trading Team

HOW-TO: FibDev Indicator and the Newest UpdatesWe previously published a HOW-TO on using this indicator, but since then the UI and the automated signals have changed noticeably. We STRONGLY recommend reading the first HOW-TO for this indicator as the core concepts are still the same (outside of the signals).
UI Updates:
We now hide the supply or demand zones if they aren't applicable to the current price action. If the price is in the neutral zone, there is no current target zone so both supply and demand are hidden. If price has broken out to the upside, we display the target supply zones at this time and vice versa for the downside, we display the demand zones. The way these zones are calculated is still the same, they are built using daily values and do not change through out the day (regardless of if/when they are displayed on the chart).
Automated Signals:
This is the biggest change, we are no longer generating automated signals based on possible reversal points of oversold and overbought price areas. This strategy can still be used, but there will be no signals created is all.
Instead, the signals are now generated when the price leaves the neutral zone and track momentum vs searching for trend reversals as before. When the price breaks through the neutral zone to the upside a Bullish Break Over signal is now printed implying that we see bullish momentum to the upside. The supply zones will display and now we are tracking the upside move with the indicator. The opposite for the downside break, Bearish Break Under signal and demand zones displayed for tracking the momentum to the downside.
Conclusion:
The indicator is now tracking momentum vs reversals, but using a combination of the Intraday Clouds and Neutral/Supply/Demand zones you can still use this for reversal setups.
Thank you!
Great Blue Trading Team

Know Your LevelsTodays daily primer is all about key levels, Don't make trading harder than it needs to be. Know your levels, keep track of them, have a system that says BUY or SELL as quickly as possible and then just execute your trades!
All you needed to do was follow up, know the key levels and execute. It makes this job much easier when you are prepared and this type of preparation is easy. We are looking for an edge and keeping track of levels is KEY at making easy money (at least for our day trading system).
Every Sunday I sit down and map out important levels, I also review my trades for the previous week, for development purposes, and during that review of past trades I specicially check these levels and how price behaved at them.
I'd like to show you just how important levels are, but you should also checkout our VWAP video released just before this video.

⚡️NAS100 - Breakdown of the Two Sniper ‘Shorts’⚡️Hello Traders :)
- I haven’t been posting trades lately but I’ve been trading
- So here I will post a breakdown of the two Effortless trades I took on NAS100
⚡️Let me break it down⚡️
❗️❗️Reminder when trading NAS100❗️❗️
▫️Use Pending orders
▫️Take Partial Profits
▫️Trail your Stops
▫️Minimum Risk to reward 1 : 3..NB. NAS can give you up to 1:10
First time frame was the Daily
♦️Downtrend confirmed by a lower low
♦️Price reached a Strong Resistance Area
♦️Strong downtrend structure
Second time frame was the 4 hour
♦️Supply Area on 4hr
♦️Several touches on the strong resistance level
♦️Lower low structure for downtrend
Third time frame was on the 1 hour
♦️Strong Bearish engulfing candle used for Entry
♦️Lower Lows made at a strong Resistance Level
♦️Weakening formation of candles as they approach the strong level
Hope you guys learnt a thing or two
Kindly leave a like and tell me what you think about these trades and where NAS might be heading to next
Stay Blessed!
Slick⚡️

How To Use The Trading View Parallel ChannelsHey wits, it's currently 1am and I thought why not drop some tutorials cos' it's Saturday. Most aren't familiar with the trading view tools. So, we're here to help.
Watch the clip to get started with the trading view parallel channels.
Leave a comment and smash the like button if you found this helpful.

What Are Key Levels? Learn To Identify Key LevelsIt's currently 12am and I thought why not drop a nugget.
So here it is... Finally, I dropped my supply and demand, support and resistance a.k.a Key levels tea.
Take this one seriously Cos' Nasdaq100 respects it a lot.
For better entries and exits you'll need to have a clear knowledge of key levels.

The dominance of stablecoins as a divergence tool in BTCOn the top chart we have the BTC/USD index, and on the bottom chart we have the sum of the dominance of the main stablescoins: USDT, USDC, DAI and UST.
As a rule, when the dominance of stablecoins rises, the price of BTC falls.
Just look at the respective numbered arrows. The only exception was arrow number 3, which had a more lateral movement in the dollar's dominance.
Now looking at this exact moment, we have a rise in stablecoin dominance.
The next resistance is at 7.75% (if dominance continues to rise).

Analysis way - Buyers Vs Sellers ShiftsAnalyzing buyers vs sellers .
Very simple way of analyzing and trading supply demand in its purest form.
Identify where buyers has stepped in and showed interest in price and where is potential that they can step in again.
Identify where sellerss has stepped in and showed interest in price and where is potential that they can step in again.
Drop timeframe lower and -
1. see that for example Buyers are defending that level. and there is interest of buying.
2. identify shift of buyers vs sellers. see that the buyers have won battle against the sellers.
Price target: In uptrend price keeps breaking highs consistently. Once this stops and market keeps breaking lows trend changes. This highs and lows act as price target that If trend would continue price should hit and break higher.
Shifts: Shift where buyers won the battle against sellers and via versa.

What are Supply and Demand Zones and How to Trade with Them?What are Supply and Demand Zones?
▷ Demand Zone (Accumulation Area):
Accumulation comes from a Latin word meaning to increase something over time.
A strong uptrend can only exist if buyers outnumber sellers. During a trend, price moves up until enough sellers enter the market to absorb the buy orders. The origin of strong bullish trends is called an accumulation or a demand zone. Demand Zone is where traders are willing to buy aggressively because the balance has shifted to the demand side. Here, buyers are dominant and sellers weak.
The demand zone represents a period of implicit buying, typically by institutional buyers, while the price remains fairly stable. This area is characterized by mostly sideways price movement. Before a trend starts, price stays in an demand zone until the “big players” have accumulated their positions and then drive price higher.
This can be contrasted with the Supply Zone, where institutional investors start to sell.
▷ Supply Zone (Distribution Area):
Bearish trends are created when sellers outnumber buy orders. Then, price falls until a new balance is created and buyers become interested again. The origin of a bearish trend wave is called a distribution or a supply zone. At Supply Zone traders are willing to sell aggressively because the balance has shifted to the distribution side. Here, sellers are dominant and buyers are weak.
Support and Resistance Levels vs. Zones
If you have an idea of how to trade with support and resistance zones, you might find supply and demand zones very similar.
You won’t be mistaken; Supply and demand zones are natural support and resistance levels. You’ll often find supply and demand zones just below/above support and resistance levels.
Types of Supply And Demand Patterns
There are two types of patterns: “Reversal” and “Continuation” patterns.
While a pattern is forming, there is no way to tell whether the trend will continue or reverse. As such, careful attention should be paid to whether the price breaks above or below the zone.
▷ Continuation Patterns
If price continues on its trend, the pattern is known as a continuation pattern.
We have two continuation patterns: “Rally-Base_Rally” and “Drop-Base-Drop”
▷ Reversal Patterns
When price reverses after a pause, the pattern is known as a reversal pattern. The established trend will pause and then head in a new direction as new energy emerges from the other side (bull or bear).
Reversals that occur at market tops are known as distribution patterns. Conversely, reversals that occur at market bottoms are known as accumulation patterns.
We have two reversal patterns: “Rally-Base_Drop” and “Drop-Base-Rally”
How to Find Supply and Demand Zones?
On a price chart, the demand zone is characterized by sideways price movement on above-average volume. When a stock price doesn't fall below a certain price level, and moves in a sideways range for an extended period, this can be an indication to investors that the stock is being accumulated by investors and as a result, will be moving up soon.
The demand and supply zones are encompassing the base on the beginning of the move. The most important thing is to first finding a sharp move in either direction, after which you can identify its starting point and roughly define the supply or demand zone:
• Look at the chart and try to spot successive large candles.
• Find the base from which price started the quick move. Usually, before that you have a small sideways move, that is where your supply / demand zone is.
• Draw the zone
It is very hard to be precise with those levels and here it is more of an art than science. To make it easier to identify these levels, you can use another tool for confirmation.
How to Trade with Them?
One way to trade with supply and demand areas is reversal trading. After identifying a previous strong market reversal, wait for the price to return to that area. If a false breakout occurs, the chance of seeing a successful reversal is extremely high.
Some candlestick patterns such as "Engulfing", "Pin Bar" and "Tweezer Blades" can help you identify trend reversals.
Be careful, trading in the opposite direction of the trend is very risky. Technical analysts typically recommend assuming a trend will continue until it is confirmed that it has reversed. Trend reversal trading can be a profitable way to trade the markets. However, like any other trading strategy, there is a correct and a wrong way to do it.
Pros and Cons
Being able to recognize whether an asset is in the demand zone or the supply zone is helpful to investing success. Demand Zone is the origin of a big rally in price. Identifying this area could help investors spot good entry points into an investment before its price begins to rise.
Once the price leaves an demand zone, not all buyers got a fill and open interest still exists at that level. Supply and demand traders can use this knowledge to identify high probability price reaction zones.
As with anything else, supply and demand zones have their cons, as well. Understanding chart movements such as those seen in the accumulation area can work well during times of relative stability. Still, prudent investors know to pay attention to larger economic events that can quickly reconfigure charts (like the covid-19 epidemic)
Key Points
• Accumulation / Re-accumulation zones can becomes distribution/Re-distribution zones over a period in the Stock Market
• The narrower a supply/demand zone before a strong breakout is, the better the chances for a good reaction the next time typically.
• Good supply and demand zones are quite narrow and do not hold too long, which shows strong imbalance between buyers and sellers.
• The stronger the breakout, the better the demand zone and the more open interest will usually still exist.
• Always look for extremely strong turning points. They are often high probability price levels.
• Each time the price re-tests a supply/demand zone, more and more previously unfilled orders are filled and the level is continually weakened.
Conclusions
Supply and Demand Zones are a great way to identify areas of buying and selling as well as support and resistance, but they work best when combined with other kinds of technical analysis.

⚡️♦️Breakdown of the Big Gold Short♦️⚡️Greetings To You Traders
▫️Let’s break down this superb trade timeframe by timeframe
▫️One of the the most important factor in our lives is Time.
▫️It also proves to be very important In our trades as well
I will break down this trade in the same way I did when I took it on Friday
I use just 4 things in my trading:
1. Recent price Structure ( Supply and Demand)
2. Overall Structure (Support and resistance)
3. Structural moves ( Higher Highs/ Higher Lows ( Uptrend)
4. Structural moves( Lower Highs / Lower Lows ( Downtrend)
▫️First Time frame : Daily
Key factor : Resistance level
Looking at the daily timeframe you could see that price had reached a previous support now turned into resistance
This is a textbook market structure move and is very profitable if traded well
♦️♦️♦️♦️♦️♦️♦️♦️♦️♦️♦️♦️
▫️Second Time Frame : 4 Hour
Key factor : Supply Zone
Looking at the 4 Hour time frame I saw a nice supply zone and all I was waiting for was the wick rejection and entry on smaller TF
♦️♦️♦️♦️♦️♦️♦️♦️♦️♦️♦️♦️
▫️Third time Frame : 1 Hour
Key factor : Structure move ( lower lows )
Look at the 1 hour time frame I observed that the market was now making lower lows
Very typical for price to do so in a down trend and that is when I started loading up my lots
My stops were above structure and I took the plunge
♦️♦️♦️♦️♦️♦️♦️♦️♦️♦️♦️♦️
▪️I hope this breakdown can help you in executing your own trades too and using multi time frame analysis
▪️Be kind and leave a like and a follow : )
God bless you all
Slick✨

Gold being resisted despite Inflation.Classic pattern formed in the 15mins tf. looking for sells to the trend line below.
If you want to be a better trader, CHECKOUT ENCYCLOPEDIA OF TRADING.
Train your eyes to see patterns.
I traded this with 0.02 lot size.

Options flow predicting moves on Derivatives (Futures)Options have been and are an important instrument on the financial market for a trader trading Intraday Futures. Therefore, while exploring the mechanics of the option market over the last several months, as a result of work, indicators were created that load data from Quandl and then look for patterns that may herald a change of direction on the derivative market - in this case Futures Contracts. There are two main types of Options:
CALL - allow their owner to buy a given product in the future at a predetermined price (Strike Price)
PUT - allow you to sell this product at a predetermined price (Strike Price)
By observing the market volumes of both types of Options, we can observe the sentiment of investors. The key factors are which volume (call or put) prevail in the volume and the dynamics of the volume - what is the trend on volume, whether the difference between them increases or decreases. In addition, the Put / Call Ratio analysis allows you to confirm or negate the signals from the Option volume. The Ratio indicator behaves inversely to the price movement - in the case of a bearish sentiment, we expect the ratio to increase, and in the case of bullish sentiment - the indicator should decrease. If the Ratio follows the price in the same direction, it is an anomaly.
Of course, the mere observation of the Option volumes and the Put / Call ratio is not sufficient, as the Options Market is a much more complicated activity. It is worth including in the calculations such factors as Expiration Date, Bonus Amount, option type (In the Money, Out of Money or At the Money). Not each of the factors is equally important, therefore the key is additionally the appropriate selection of the weighting factors. For this purpose, due to the multitude of data, it is worth using Machine Learning, which I also do by saving the resulting data in a dataset in Quandl and displaying the data in TradingView using Pine Script.
Below are some additional examples from recent sessions on ES showing the predictive nature of the Option sentiment, often preceding major movements in the ES index (during the spot session):
First, from the left, the session from November 15 is shown and an opportunity to play Short. On the right, the session from November 16 and an opportunity to play the Long position this time.
Session from November 10, where we first got the Bull's signal, and at the top we got a warning signal of traffic reversal and the possibility of entering Short:
And one of my favorite moves on November 3:

Plotting bitcoin and doge supplyTrading view calculates the market cap for bitcoin and doge. I don't know how the market cap is precisely calculated by them. However, for the sake of exploration, I'm going to assume it is simply taking the available supply and multiplying it by the price of one coin. From there, we can use arithmetic to plot the total supply.
market cap = supply * price
supply = market cap / price
That is the line plotted in the indicators underneath each chart. It tracks coins supply denominated in millions, 18.7M bitcoin and 129,427.06M doge.
What we see for the bitcoin chart makes a lot of sense. Supply is growing steadily and linearly. Every day about 900 bitcoins are mined (6.25 every 10 minutes approx.). The graph shows that consistent growth at an almost precise 45-degree angle.
What we see for the doge chart is puzzling. Every day about 14,400,000 doge coins are mined (10,000 every minute approx.). The daily minting rate is fixed just as with bitcoin. So, I would have expected a similar plot with linear growth. Instead, for the most part, the graph is relatively flat. And for the past 25 days, it is entirely flat. To my surprise, the last value does match with what coinmarketcap reports as the supply: 129.53B
What am I missing here?

Examining Rejections - Probability of SuccessHi Traders. Today, we are going to discuss about Type 1, Type 2 & Type 3 Rejections that I personally examine prior to taking any Reversal setups. Are you someone who has multiples reversals strategies, but often when the trade lines up, you find it difficult to determine whether you should pull the trigger or not? If that's the case, there are two possible issues you are facing
A. You did not back-test the strategy
- Backtesting gives you to necessary confidence to take any setup without hesitation
B. You do not know exactly what you are looking for
- Due to the lack of research, backtesting and experience, you find it confusing to identify whether an entry trigger is valid or not
Below, I will be breaking down the logic behind these 3 different types of rejections, and which one had proven to give me a better Probability of Success over the long-term
Type 1 : Price just tap a Resistance zone , then begin showing signs of exhaustions
• This type of rejection often attracts traders who are FOMO (Fear of Missing Out) or have the sense of urgency to quickly get involved
• My data shows that Type 1 rejection gives the least success rate, often price tends to move sideways after the rejection, then slowly grind back up digesting the entire candle
• It is the weakest rejection due to the liquidity purposes (not always). It is not easy for a market to completely reverse into the opposite direction without attracting traders onto the wrong side
Type 2 : Price pierces through a Resistance zone , then showing strong sign of rejection closing back below
• e.g. Pin-bar, Doji , Spinning Top , etc
• It usually wick through the previous high, and wipe off traders who place their SL just slightly above the structure
• This type of rejections is often what I personally enjoy trading the most too, as it shows extreme price disagreement.
• Price attempts to break above the Resistance zone , but faced immediate opposing pressure defending the price zone, showing solid rejection
Type 3 : Price closes above the Resistance, then pop back below
• Commonly referred as a "Fakeout"
• The logic behind this is great as well. Price closes above a Resistance zone attracting more fresh buyers in, Buyers who bought at low would scale-in, Breakout traders would try to chase the aggressive buys
• All of a sudden, buying pressure turns off, Big Boys step in immediately reverse the market into the opposite direction
• Think about the amount of selling volume requires to shut down that huge amount of Bullish momentum
• A very reliable reversal entry trigger too
In this example, I am using a Bearish reversal scenario. It works the same way in a Bullish reversal environment too.
Comment down below which one is your favourite rejection trigger?
Do not forget to like if you enjoy the sharing. Trade safe and take care.

How To Trade High and Low Volatile Currency PairsTrading volatile pairs is like knowing what's in season and not in season. Whats hot and not hot. Who is in and who is out.
In this video, I am going to show you what high and low volatile pairs look like and trade examples.

When Not To Trade A Currency PairDo you know what it looks like when you don't have a trade? Let's face it, there are a lot of videos that tells you when to place a trade or how to trade, but not when not to trade and that is what I'm showing you in detail today.
I hope you enjoy my mini Ted Talk, I mean mini lesson.

Volume Profile Basic Shapes (D-Shaped Profile) # 1- # 4D- Shaped Profile (see chart)
Looks Like A letter "D"
Temporary balance between buyers and sellers
Usually heavy volumes get accumulated there
Institutions are entering their positions and they are getting read for a big move

Volume Profile (Point Of Control) #1POC (Point Of Control) line
POC= Point Of Control (place where most volumes got traded)
POC= Place where institutions were accumulating their positions the most.
Significant reference point for market participants
Most important place in any Volume Profile (no matter the time frame and shape)
Volume Profile is thickest there
Big Banks and Hedges can not hide their FOOTPRINTS of what price they are accumulating positions at with the Volume Profile.
Keep trading Easy- one way is by using a Volume profile. IF you have pro or premium level here at Trading view- try it with naked charts (nothing on them except the volume profile)- four choices in indicator settings.
I like under volume profile either the fixed and/or session ones- but experiment and do some back testing- might change way you trade.

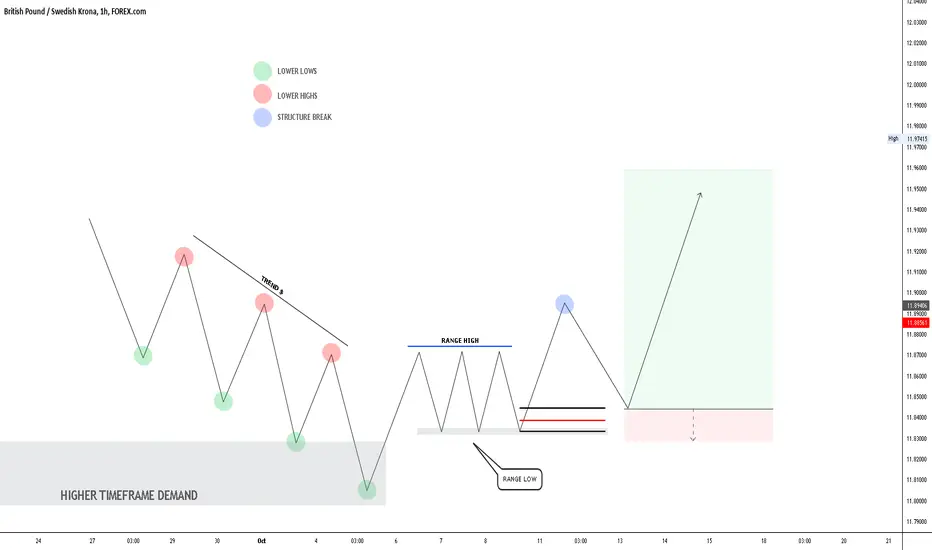
What is a RANGE?Hello Traders,
Here is the most simple & easy explanation about a Range.
In this Lesson I will Show you how to Identify & Trade a RANGE!
These patterns are seen daily in Stocks, Forex and different markets across the Globe.
I hope you will find this information educational & informative.
Your support is appreciated with a follow, like & Comment
Lets dive Right Into it!!
What Is a Range?
Range refers to the difference between the low and high pricesover a specific time period. Range defines the difference between the highest and lowest prices traded for a defined period, such as 4H, day, Week & month. The range is marked on charts, for a single trading period, as the high and low points on a candlestick or bar.
The top of the trading range often provides price resistance, while the bottom of the trading range typically offers price support.
Understanding Trading Ranges
When the Market breaks through or falls below its trading range, it usually means there is momentum (positive or negative) building. A breakout occurs when the price of the Market breaks above a trading range, while a breakdown happens when the price falls below a trading range. Typically, breakouts and breakdowns are more reliable when they are accompanied by a large volume, which suggests widespread participation by traders and investors.
Many traders look at the duration of a trading range. Large trending moves often follow extended range-bound periods. Day traders frequently use the trading range of the first half-hour of the trading session as a reference point for their intraday strategies. For example, a trader might buy a stock if it breaks above its opening trading range.
Ranges and Volatility
Since price volatility is seen as equivalent to risk, a Markets trading range is a good indicator of relative riskiness.
A conservative Trader prefers a Market with smaller price fluctuations compared to Market that are susceptible to significant gyrations. Such an trader may prefer to Trade in more stable Market rather than in more unstable Market.
Trading Range Strategies
Range-bound trading is a trading strategy that seeks to identify and capitalize on a Market trading within price channels. After finding major support and resistance levels and connecting them with horizontal trendlines, a trader can buy a at the lower trendline support (bottom of the channel) and sell it at the upper trendline resistance (top of the channel).
Support and Resistance
If the Market is in a well-established trading range, traders can buy when the price approaches its support and sell when it reaches the level of resistance. Technical indicators, such as the relative strength index (RSI), stochastic oscillator, and the commodity channel index (CCI), can be used to confirm overbought and oversold conditions when price oscillates within a trading range.
For example, a trader could enter a long position when the price is trading at support, and the RSI gives an oversold reading below 30. Alternatively, the trader may decide to open a short position when the RSI moves into overbought territory above 70. A stop-loss order should be placed just outside of the trading range to minimize risk.
Breakouts and Breakdowns
Traders can enter in the direction of a breakout or breakdown from a trading range. To confirm the move is valid, traders should use price action & Structure Break.
For instance, there should be a significant increase in volume on the initial breakout or breakdown as well as several closes outside the trading range ( Structure Break). Instead of chasing the price, traders may want to wait for a retracement / Correction before entering a trade. For example, a buy limit order could be placed just above the top of the trading range, which now acts as a support level.
Thanks for Reading this article, I hope that it was informative and educational As always, If you have any questions / Comment or Concern Please feel free to leave them below.
Thanks to @TradingView for this lovely platform to educate and grow together :)
Hope to see you in the next Educational Post!
Global Fx Education
Forex (When To Trade Is High Liquidity & Volume Time)The highest liquidity and volume in Forex daily is from end of Tokyo session to end of London session.
This is best 12 hour time frame time to trade Forex is in between those times, if you are scalper or day trader.
Noted on 1 hour chart of AUDUSD is noted times from 10 p.m. to 10 a.m. (PST/CA/USA times)= you need to change to where you live.
What happened in-between those times on Friday with AUDUSD- a great trade with a Harami two candlestick setup right at Tokyo/London overlapping session, at demand zone area, during the high liquidity and volume period of day in Forex. RR set up of 1:2.5 risk/reward or 20 stop vs 50 target.
Yes, this is how you keep Forex trading simple, just trade during this 12 hour period - and look for:
1) Engulfing two candle hourly setup
2) Harami two candle hourly setup
3) Pin-bar three candle hourly setup
4) Trend, Key Price levels, Momentum
5) Trade right pair, at right price, during right session and at right time of day.
Make Forex Trading Great Again by winning and taking what a pair gives you in a trade on a chart. Trade what you see not what you feel. Only you control when you enter and exit an individual trade- so put the most probabilities on your side to win more and make more.

ETH An example in why retail traders are wrong!Good Morning traders!
Today I have a great example of order protection and liquidity building.
This is something that I have been speaking about for a long time and this current PA shows it well.
The blue boxes show places where large orders have been placed and and initiated moves. See how price returns to retest these areas?! this gives the Banks, Whales and big players a chance to protect orders.
Retail traders place orders outside of these areas "support and resistance areas" These orders can easily be seen, and therefore hunted. The highs and lows create areas for the big players to exit the large volume positions as every buy order needs a seller and vice versa.
I hope this information has been helpful.
As always trade safe.
EnvisionEJ
